Handmade Gingerbread House Garland
This Post May Contain Affiliate Links. Please Read Our Disclosure Policy
Step into the holiday season with a delightful DIY Gingerbread House Garland that’s sure to be the centerpiece of your Christmas decor. This easy-to-follow guide will show you how to craft charming miniature gingerbread houses and string them into a festive garland. Perfect for bakers and crafters alike, this homemade garland is the ultimate expression of holiday cheer.

Recently, I’ve been trying to craft a handful of new Christmas decor items each year. It’s honestly been such a joy and one of my new favorite traditions. I’ll take anunique and handmade holiday over store-bought decorations any day.
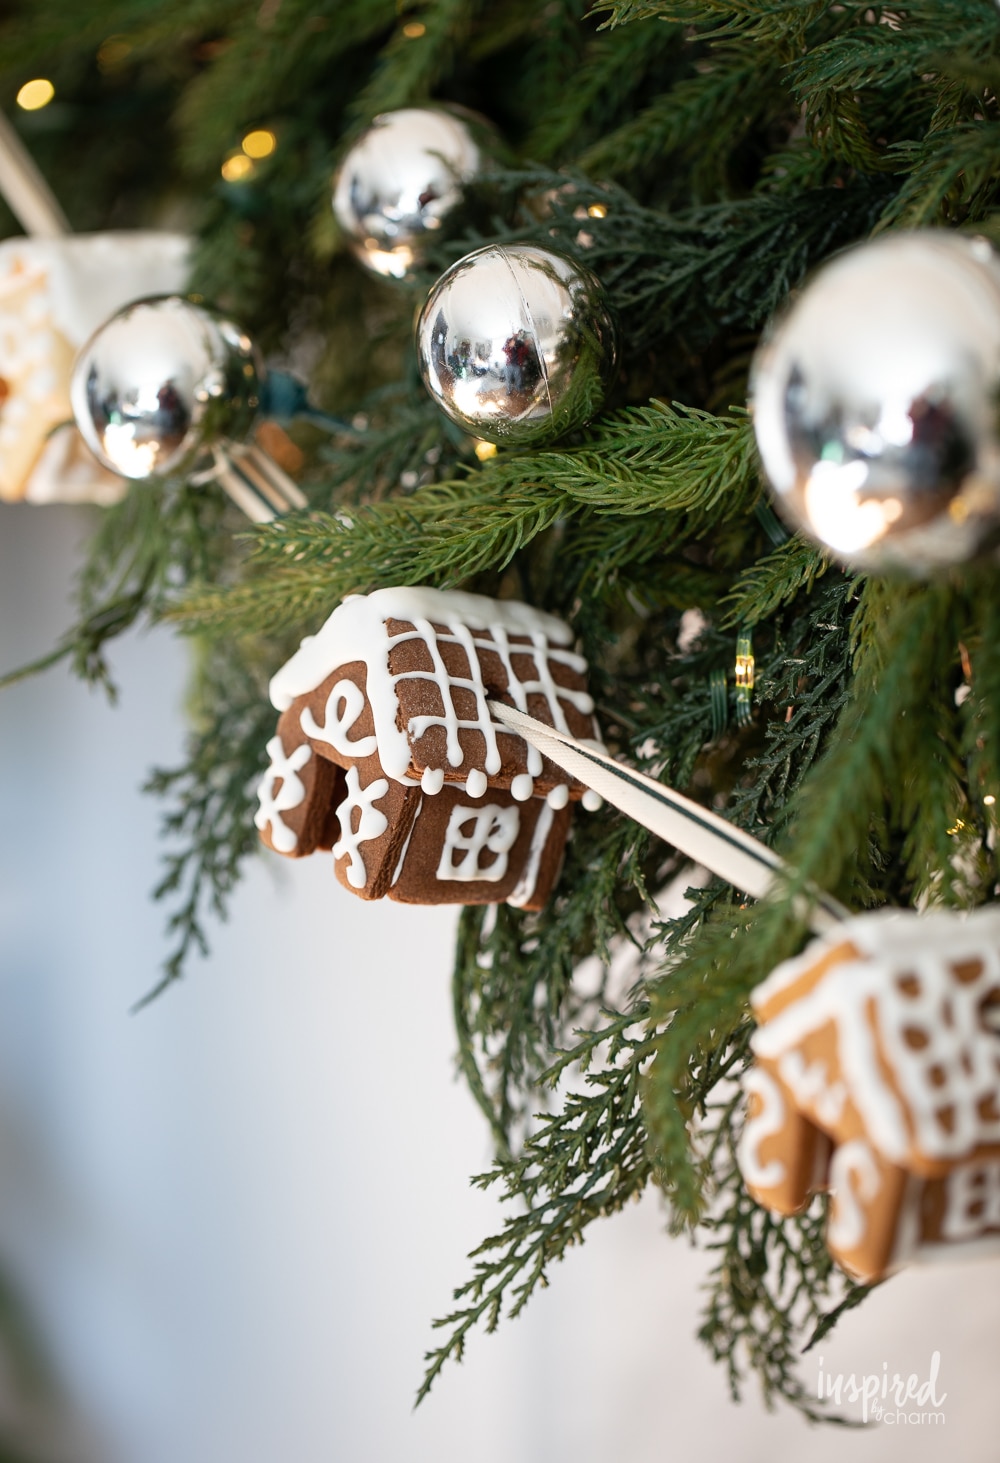
This Gingerbread House Garland immediately moved to the top of my list of favorites. In the past, I’ve made some of these mini gingerbread houses to use as little cup huggers for coffee and hot cocoa. As I was brainstorming my handmade holiday projects for this year, I wondered if I could turn these cute little houses into a garland. Spoiler alert: I did and the results couldn’t be more charming and whimsical.
This project was extra special as I worked on it with my mom. We cut out, baked, and decorated the cookies together. THIS is what the holiday season is about. What a gift.
It’s also worth mentioning that this DIY does take some time and effort, but I enjoyed every single step along the way. With a little patience even the most novice baker or crafter can tackle this.
I hope you’re ready to add a sprinkle of joy and a dash of creativity to your holiday traditions with this adorable Handmade Gingerbread House Garland. I’m certain you’re going to love it as much as I do!
Why You’ll Love This Project
- Ditch the mass-produced holiday decorations and add a splash of charm with these one-of-a-kind gingerbread houses. Each piece you create is a testament to your creativity and style, guaranteeing no two garlands are alike. Your holiday decor will stand out with a story to tell — one that’s baked by you.
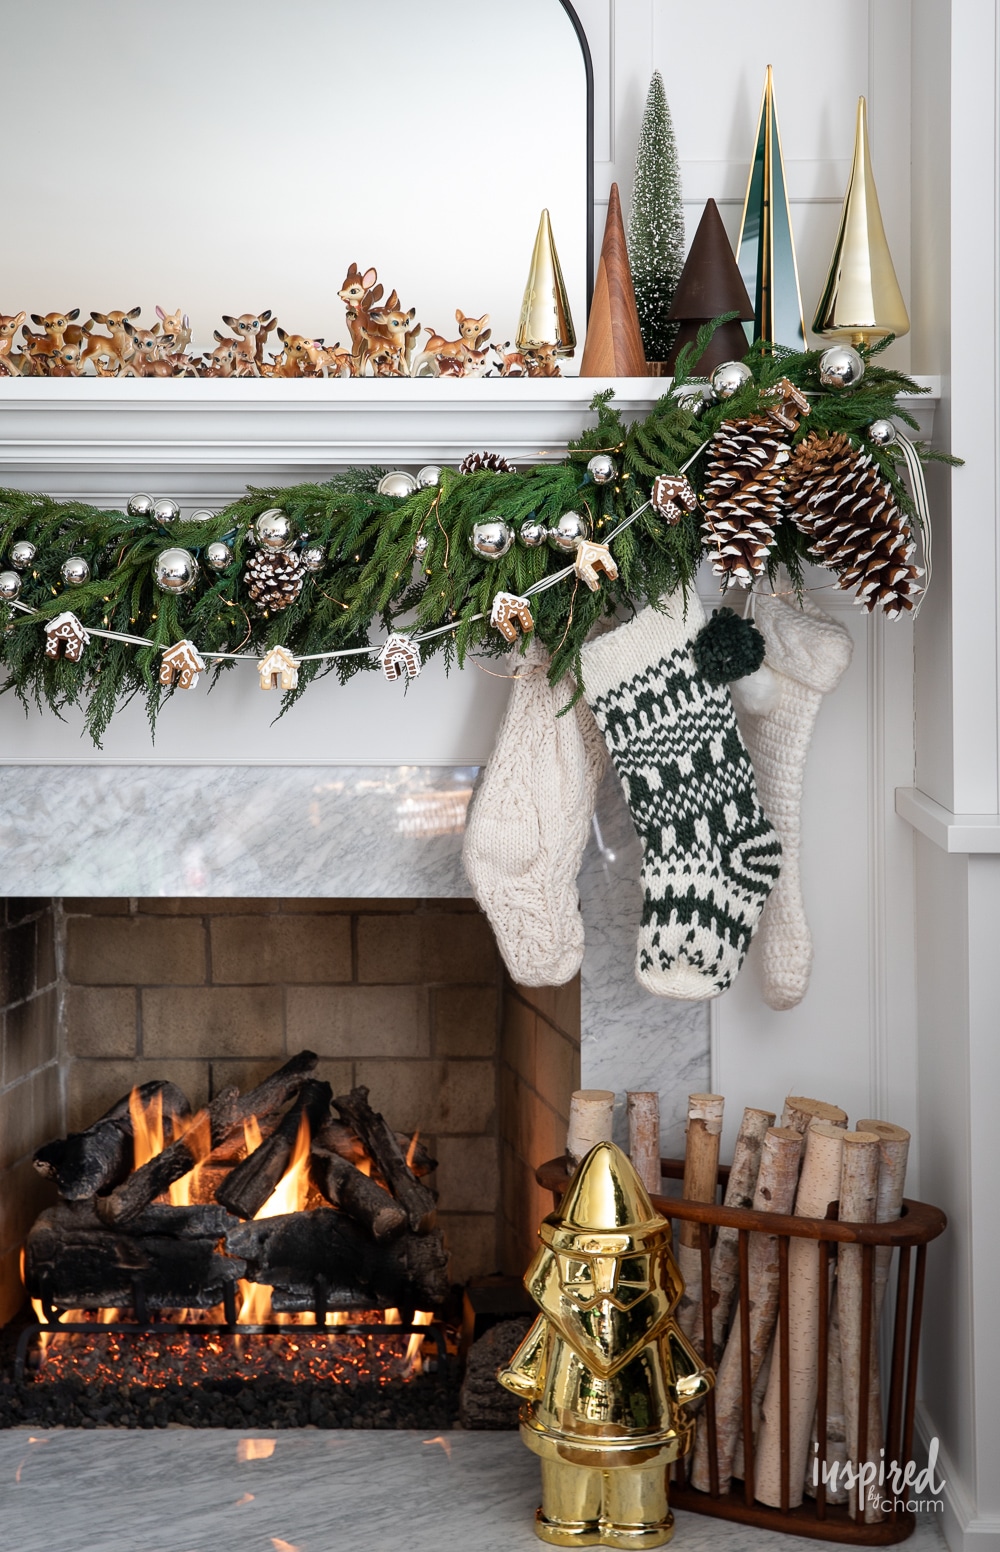
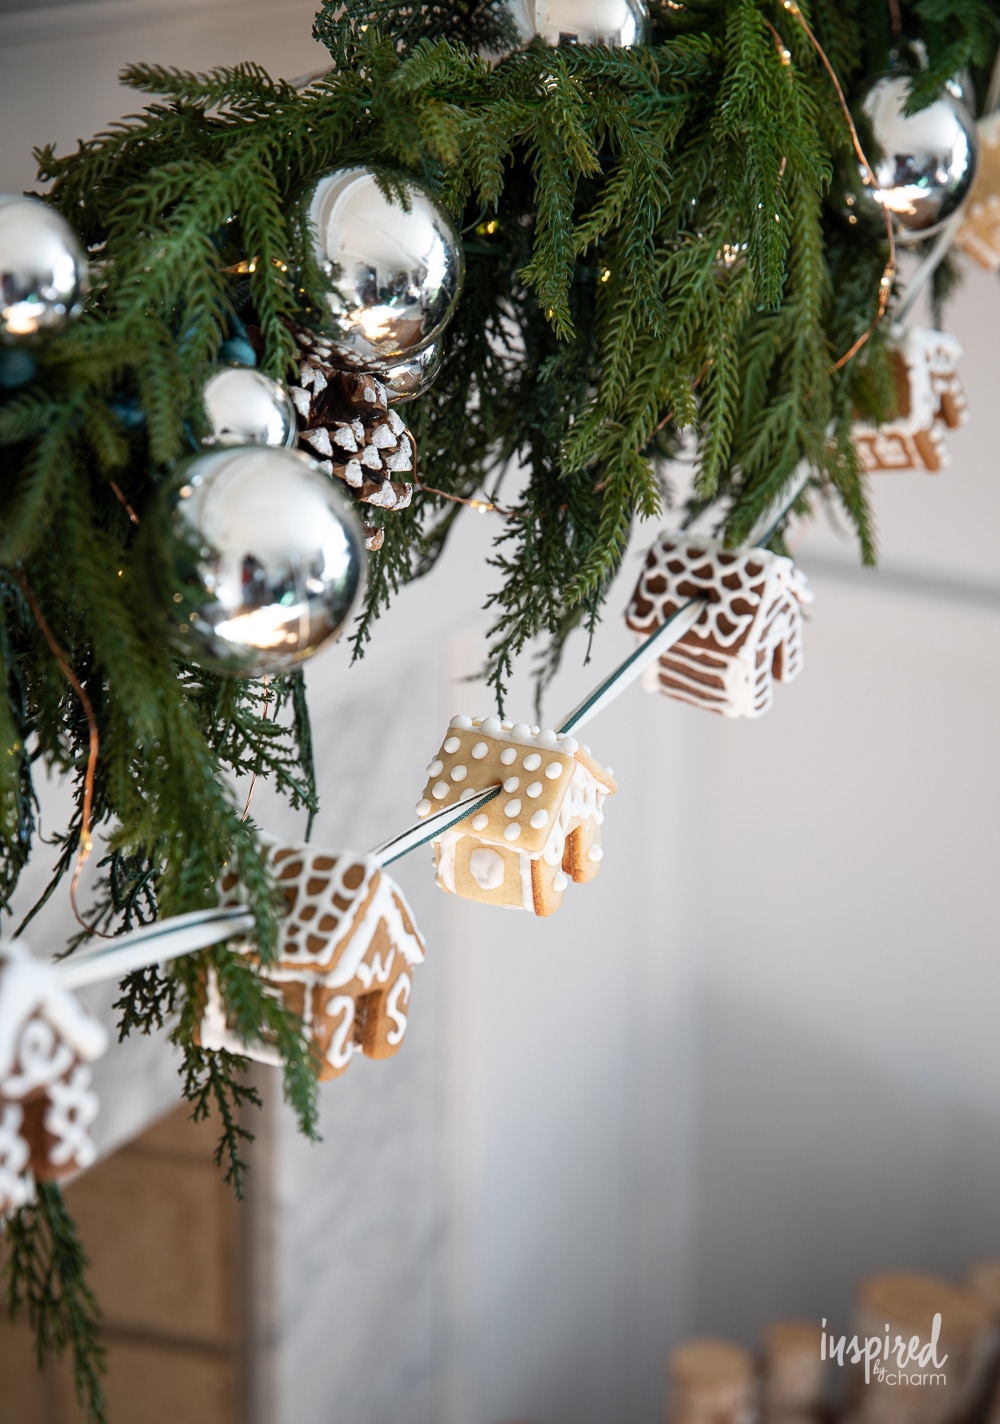
- Imagine your space adorned with this whimsical garland; it’s not just decor, it’s a conversation starter. Strung across your mantle or twirled around your Christmas tree, these gingerbread houses add a beautiful, fairy-tale quality that store-bought simply can’t match.
- From classic gingerbread house designs to modern minimalist icing designs, you have the freedom to decorate each little house in a way that perfectly matches your festive style. Feel free to add colorful sprinkles or candies, change up the ribbon, etc.
- I know you’re not going to want to give this garland away, but it would make an absolutely adorable gift idea.
And with that we’re ready to get started. So, grab your apron, preheat your oven, and let’s begin making a charming mini gingerbread house garland that’s as fun to make as it is to display.
Want more gingerbread decor items? You’ve got it! I have an entire collection full of beautiful Christmas decor made from gingerbread!
Ingredients
Before we dive into crafting this Handmade Gingerbread House Garland, let’s gather all the ingredients and tools you’ll need.
- Gingerbread Dough: You’ll find the recipe for this dough on the printable recipe card at the end of this post. It’s the perfect balance of spice and sweetness, ready to be rolled and cut into adorable house shapes.
- Royal Icing: This acts as both the glue that holds our gingerbread houses together and the decorative detail that brings them to life. The recipe is on the printable recipe card as well.
- Mini Gingerbread House Cookie Cutter: This gingerbread house cookie cutter is the essential tool for creating our mini houses. I’ve linked to the exact one I used HERE, but any similar style will work just fine.
- Icing Piping Bottle: For more precision and ease when decorating with royal icing, an icing piping bottle is highly recommended. It’ll give you better control for those intricate designs. You can also use a piping bag, but I find the bottle much easier.
- Ribbon: I opted for a ⅜” wide ribbon that complements the gingerbread houses beautifully. You can find the same ribbon HERE or choose one that fits your holiday theme.
- Large Needle: A darning needle like this one will help you thread the ribbon through the gingerbread houses with ease.
With these ingredients and tools at the ready, you’re all set to start crafting a garland that’ll sprinkle your space with the homemade magic of the holidays.
How To Make
I’m going to walk you through the basic assembly steps for this Gingerbread House Garland below. I’ve also provided a full ingredient list and detailed instructions in the printable recipe card below. You’ll find the cookie and icing recipe there as well.
- Begin by baking your gingerbread cookies and making your royal icing. (Recipe and instructions for the cookies and icing are on the printable recipe card below.) You can use your favorite gingerbread recipe or see mine at the end of this post. It’s my go-to for all of my gingerbread decorating projects. Note: This recipe makes 48 standard size cookies. I recommend making as many houses as you need and then using the rest of the dough for regular cookies or more gingerbread decor for your home.
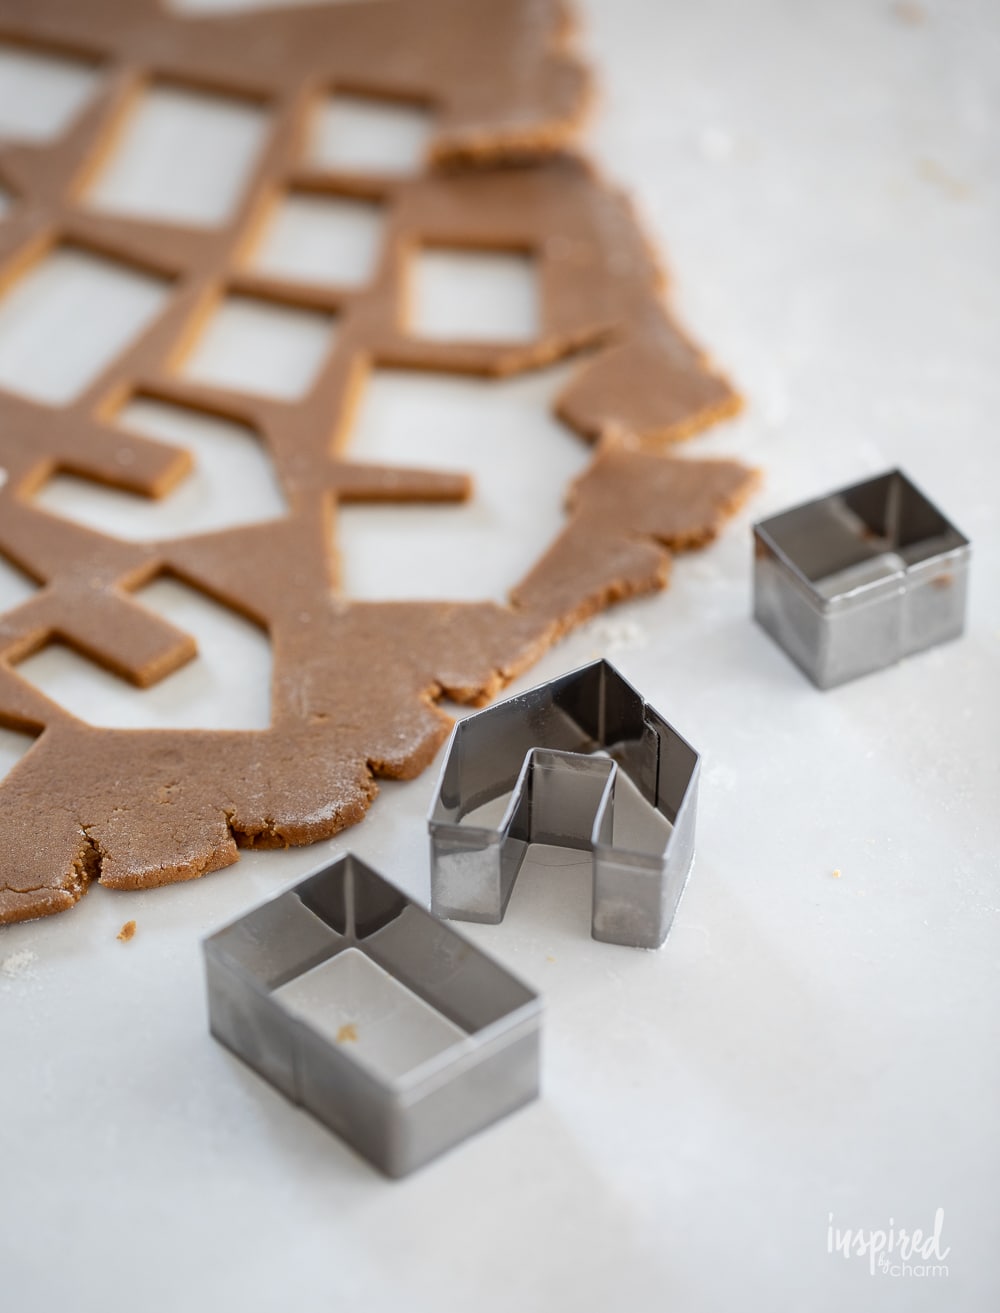
- Use THIS cup hugger gingerbread house cookie cutter to cut out the shapes. For each house you’ll need two of each shape.
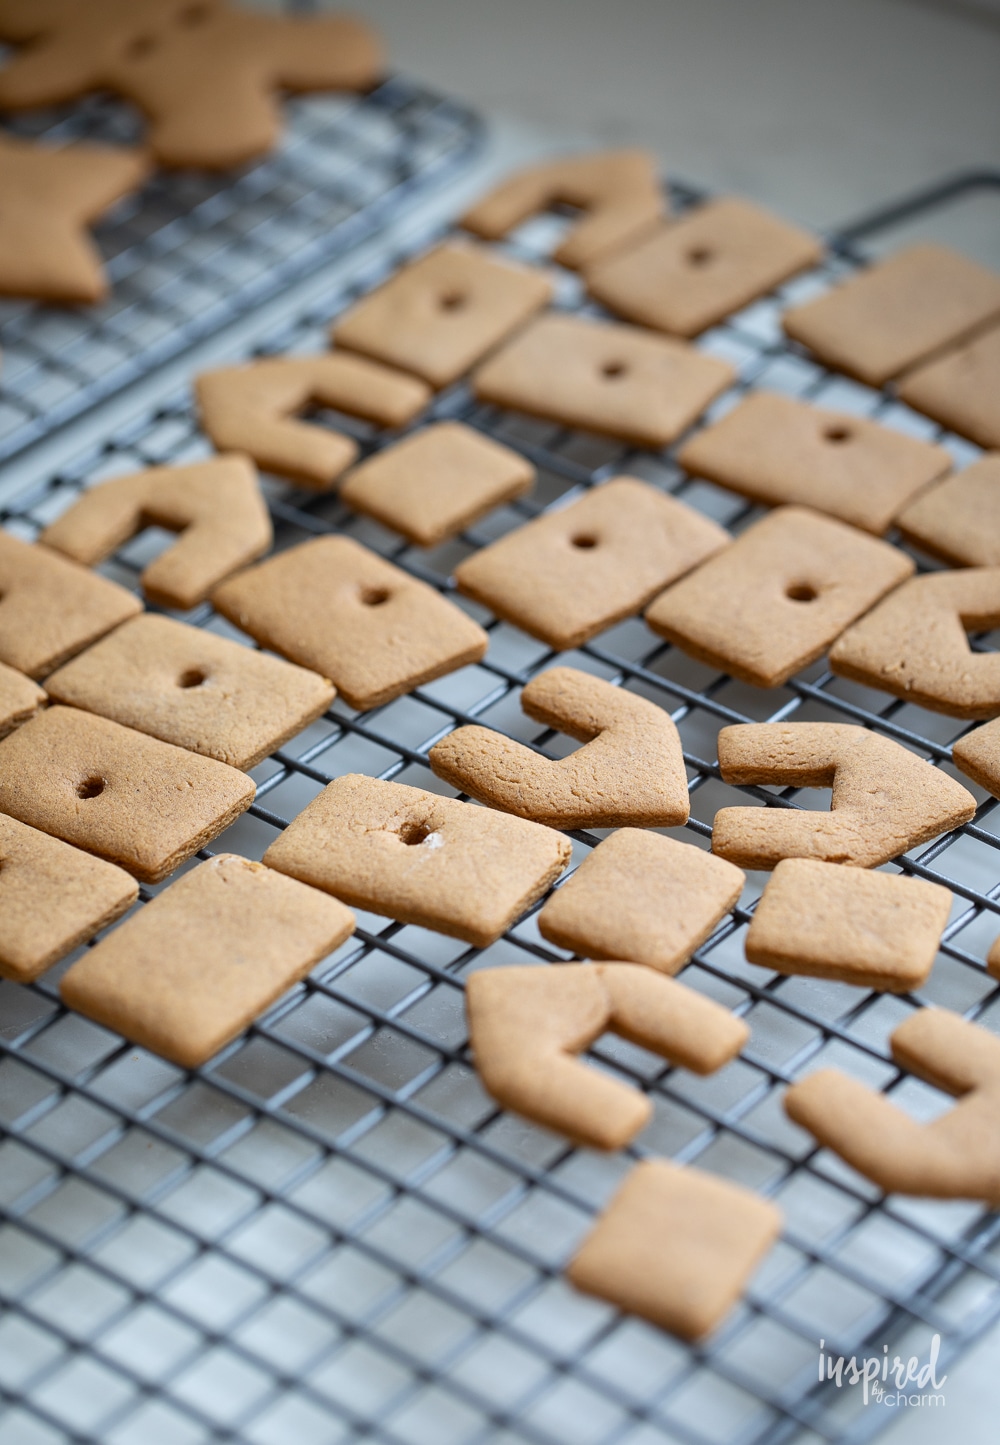
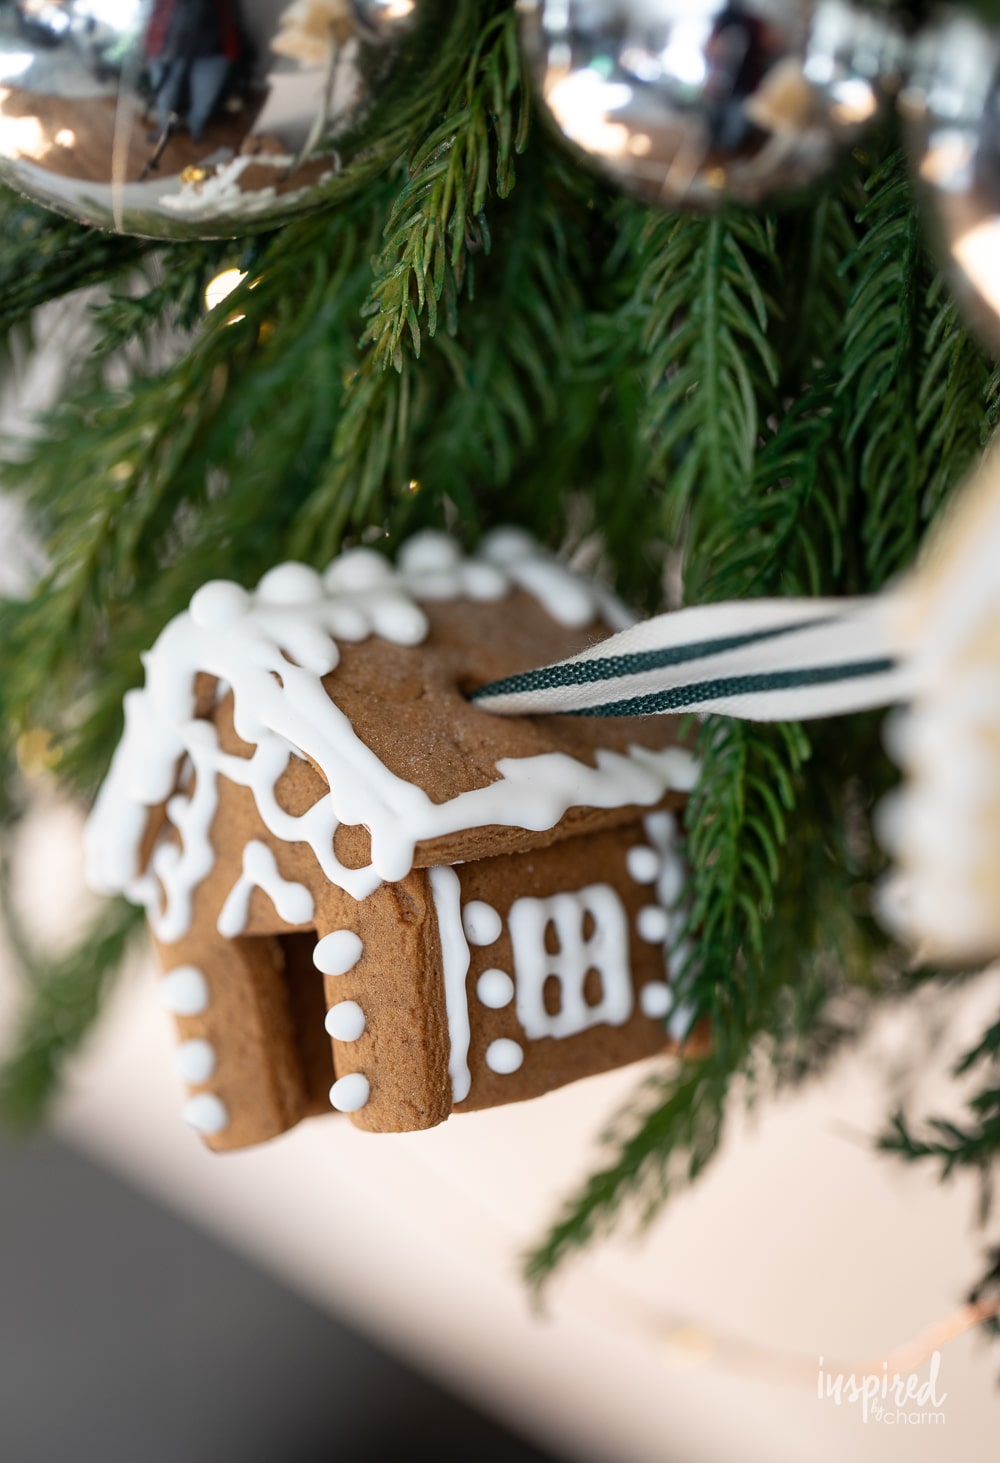
- With the roof pieces (the larger rectangular shape) you’ll want to put a hole in the middle of each. This hole is where you’ll thread/string your ribbon. I used a metal straw to create my hole and this seemed to be a good size.
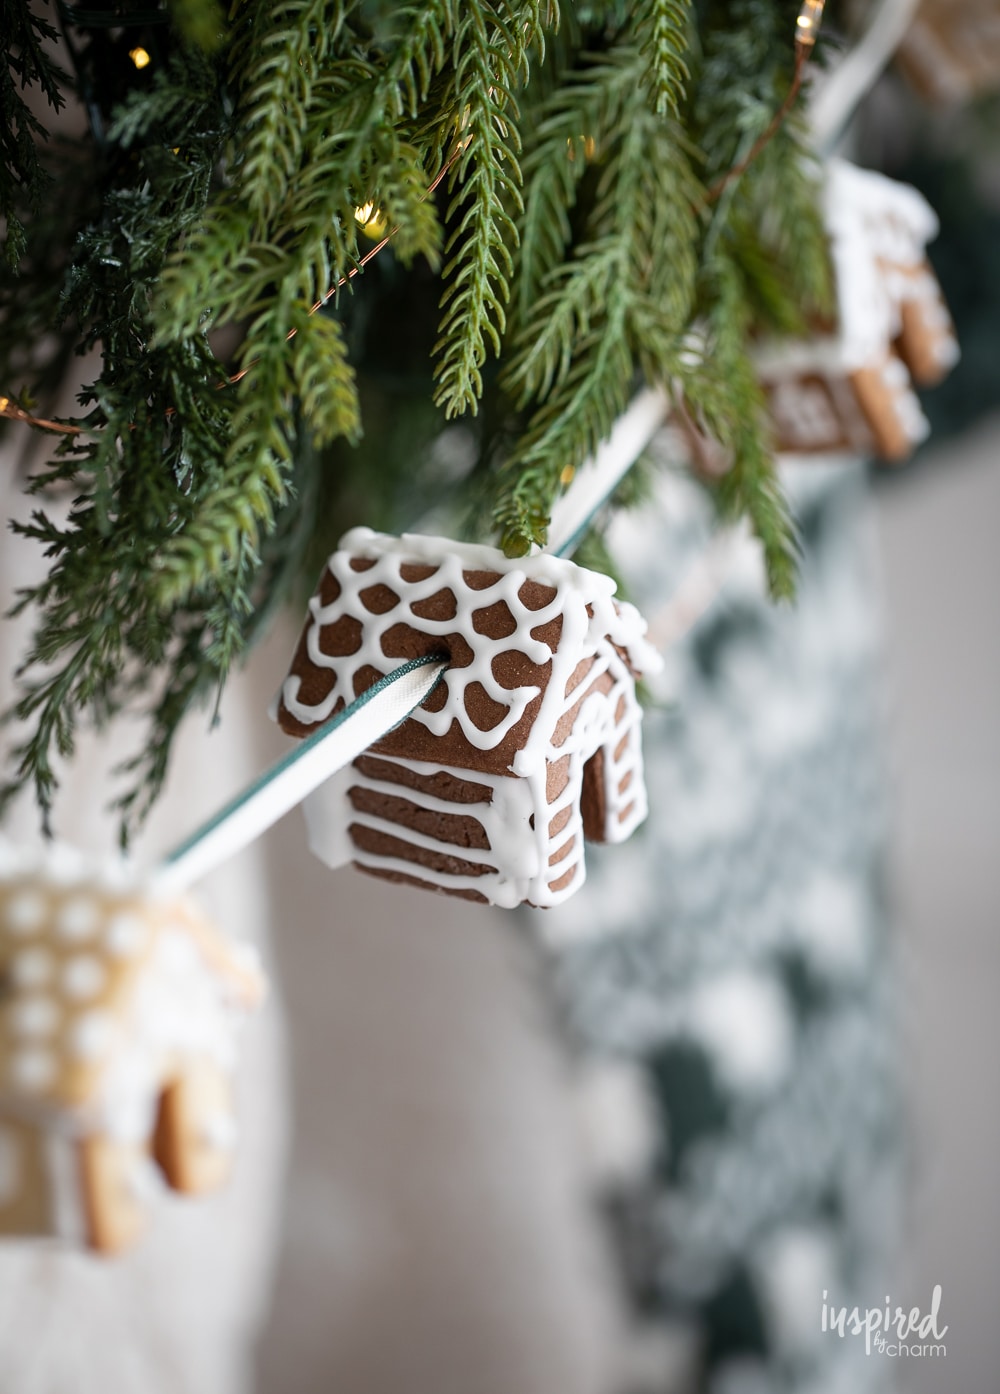
- Let the cookies cool, then assemble using royal icing. Start by “gluing” the sides of the house to the front of the house and let sit for a few seconds. Then add on the back of the house and let that sit for a few more seconds. Finish by gluing on each roof piece.
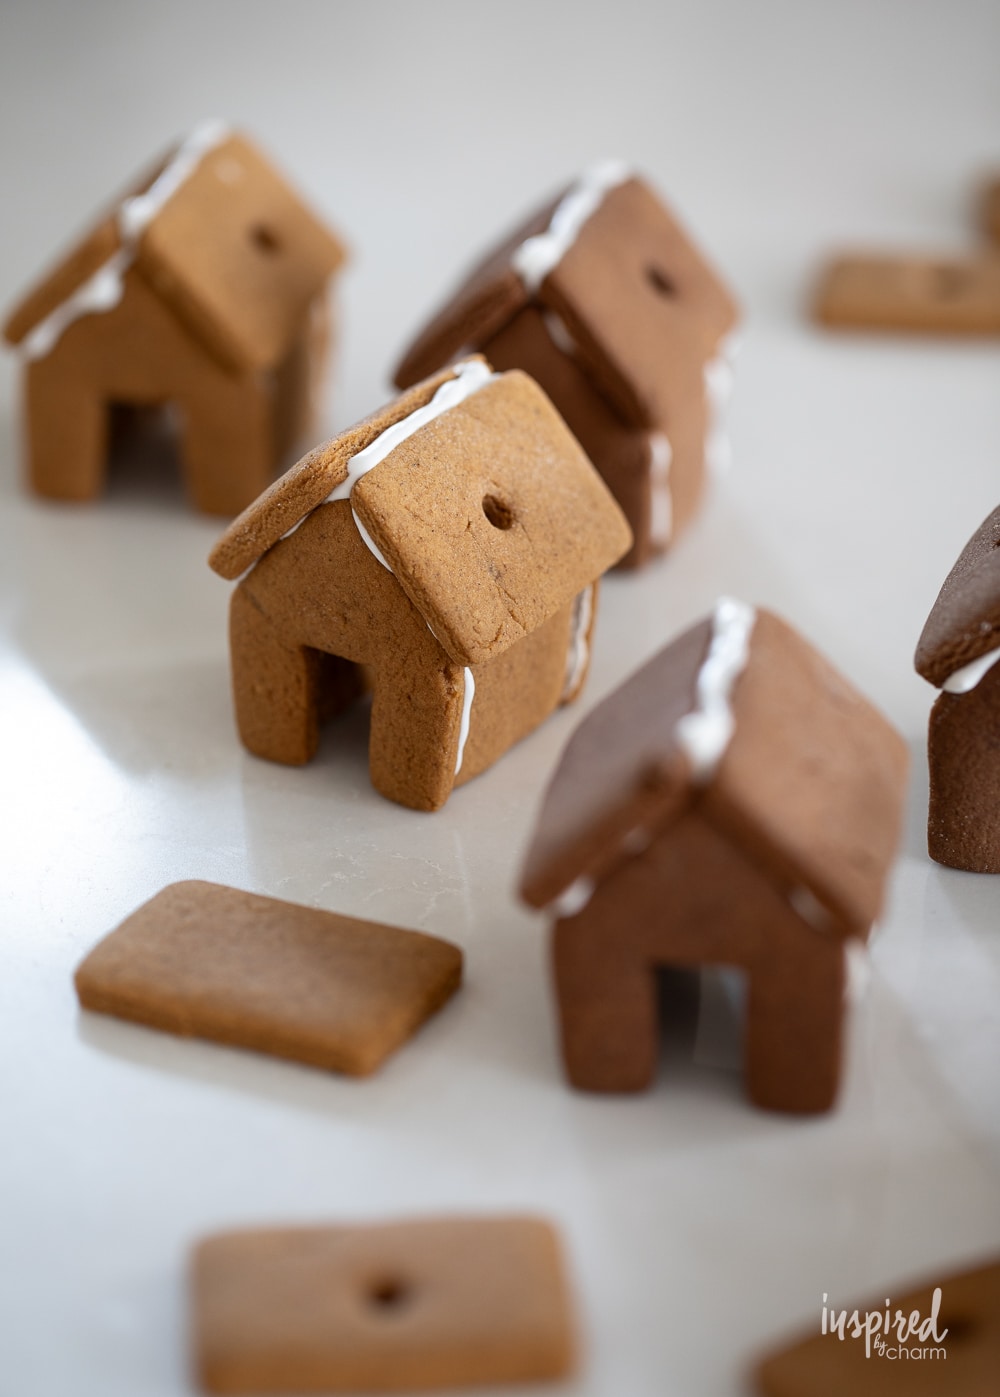
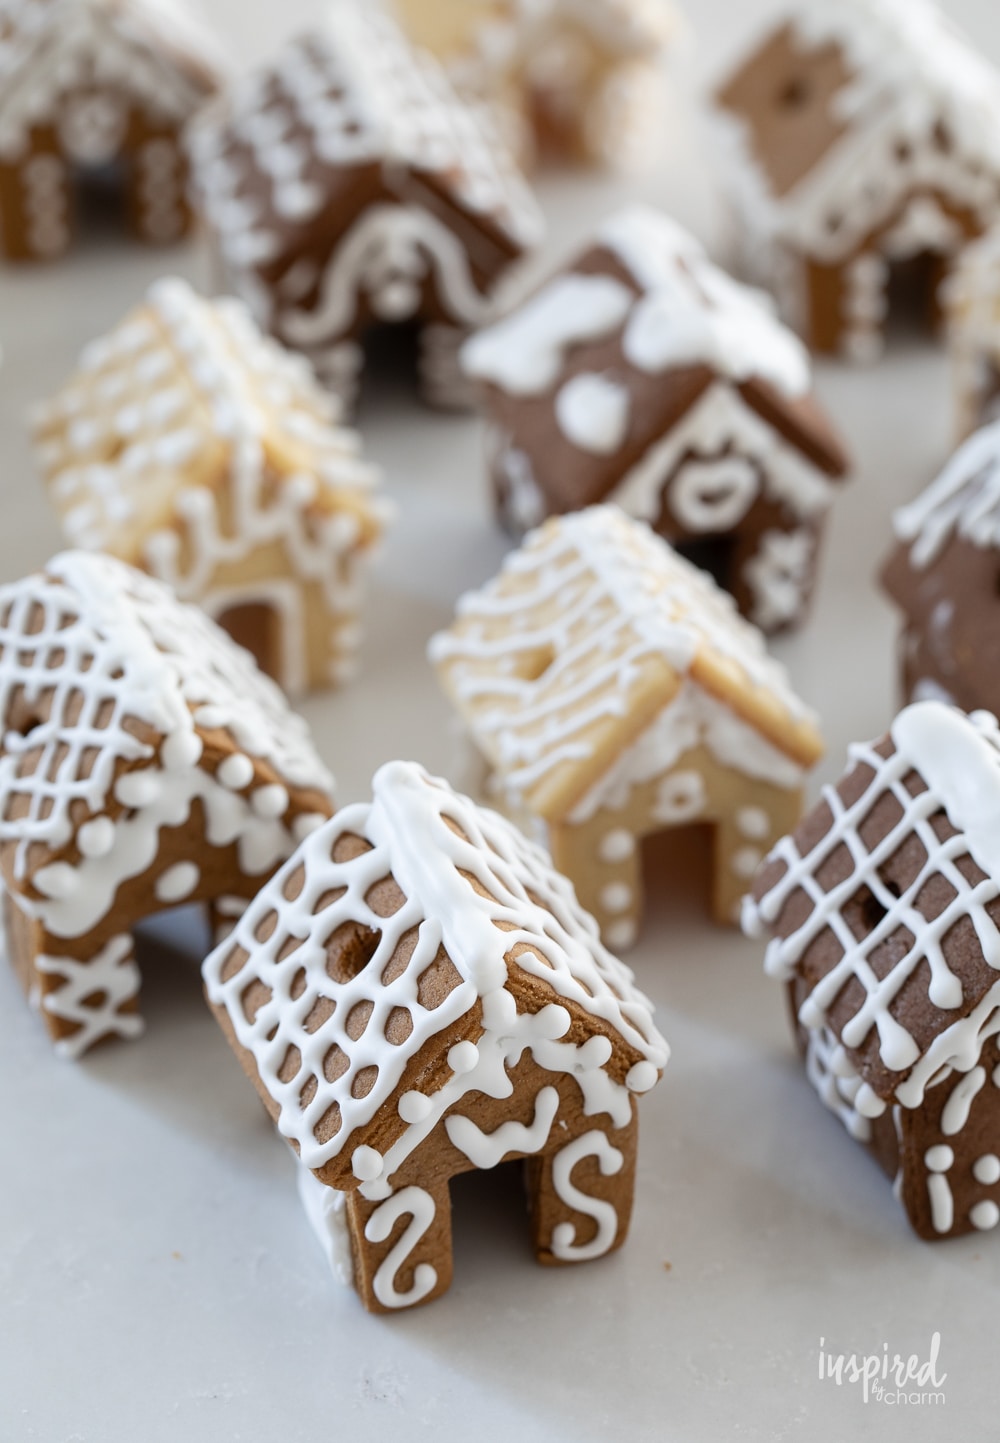
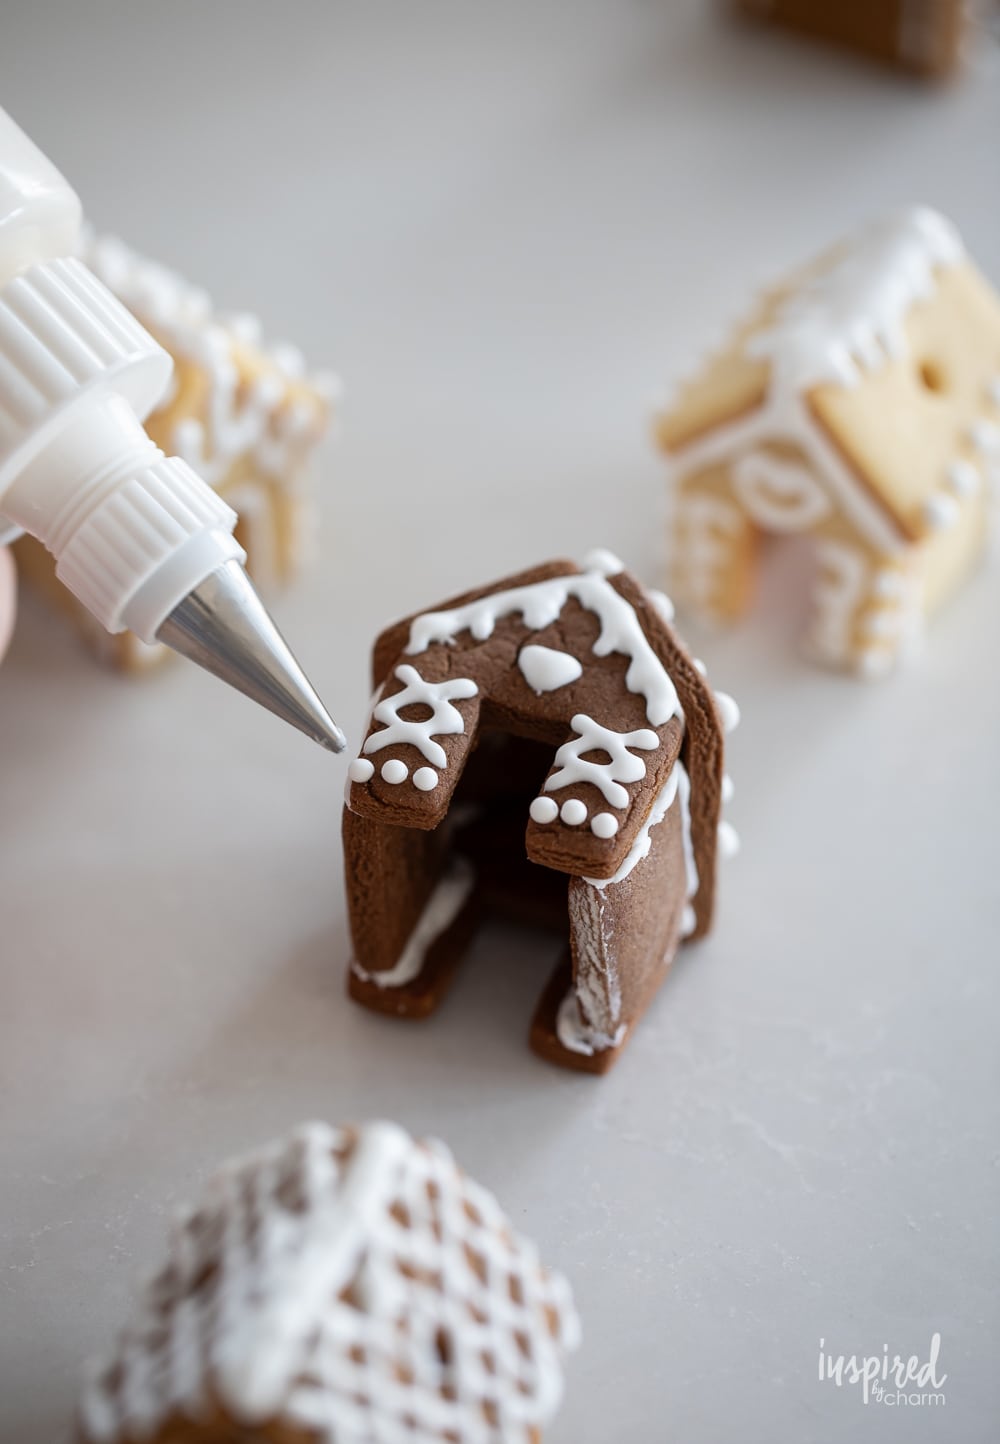
- Once the royal icing is set, have fun decorating your adorable little gingerbread houses. I usually do all of the fronts of the houses first (let them dry), then the backs and the roofs (let them dry), and finish with the sides.
- Let your icing completely set before proceeding.
💌 SAVE THIS POST / RECIPE!
- Use a large needle to thread your ribbon through the houses. (I used a plastic darning needle my mom had.) To secure the ribbon in place while threading, I cut the end of the ribbon to make it narrower, threaded it through the needle, and then superglued the tip of the ribbon to the ribbon strand.

- When threading through the houses, you won’t be able to do both holes in one go. So, thread through the first hole, pull the needle and ribbon through the bottom of the house, then go back up through the bottom and thread through the second hole.
- Continue threading on through your houses until you have as many as you like/need.

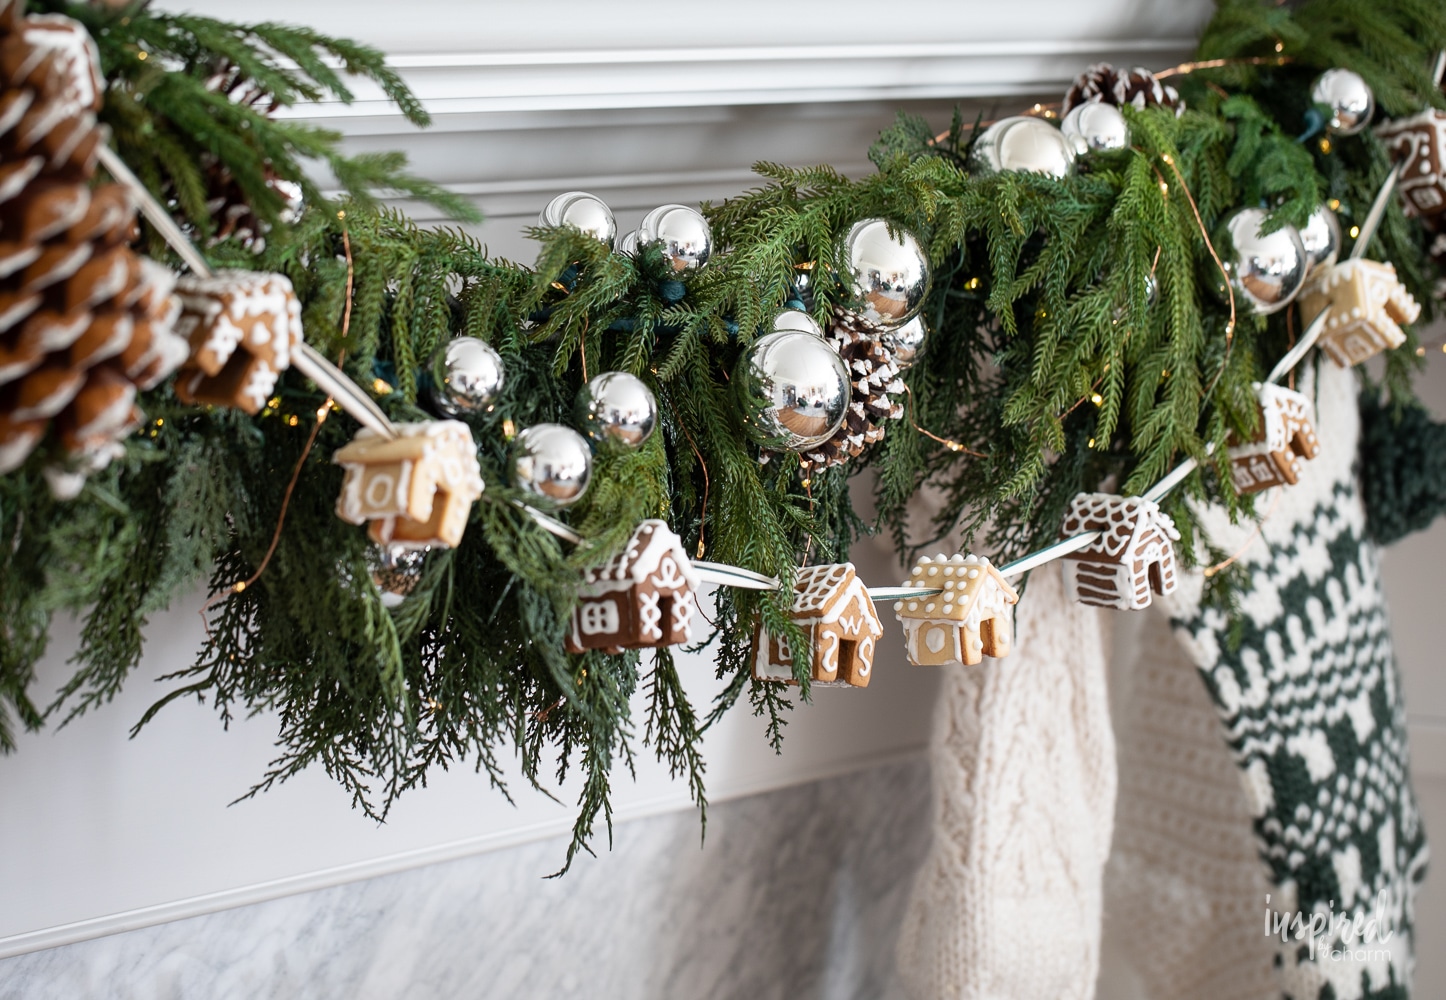
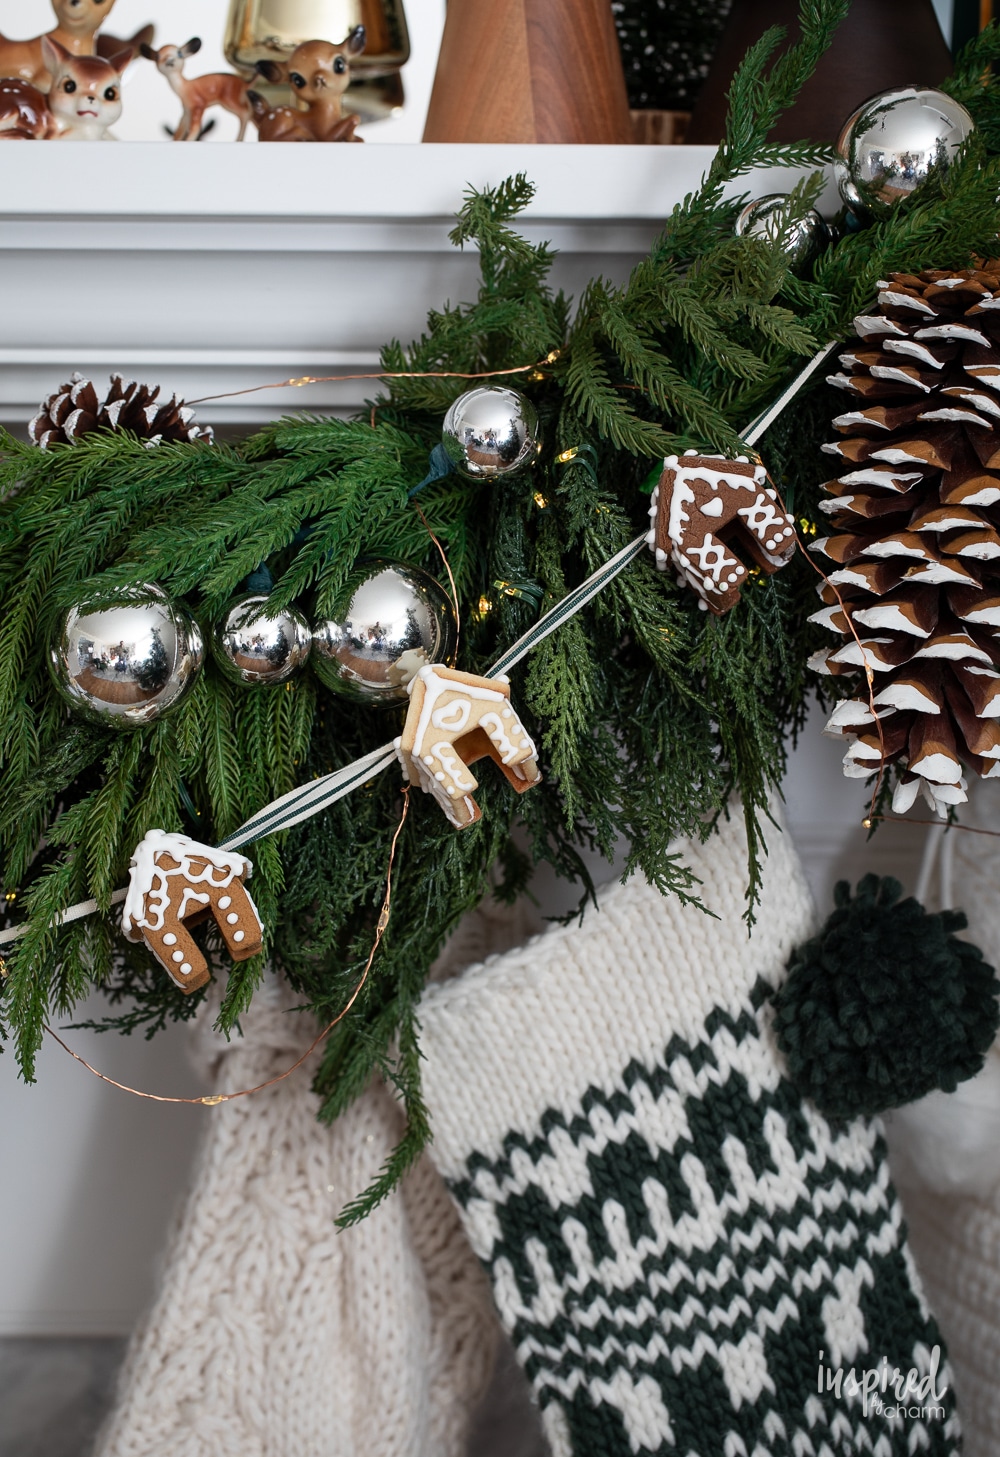
- Your ribbon should be thick enough to hold your houses in place. I spaced my houses about four inches apart. You can do what works best for you.
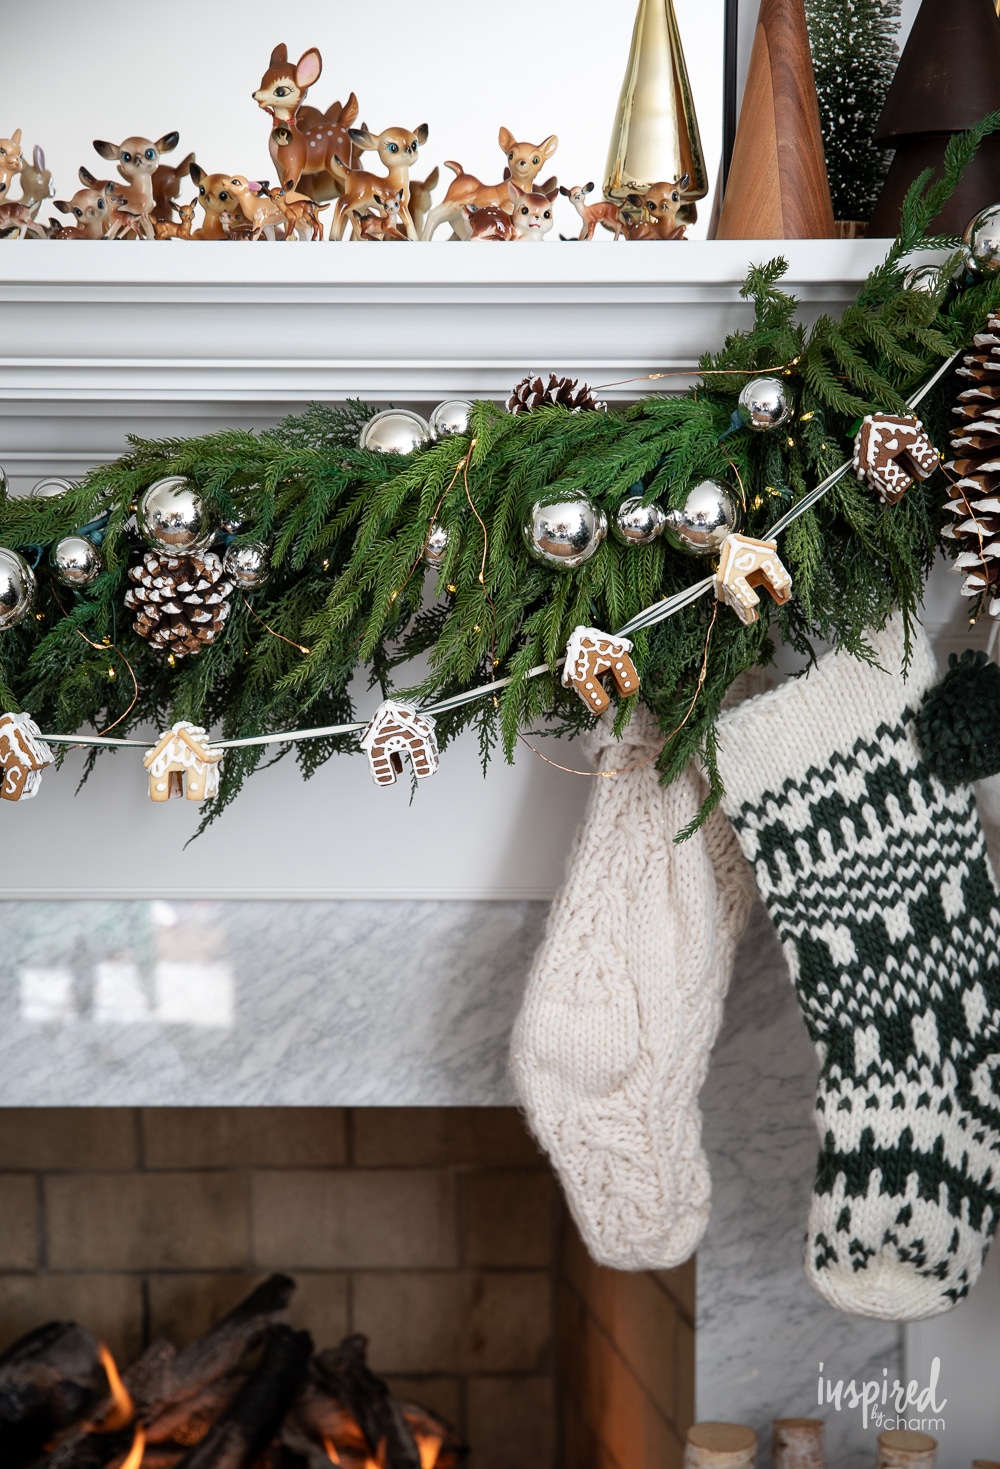
- And with that, your Gingerbread House Garland is complete and ready to hang and enjoy!
If I haven’t said it enough, I couldn’t be more thrilled with how this project turned out. I’m absolutely obsessed. Handmade Christmas decor is my favorite!
Project Notes
There are few additional details I wanted to mention:
- You might be wondering why some of my houses are a lighter brown, while others are a darker brown. Great observation! I used a standard snap cookie recipe for the lighter colored houses. (I’ll be sharing that recipe soon.) For the darker colored houses, I added a bit of cocoa powder to my gingerbread cookie dough to make the darker color.
- I used a plastic darning needle from my mom to thread the ribbon through the houses. To secure the ribbon in place while threading, I cut the end of the ribbon to make it more narrow, threaded it through the needle. and then superglued the tip of the ribbon to the ribbon strand. (There is a photo in the blog post for reference.)
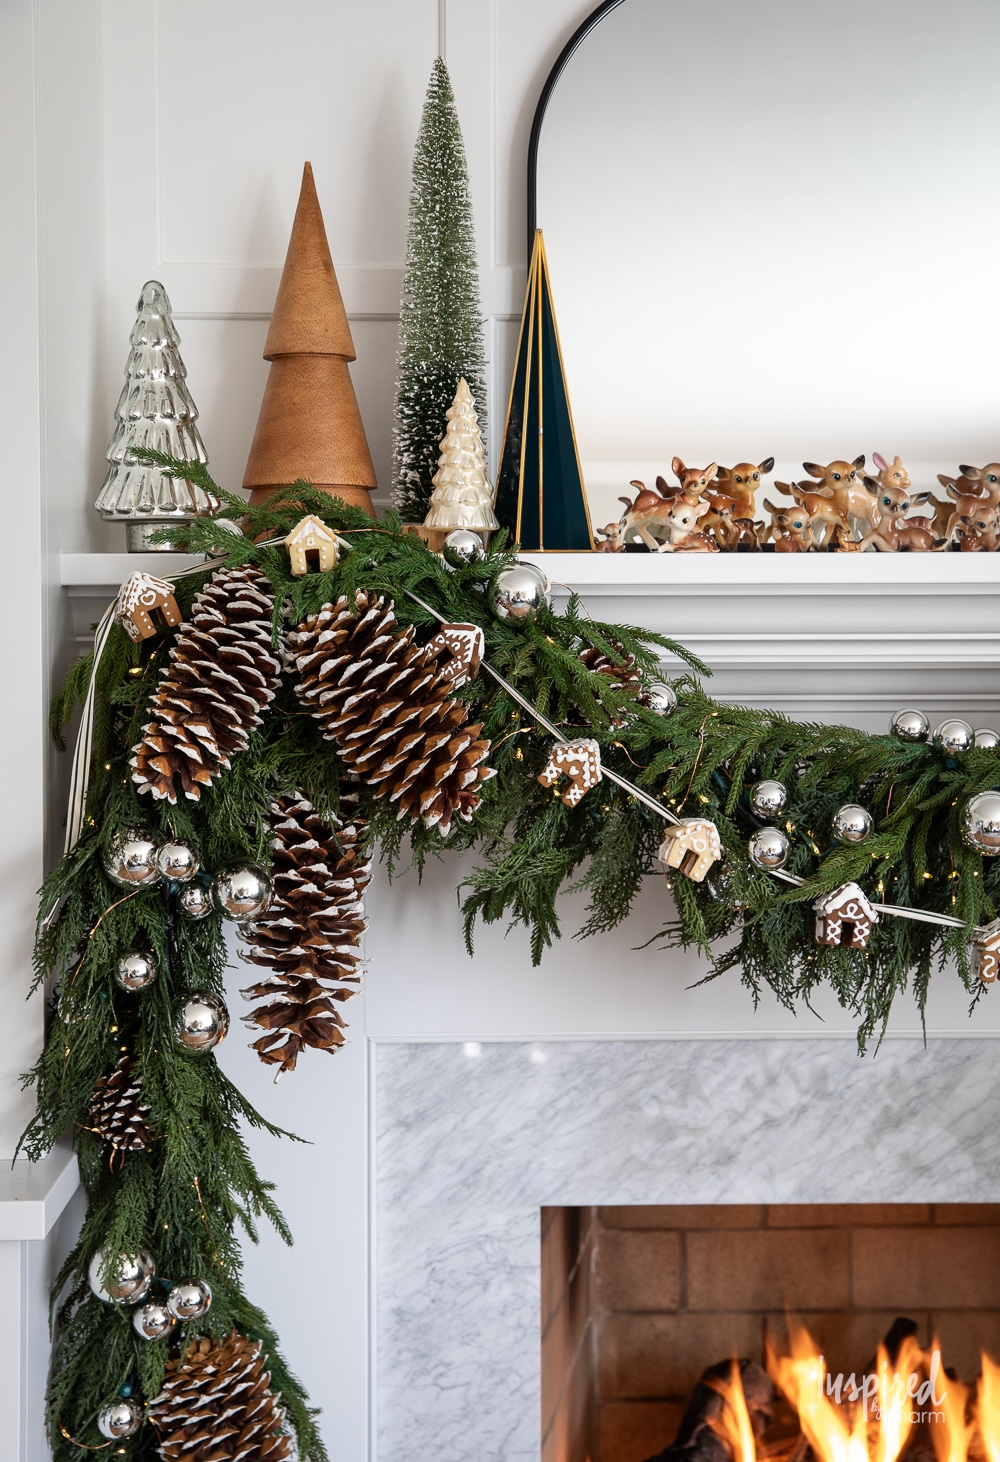
- I made my garland long enough to stretch across my mantel, but this would be just as adorable with just five little houses used across a window or cupboard. You can really make it as long or as short as you’d like.
Frequently Asked Questions
Can I make the gingerbread dough ahead of time?
Yes, you can! The dough can be made up to three days in advance and stored in the refrigerator.
How long will the gingerbread houses last?
Like some of my other gingerbread decor, I suspect these will last a couple of years. I’ve found the icing is the first thing to come off. If you want something more permanent, try using puffy paint.
Can the garland be eaten after it’s been displayed?
While it’s safe to eat, the gingerbread will harden over time making it less suitable for consumption.
How do I fix a broken piece of gingerbread?
A bit of royal icing can act like glue to repair any breakages. Just give the “icing glue”time to dry before you continue with the assembly.
What’s the best way to preserve the garland for future holidays?
To preserve the garland, wrap it gently in tissue paper and store it in an airtight container. Keep it in a cool, dry place to avoid humidity which can soften the gingerbread. Do not store in an attic.
I’m certain you’ll have more questions. If you do, please leave them in the comments below and I’ll get back to you as soon as possible.


More Gingerbread Ideas You Will Love
- Gingerbread Cookie Wreath
- Gingerbread-Inspired Christmas Tree Decor
- Gingerbread Chex Mix
- Gingerbread Cake with Crumb Topping
- Gingerbread White Russian Cocktail
And there you have it — a Handmade Gingerbread House Garland that’s sure to add warmth and charm to any nook of your home. Whether it’s draped over your Christmas fireplace mantel, wrapped around your Christmas tree, or gifted to a friend, it’s a little piece of holiday cheer that you’ve created with your own two hands. If you give this project a try, be sure to come back and leave a comment and a 5-star rating below.
Want more from Inspired by Charm? Join the IBC Mailing List for inspiration in your inbox! Follow along on Instagram and TikTok for daily updates and behind-the-scenes looks at my processes. There’s even more inspiration on Facebook and Pinterest!

Gingerbread Cookie Dough and Garland
Ingredients
Gingerbread Cookies
- 4 cups all-purpose flour
- 2 teaspoons ground ginger
- 2 teaspoons cinnamon
- 1 1/2 teaspoon baking soda
- 1/2 teaspoon ground cloves
- 1/2 teaspoon salt
- 3/4 cup butter softened
- 1 cup packed brown sugar
- 1 egg
- 3/4 cup molasses
- 1/2 teaspoon vanilla extract
Royal Icing
- 4 cups confectioners’ sugar
- 3 tablespoons meringue powder
- 6 tablespoons warm water to start plus 4-6 more
- 1 tablespoon corn syrup
Instructions
- In a medium bowl, whisk together the flour, ginger, cinnamon, baking soda, cloves, and salt. Set aside.
- In the large bowl of an electric mixer, cream together the butter and brown sugar for three to four minutes or until light and fluffy. Add the egg, molasses, and vanilla. Mix to combine.
- Gradually add the dry ingredients to the wet. Mix to combine. Cover and refrigerate the dough overnight or for at least four hours.
- Preheat the oven to 350 degrees F. Divide the dough in two. On a lightly floured surface, roll out half of the dough so it is about 1/8-inch thick. Cut out shapes with the gingerbread house cookie cutters. For each house you’ll need two of each shape.
- Place the shapes about one inch apart on a cookie sheet. Repeat with the remaining dough.
- With the roof pieces (the larger rectangular shape) you’ll want to put a hole in the middle of each. This hole is where you’ll thread/string your ribbon. I used a metal straw to create my hole and this seemed to be a good size.
- Bake 5-8 minutes (or 8-10 minutes for standard cookies) or until the edges of the cookies are firm. Transfer the cookies to cooling racks to cool completely.
- While the cookies cool, prepare the royal icing. Add the confectioners’ sugar and meringue powder to the bowl of a stand mixer. (You can also use a hand mixer.) Whisk to combine.
- With the mixer on low, add one tablespoon of warm water at a time. Once all six tablespoons have been added, add in the corn syrup.
- Continue to mix on low-medium speed adding more warm water, one tablespoon at a time, to achieve the desired consistency. The ideal consistency is something that is a bit thicker than corn syrup.*
- Transfer the icing to a piping bottle or piping bag. **
- Start by “gluing” the sides of the house to the front of the house and let that sit for a few seconds. Then add on the back of the house and let that sit for a few more seconds. Finally, glue on each roof piece.
- Once the royal icing is set, have fun decorating your adorable little gingerbread house. Start with the front of the house first (let it dry), then the back and the roof (let them dry), and then finish with the sides.
- Let your icing completely set before proceeding.
- Use a large needle to thread your ribbon through the houses. (I used a plastic darning needle my mom had.***) To secure the ribbon in place while threading, I cut the end of the ribbon to make it more narrow, threaded it through the needle, and then superglued the tip of the ribbon to the ribbon strand.
- When threading, you won’t be able to do both holes in one go. So, thread through the first hole, pull the needle and ribbon through the bottom of the house, and then go back up through the bottom and thread through the second hole.
- Continue threading on your houses until you have as many as you like/need.
- Your ribbon should be thick enough to hold your houses in place. I spaced my houses about 4 inches apart. You can do what works best for you.
- And with that, your Gingerbread House Garland is complete and ready to hang and enjoy!
Do you think these will attract mice or other pests?
I haven’t had any issues, but I know mice dislike the smell of cinnamon and cloves.
xo michael
Very excited to assemble these with grandbabies!! How long does it take for the icing to dry?
Umm, maybe an hour to set, but a few more so they are really firm. I leave them set for as long as possible just to make sure.
xo Michael
Where can I find the house cookie cutters?
You can find it HERE.
xo Michael
Where can I find more info on the beautiful, bountiful green garland on your mantle, and the silver balls?
OMG ~ those are adorable. 🙂
Thank you Reenie!
xo Michael
That is about the cutest gingerbread houses i have ever seen. You are blessed to be able to do this with your mom. That is very special. Thank you for sharing.
Thank you so much Cheryl! It was such a special time.
xo Michael
This tiny gingerbread house garland is the most adorable Christmas idea I’ve ever seen! I’d give you a 10 rating if I could! Just amazing!
You just made my day Grace! Thank you!
xo Michael
These are absolutely adorable! I love all the photos and detailed instructions. I would love to try making them!
Thank you so much Ramona!
xo Michael
This may be the cutest garland I have ever seen! Going to give it a go this weekend! Thanks for the creative idea
Awww! Thank you so much!
xo Michael
Ummmm excuse me….I didn’t think anything could top the rainbow tree in “digital hall of fame” for IBC…..but introducing the most ICONIC and unique garland! Round of applause and standing ovation on repeat here!!!! Ok you are officially on creative brain vacay for another 3 years! Well done my online friend, well done!
Creative brain vacation!? Omg. YES! Haha.And thank you so much for your kind words.
xo Michael
This is incredible and might be the cutest Christmas decorating I’ve seen all year. Bravo. Love your creativity! I’m forever inspired by charm!
You made my day Kelly! Thank you!
xo Michael
literally the cutest! i eagerly await your christmas posts every year <3
Thank you so much Michele!
xo Michael