DIY Vintage Ornament Wall Decor Tree
This Post May Contain Affiliate Links. Please Read Our Disclosure Policy
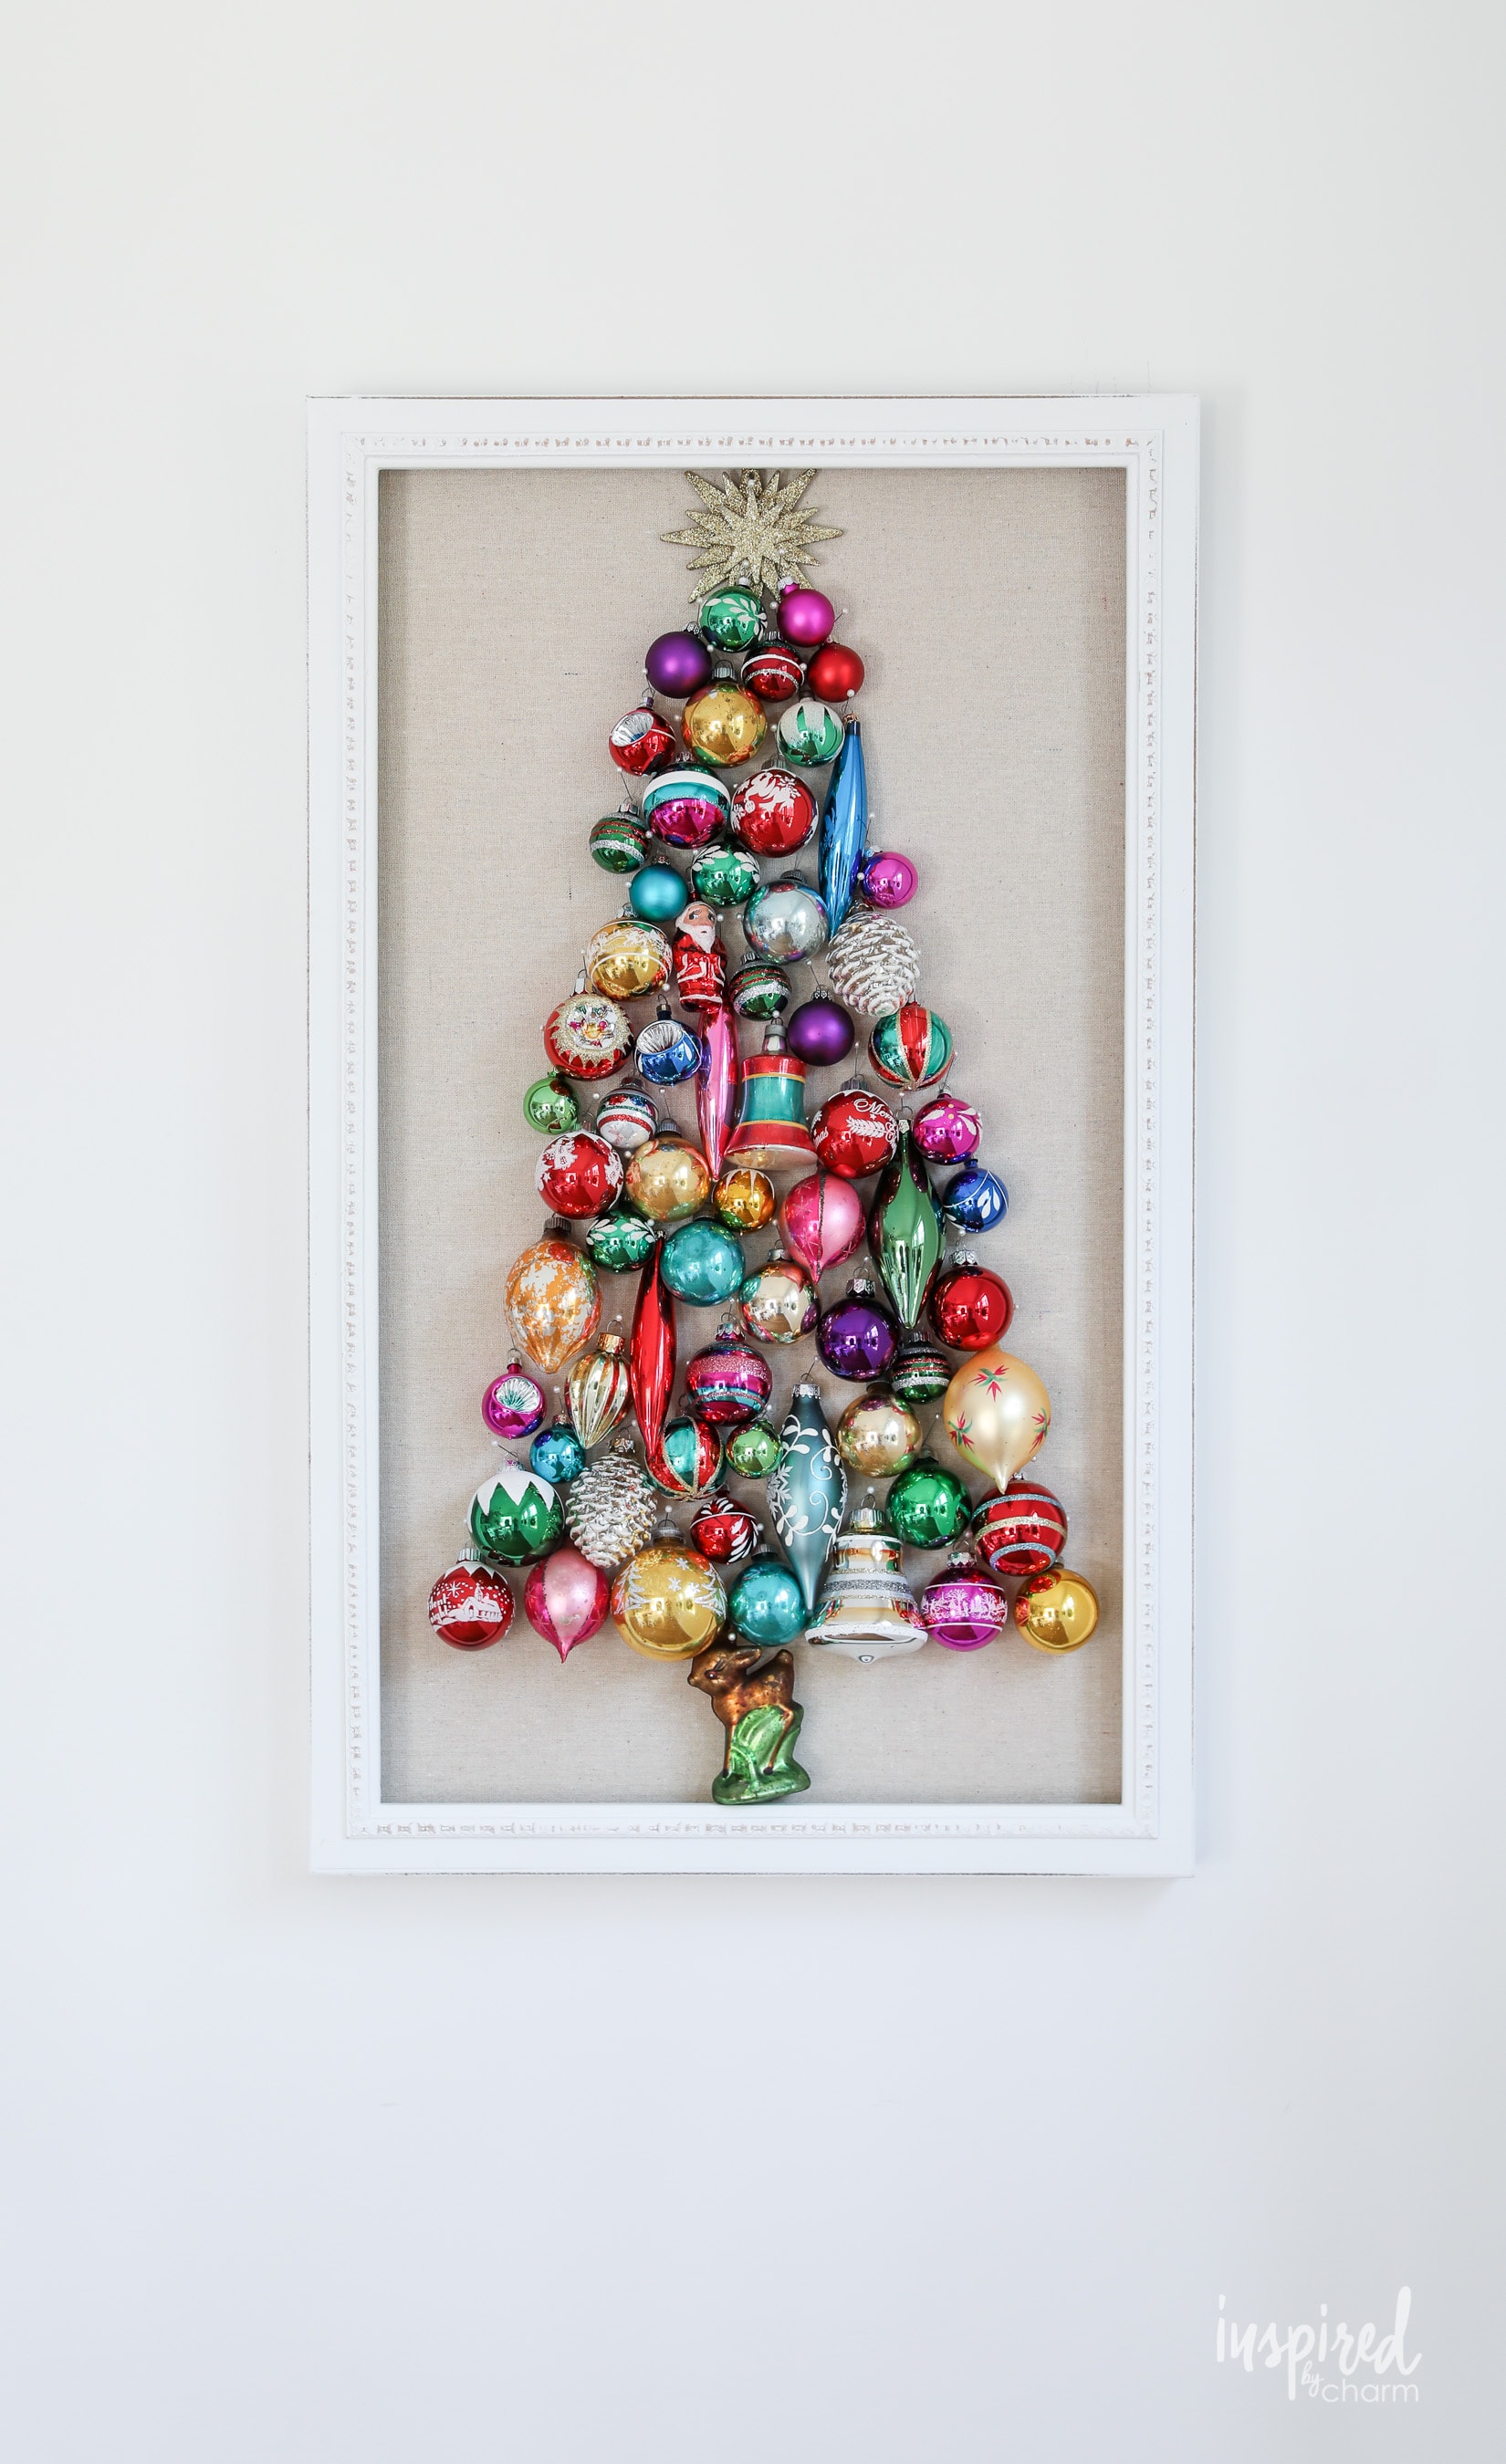
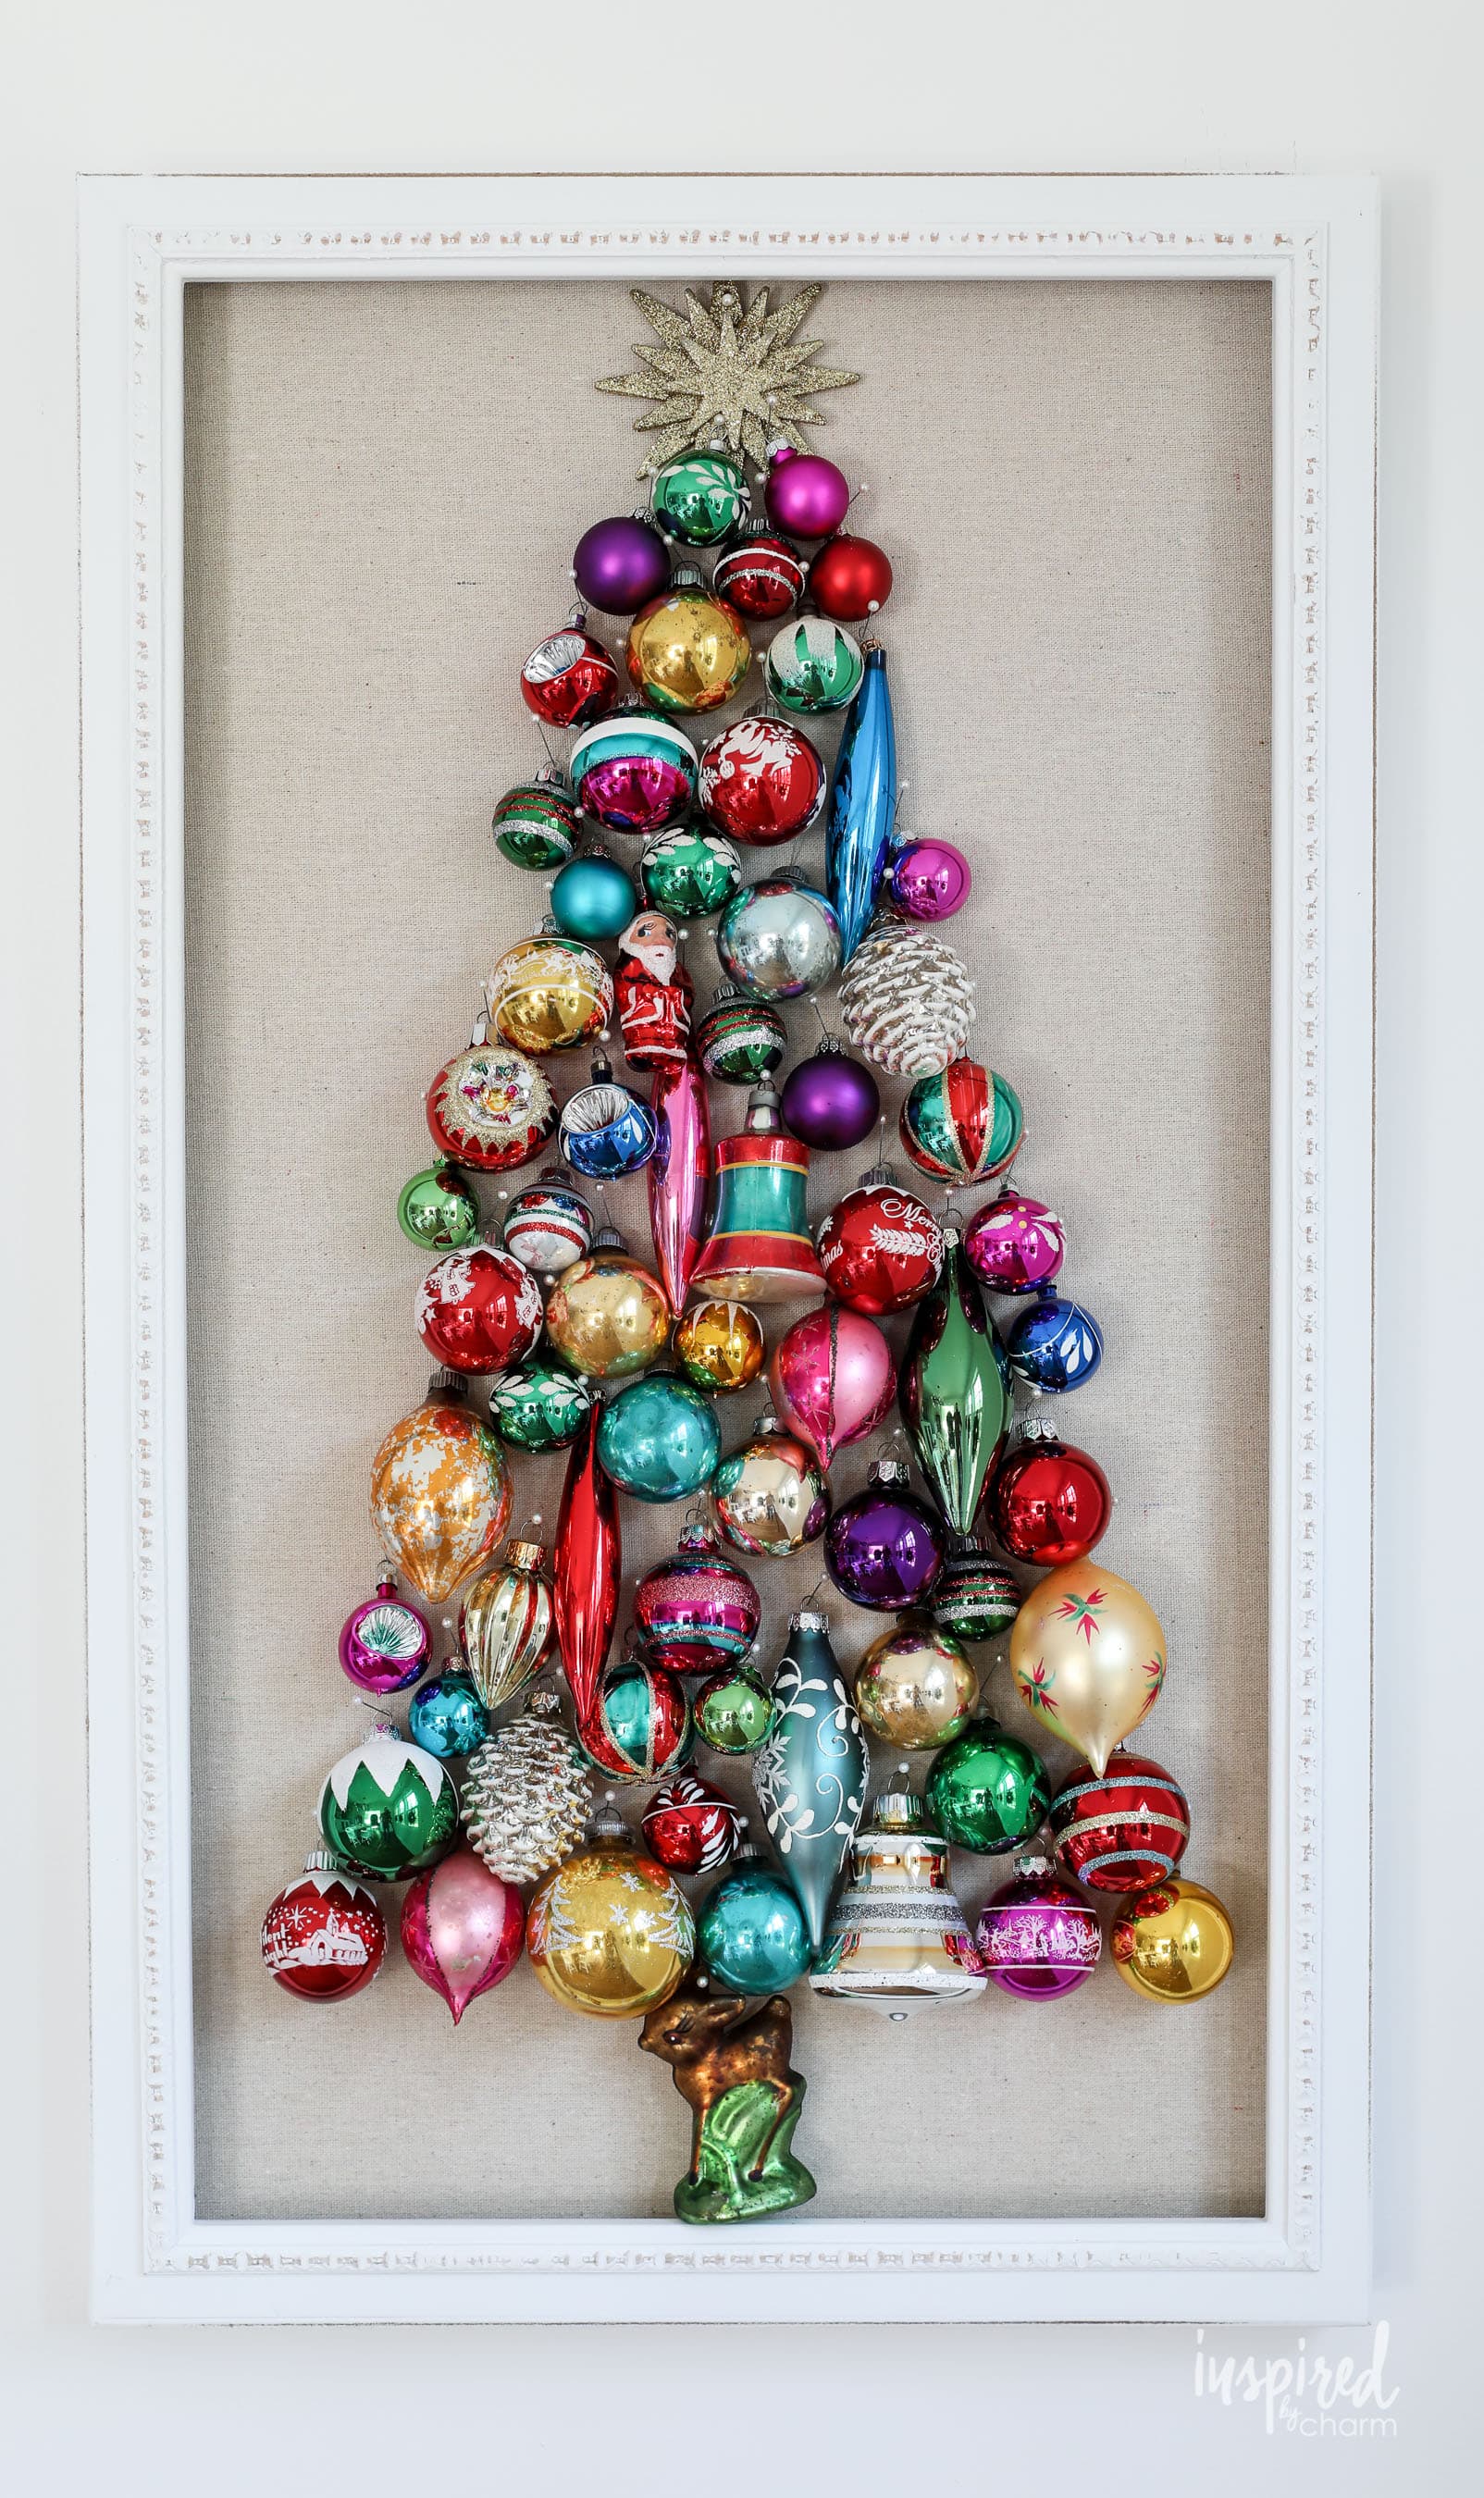
Bring a burst of color and nostalgia to your Christmas decor with this easy DIY Vintage Ornament Wall Tree. Using a mix of small and medium ornaments, you can design a vibrant wall display that feels both festive and personal. It’s an ideal craft for vintage lovers and anyone wanting to create something handmade and meaningful for the holidays.

Want to add color and vintage style to your home this Christmas? Today I’m showing you how to make this fun and festive DIY Vintage Ornament Wall Decor Tree.
If you’ve been a follower of IBC for some time, you know I can’t get enough of vintage Christmas decor. Inspired by my stash of vintage ornaments, I made this DIY Vintage Ornament Wall Tree. Check it out!
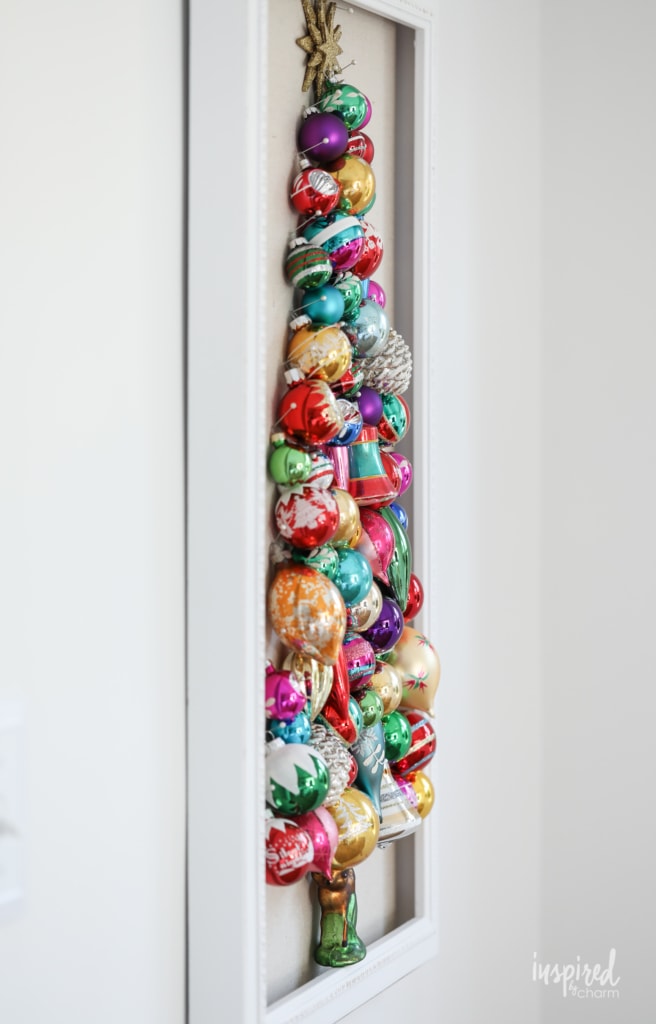
I wish I could take credit for this genius idea, but I can’t. It’s my understanding that the concept originated when someone hung ornaments on a screen. If you’ve seen trees like this, you’re probably familiar with that method. You just hook the ornaments on an old wood window screen in the shape of a tree or any design you prefer. Simple!
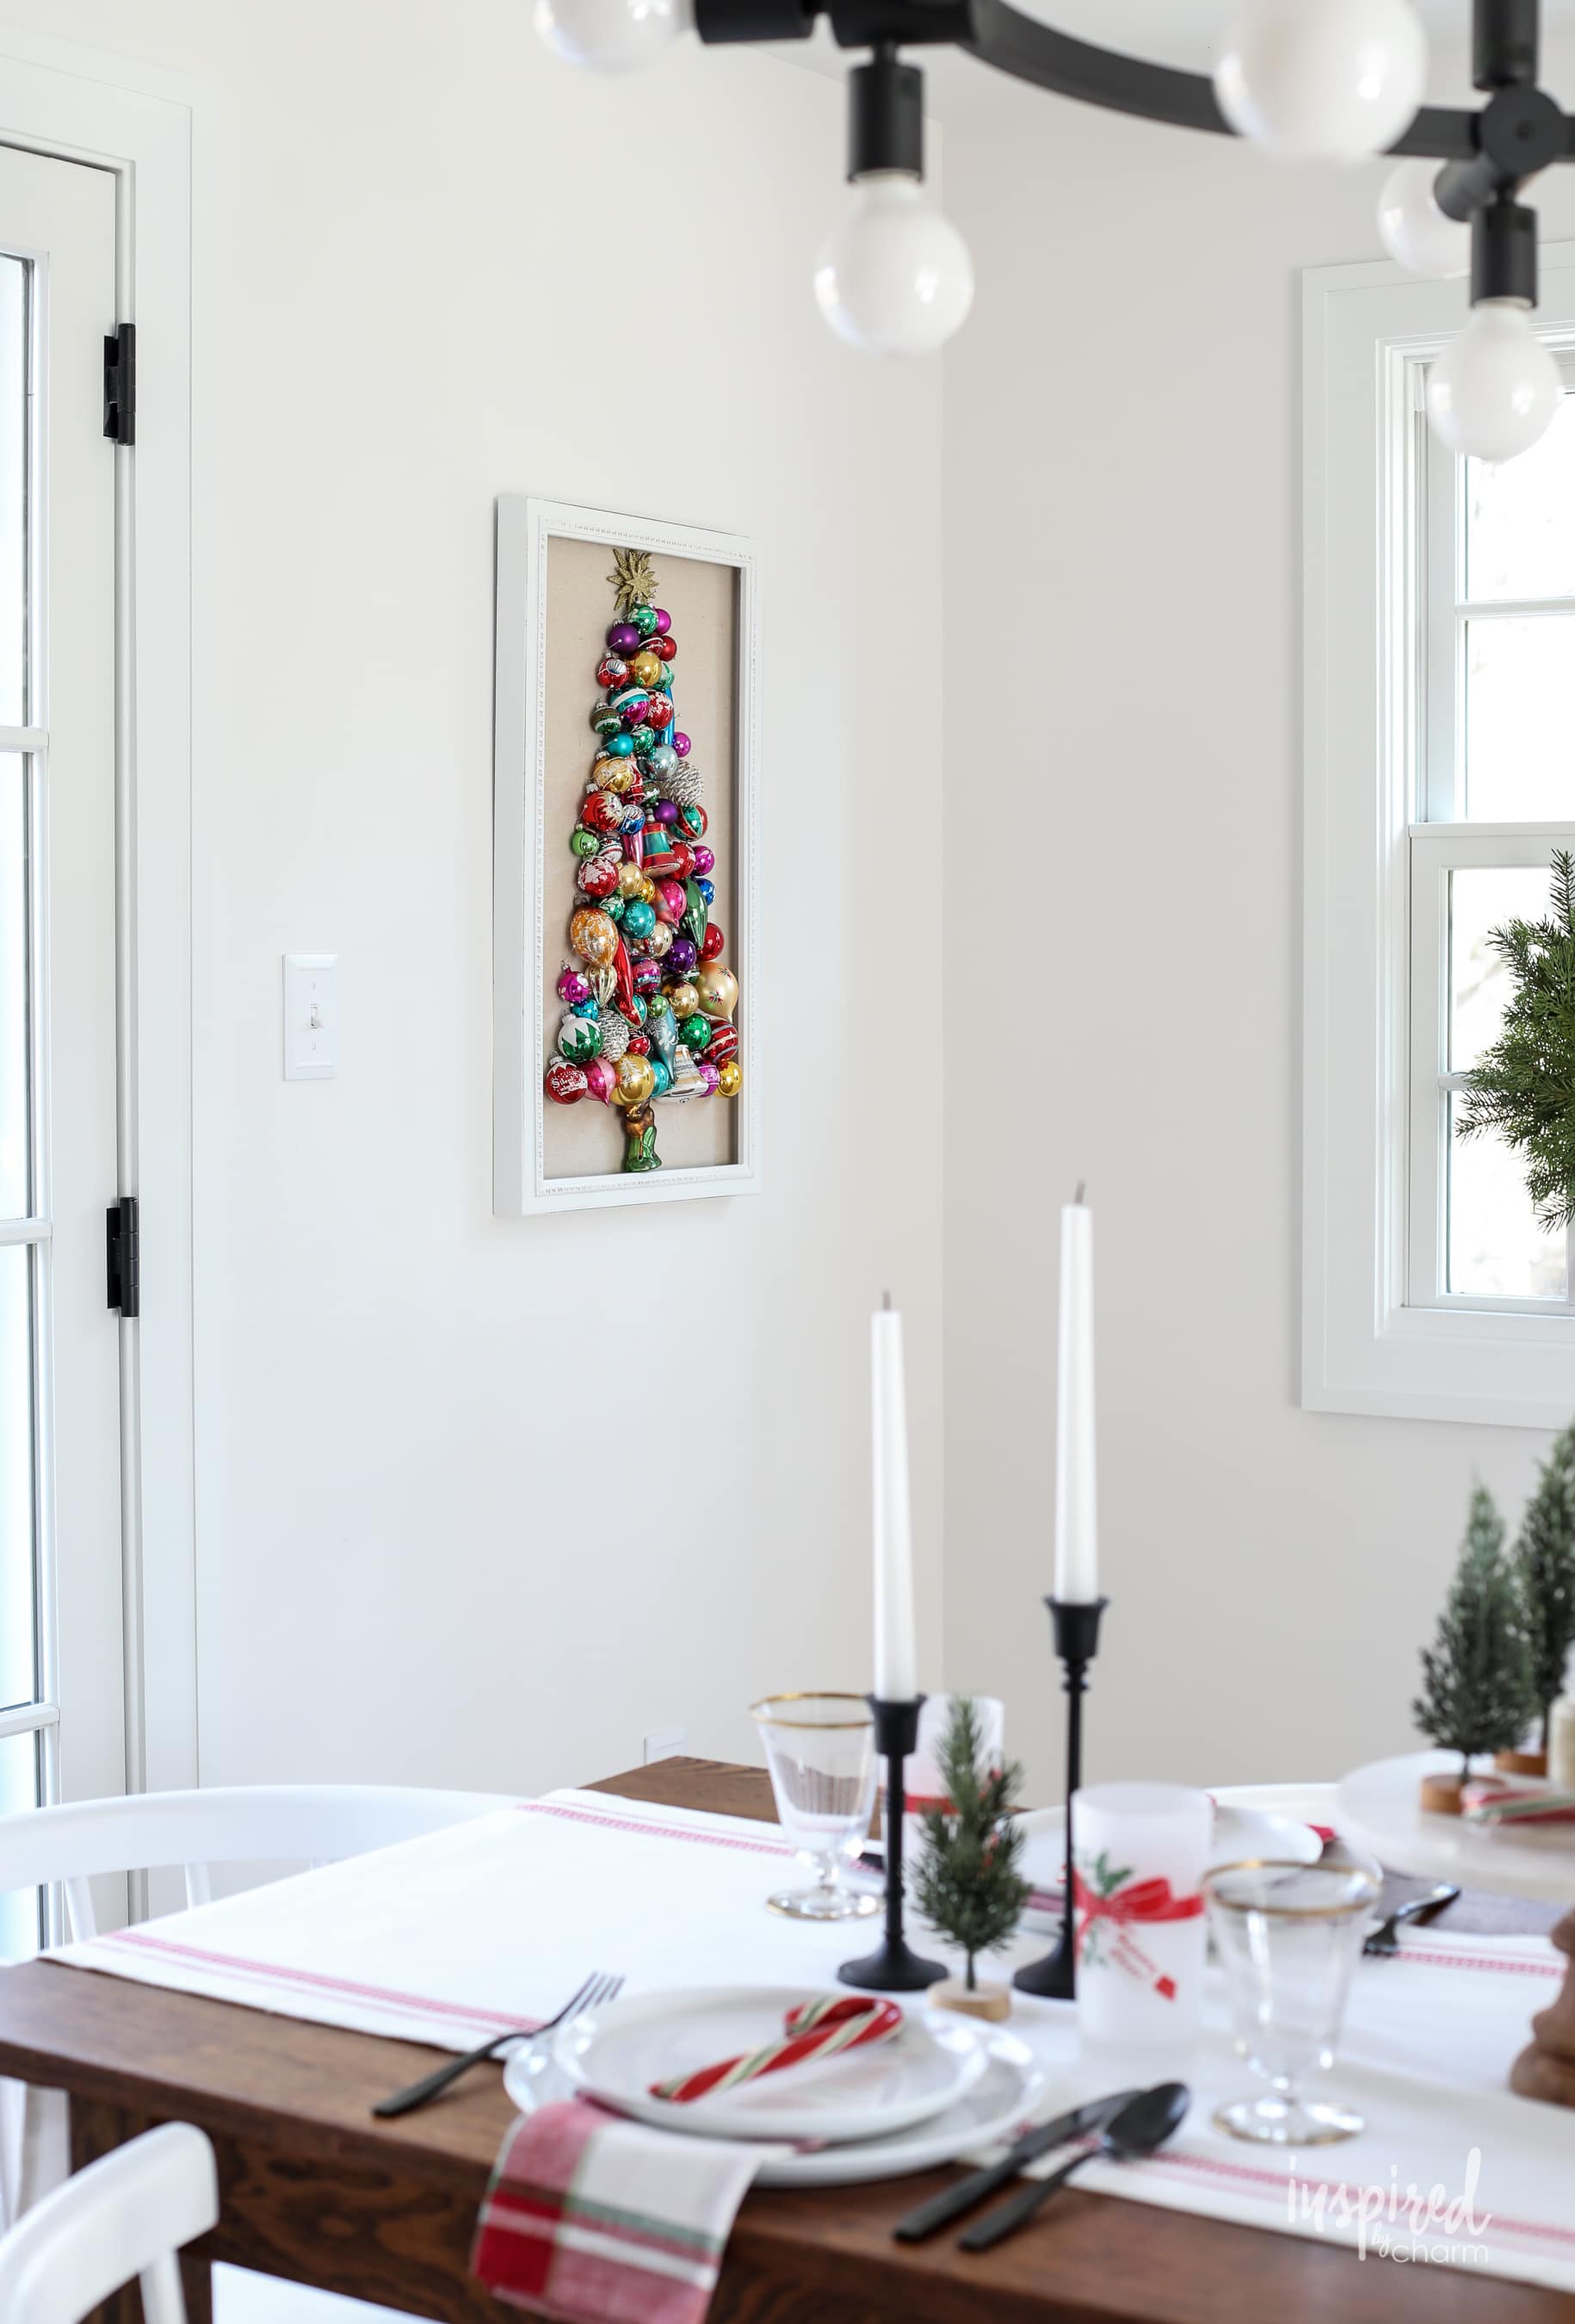
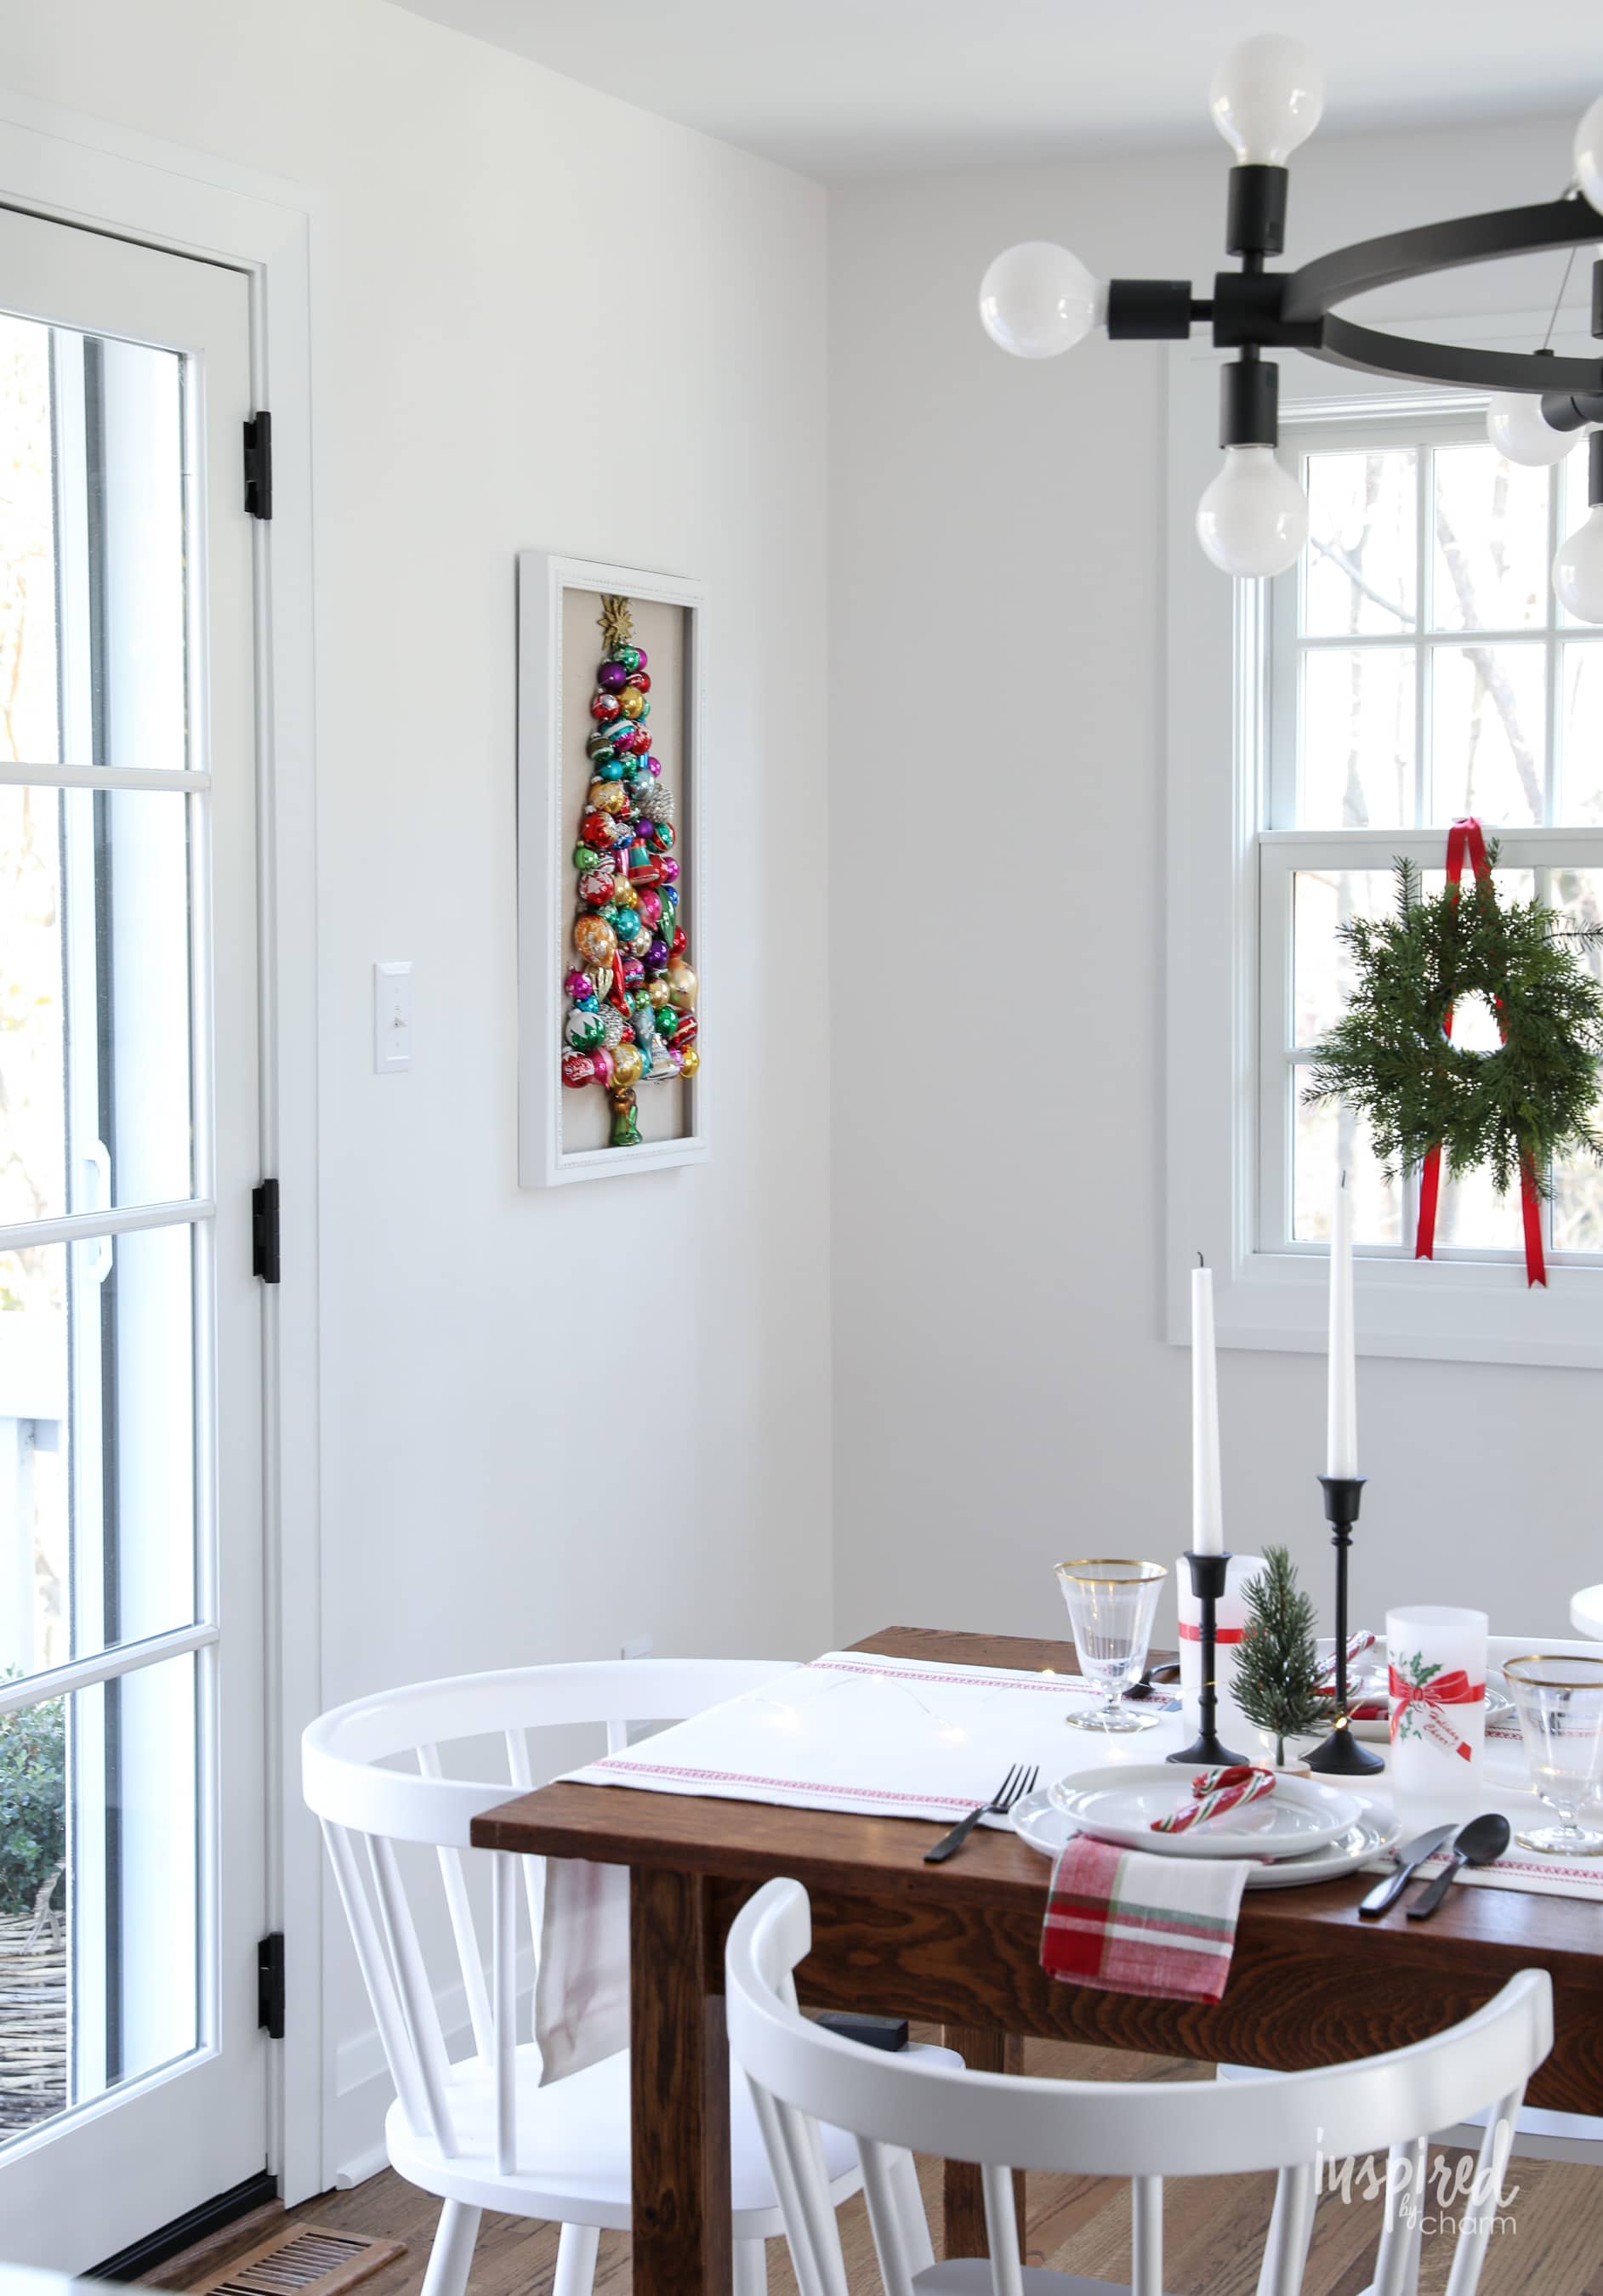
I love that look, and it was my first thought when I decided to make one for my home. However, since I’d be hanging the ornament tree in my dining room, I realized I needed something a little more refined. My search online continued and saw that folks had made similar versions on bulletin boards using straight pins. I loved that idea and thought it would be perfect in my space.
I searched a few stores for just-the-right bulletin board and found a winner at HomeGoods. It took me a couple of weeks of hunting and going to a few different stores, but I finally found THE board for my project.
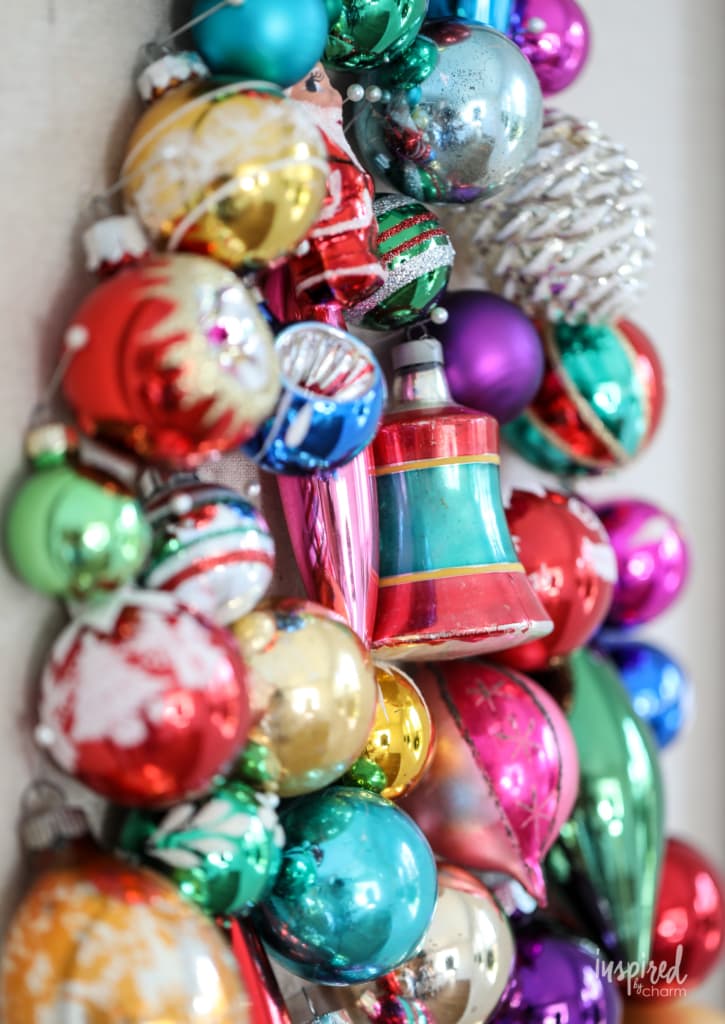
While I did pick up a few new ornaments to make this wall tree, I had a pretty good collection to start. I used about 65 small- and medium-size ornaments for this project. I also ordered a set of these pearl top straight pins. They turned out to be the ideal length. With all my supplies on hand, I got started on my project!
If you like DIY and vintage ornaments, you will also want to check out the DIY Vintage Christmas Ornament Wreath that I made last year. It’s one of my favorite holiday creations!
Why You’ll Love This Project
- It’s a unique way to showcase your favorite vintage ornaments. Instead of packing them away or hiding them deep in the branches of a tree, this wall display lets each one shine. It’s like creating a piece of art with meaning and sparkle.
- The project is simple and customizable. You can make it as large or as small as you like, use whatever ornaments you have on hand, and adjust the colors or shapes to match your home’s holiday decor. No two trees will ever look alike.
- There’s a sweet sense of nostalgia in every ornament. Whether they’re pieces you’ve collected over time or treasures passed down through family, this project celebrates memories while creating something fresh and joyful for the season.
Love making your Christmas decor? Me too! In recent years it’s been one of the highlights of my holiday season. I have an entire post dedicated to all my favorite handmade Christmas decor that I’m sure you’ll love.
Materials
Let’s get into the materials list. Here is what you will need to make this Vintage Ornament Wall Decor Tree.
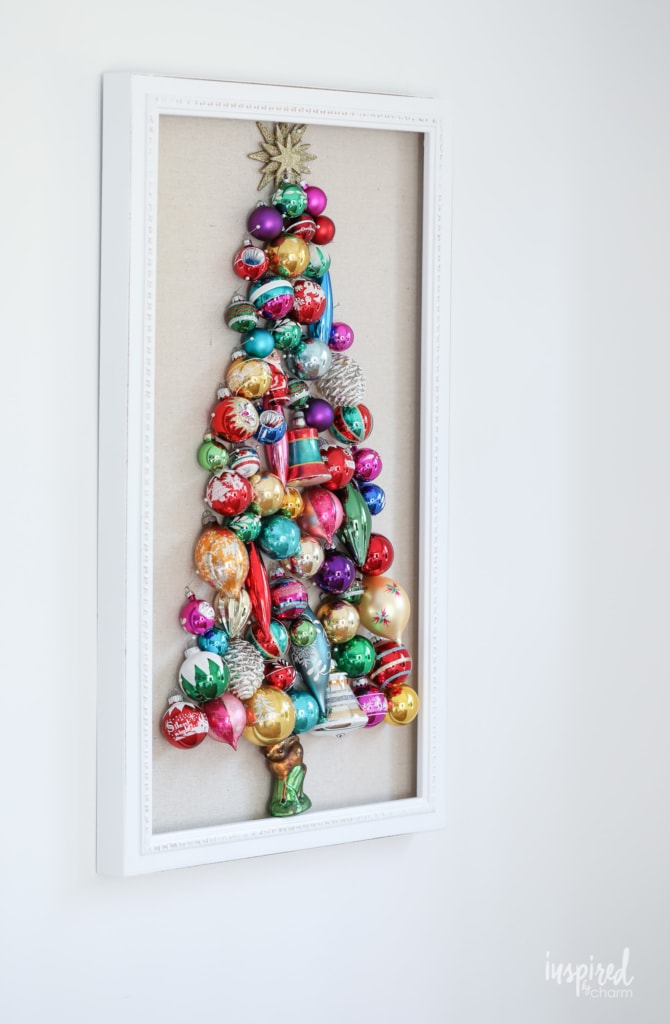
- Bulletin board – A simple bulletin board serves as the base for your ornament tree. Choose one that fits the space you plan to hang it in—mine measures about 18×30 inches, which worked perfectly for a medium-sized display.
- Ornaments – Gather a collection of small and medium ornaments in a mix of colors, finishes, and shapes. Vintage ornaments add extra charm and nostalgia, but modern ones will work beautifully too.
- Pearl top straight pins – These pins will hold your ornaments securely to the bulletin board. They’re easy to work with and allow you to rearrange ornaments as needed before committing to your final design.
- Star topper ornament – A glittery star or unique ornament at the top of your tree gives it a finished, festive look. Choose one that feels special—it’ll be the crowning touch.
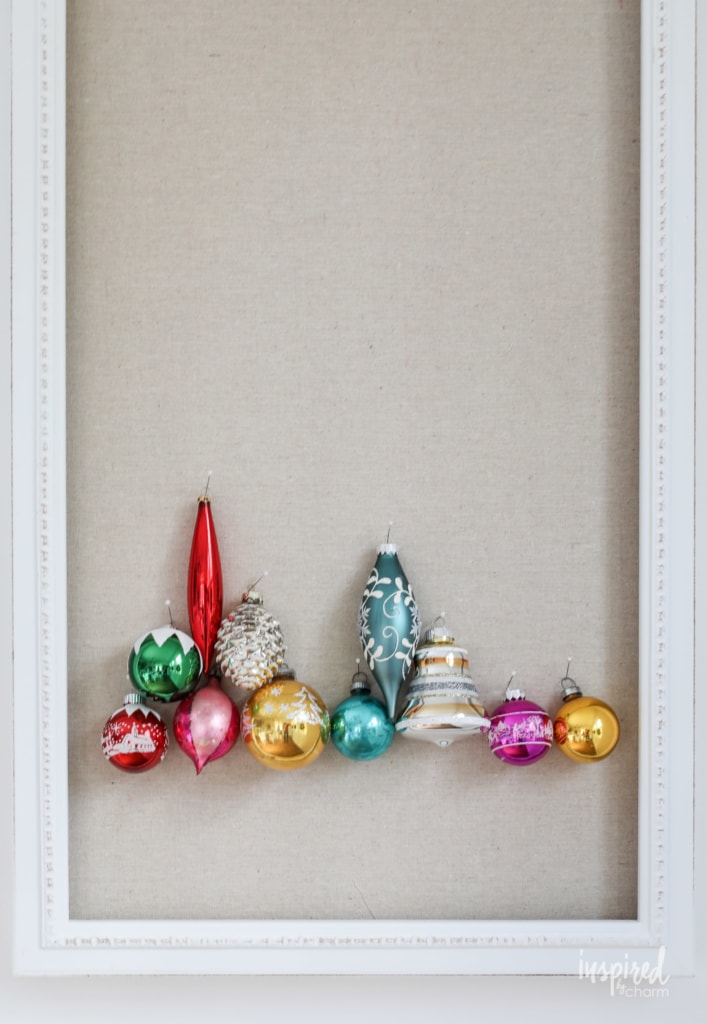
- Specialty ornaments for the “trunk” – Use one or two distinctive ornaments at the bottom of the tree to create a “trunk.” This adds personality and helps anchor the overall design.
How to Make
Okay, are you ready to make these fun project? Let’s do it! I’ll still take you through the steps below. I’ve also provided a list of materials and detailed instructions in the printable how-to card below.
- Begin by hanging your bulletin board on the wall.

- Next, start at the bottom of your tree shape. (Don’t forget to leave room for a “trunk”.) Add an ornament and secure it in place with a pin. Continue across the bottom row, adding ornaments to fill the entire row.
- Move up to the next row and continue adding ornaments to fit. Continue this method, going up the bulletin board. As you move up, your rows should get shorter and shorter to form a tree shape. (You can make this a more permanent decor project by hot gluing the ornaments to the bulletin board.)
💌 SAVE THIS POST / RECIPE!


- If you’re using a variety of sizes and shapes of ornaments, it may take a bit of trial and error to figure out which ornaments fit best where.
- Finish off the top of the tree with a star ornament and use one or more uniquely shaped ornaments for the trunk.
And with that, your DIY Vintage Ornament Wall Tree is complete!
Frequently Asked Questions
What’s the best way to plan the layout before pinning?
Tape a simple tree outline with painter’s tape, then place your largest or most special ornaments first. Step back, snap a quick photo, and adjust color balance and spacing before you start pinning.
How should I store everything after the holidays?
Take a reference photo, then remove ornaments and pack each in tissue or divided boxes. If you plan to recreate the same design next year, keep the board and pins intact, wrap it in fabric, and store it flat in a cool, dry place.
Where can I find affordable vintage ornaments, and how many will I need?
Check thrift stores, estate sales, flea markets, and online lots during the off season for the best prices. Mix a handful of true vintage pieces with modern fillers so you get the look without the cost, and plan on roughly 60 to 80 ornaments for a medium display.


More Handmade Christmas Ideas You’ll Love
- DIY Christmas Cookie Bags
- Rainbow Ornament Wreath
- Cookie Cutter Wreath
- Colorful Wood Christmas Trees
- Homemade Hot Cocoa Mix
- DIY Wood Stockings
Isn’t this a great piece for this space? I love that it adds a little sparkle and a bold pop of color. Plus, since it’s mostly comprised of vintage ornaments, there’s a touch of nostalgia.
I hope you enjoyed this easy DIY Vintage Ornament Wall Tree. With a few simple modifications, this would even be a fun craft activity for a holiday get-together with friends. If you try this festive project I’d love to hear what you think. Please stop back and leave a comment and a 5-star rating below. I’d appreciate it!
Want more from Inspired by Charm? Join the IBC Mailing List for inspiration in your inbox! Follow along on Instagram and TikTok for daily updates and behind-the-scenes looks at my processes. There’s even more inspiration on Facebook and Pinterest!

DIY Vintage Ornament Wall Decor Tree
Ingredients
- bulletin board Mine is 18×30-inches.
- ornaments I used about 65 small- and medium-size ornaments.
- pearl top straight pins
Instructions
- Begin by hanging your bulletin board on the wall.
- Next, start at the bottom of your tree shape. (Don’t forget to leave room for a “trunk”.) Add an ornament and secure it in place with a pin. Continue across the bottom row, adding ornaments to fill the entire row.
- Move up to the next row and continue adding ornaments to fit. Continue this method, going up the bulletin board. As you move up, your rows should get shorter and shorter to form a tree shape. (You can make this a more permanent decor project by hot gluing the ornaments to the bulletin board.) If you’re using a variety of sizes and shapes of ornaments, it may take a bit of trial and error to figure out which ornaments fit best where.
- Finish off the top of the tree with a star ornament and use one or more uniquely shaped ornaments for the trunk.
- And with that, your DIY Vintage Ornament Wall Tree is complete!
Oh thank you! This is beautiful! I always forget to get out grandmas vintage ornaments that I love so much. What a great way to display them as the special things they are to me! Love this!
Thank you!!
xo Michael
Unbelievably beautiful! I love it all, but that “tree” bottom ornament is just crazy perfect.
This is a fantastic idea! You are such an inspiration, Michael!
Adore this! I was wondering how/where you store it…..or do you dismantle it afterward?
I love all of your finds. It makes me want to go in the rain to Goodwill today. Thanks.
Love this! It turned out so cute… Idea for next year. Now to remember after x-mas to go looking for some ornaments like this.
Merry Christmas Michael!
Sandy
This is a darling idea! Michael you are such an inspiration!
That is a crazy cute tree!! Love the trunk. I usually read then re-read your posts at another time because I’m so busy. That’s turned into several great “more detail” adventures for me! I think I need an Inspired By Charm Pinterest board.
It is so perfect for the space! All the colors pop with the white background, I love your collection of antique ornaments, such a wonderful way to display them. Thank you for the step by step tutorial once again, sharing your unique talents of the season with us!
I love the fullness of your tree – how it just fits in the frame. The placement of the ornaments looks bountiful and not too precise or over-planned – like a real Christmas tree. What an eye-catching piece!
This is beautiful! It has set my mind to thinking about maybe creating other shapes like either round or vintage ornament shape. Or how about all one color (like green!) still in the tree shape. Or ombre (ode to your ombre tree)! Thank you for all the inspiration!
wowzers! and i thought the wreath was gorgeous …this tree is by far one of the prettiest DIY projects! and those ornaments! throws me back to all my mom’s vintage ornaments —- LOVE THIS SO MUCH! your dining room is complete for the holidays! I hope you are entertaining so everyone gets to enjoy all you have done this year on your gorgeous house! FA LA LA LA!!!
Beautiful, but I think it needs a bit more space between the tree and the frame. It looks a little crowded and a bigger frame would work well on that wall.
Stunning!
Love it!! Thanks for the great idea! Now I know what to do with all the ornaments I inherited.
How cute is that deer tree trunk! I’ve seen similar projects but none so simple to make and impactful because of the lovely frame. Another great Christmas idea.
Thank you so much, Amy!!
xo Michael
Michael this is amazing! I love everything!
Thank you!!
xo Michael
Oh my great granny! This is so neat. I love it even better that it’s done with pins as opposed to hot gluing because it can be redone countless ways for different effects. I’m also thinking that a sheet of thick foam core covered with a sumptuous fabric would be a good backdop as well. Thank you!
Yes. That’s why I chose not to glue. And you could totally DIY your bulletin board.
xo Michael