Chocolate Skull Cake
This Post May Contain Affiliate Links. Please Read Our Disclosure Policy
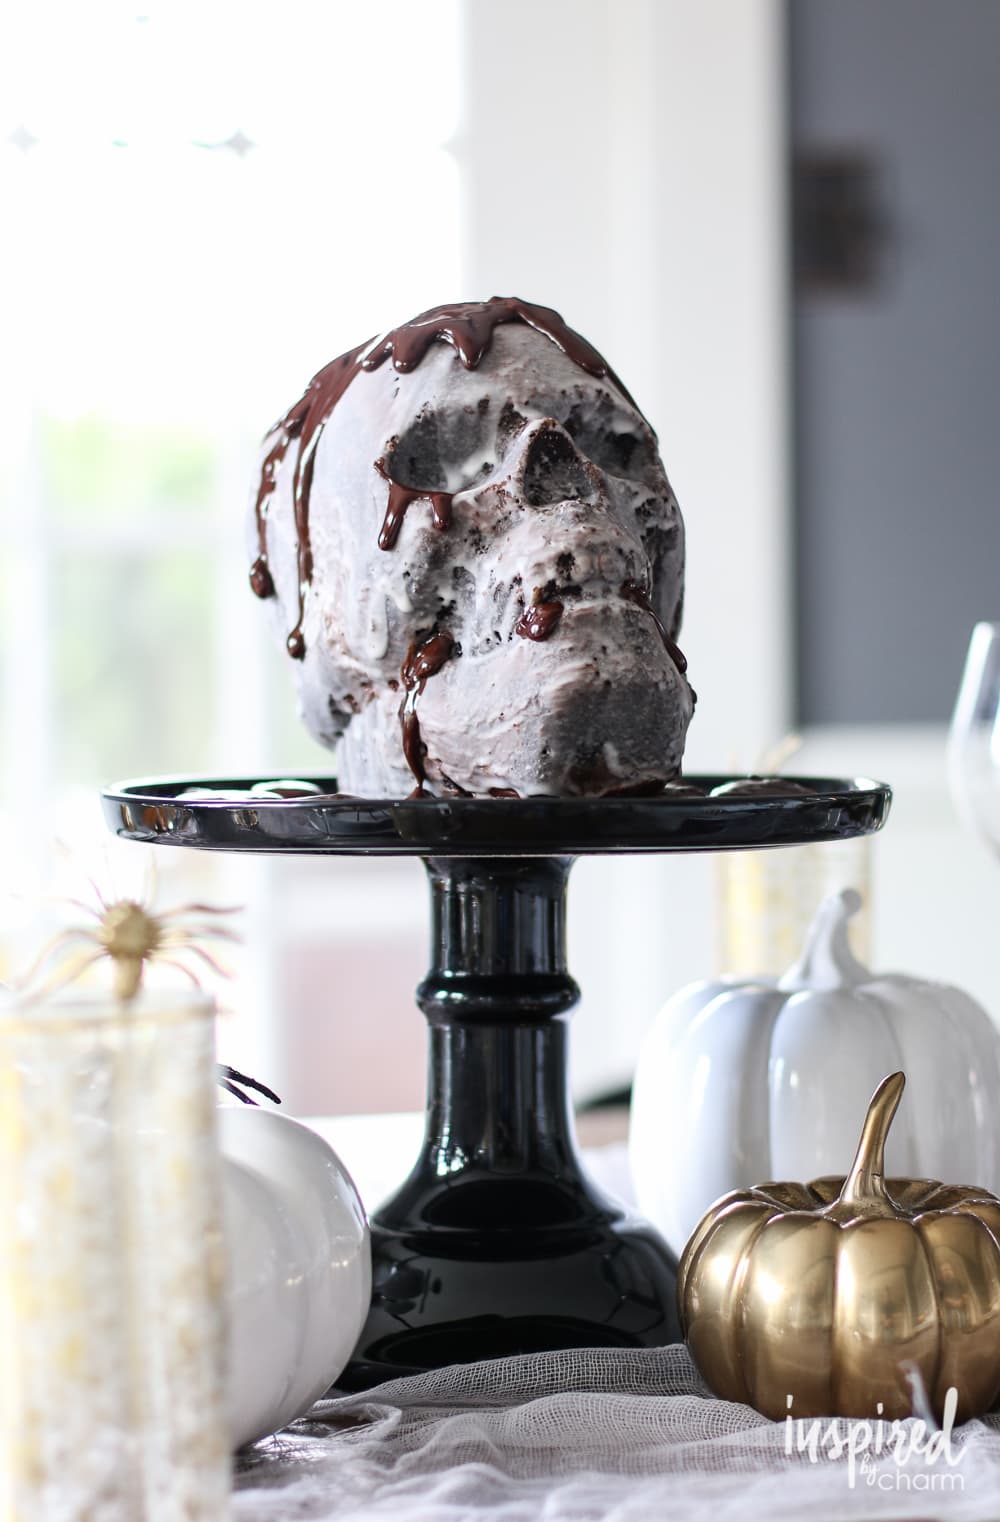
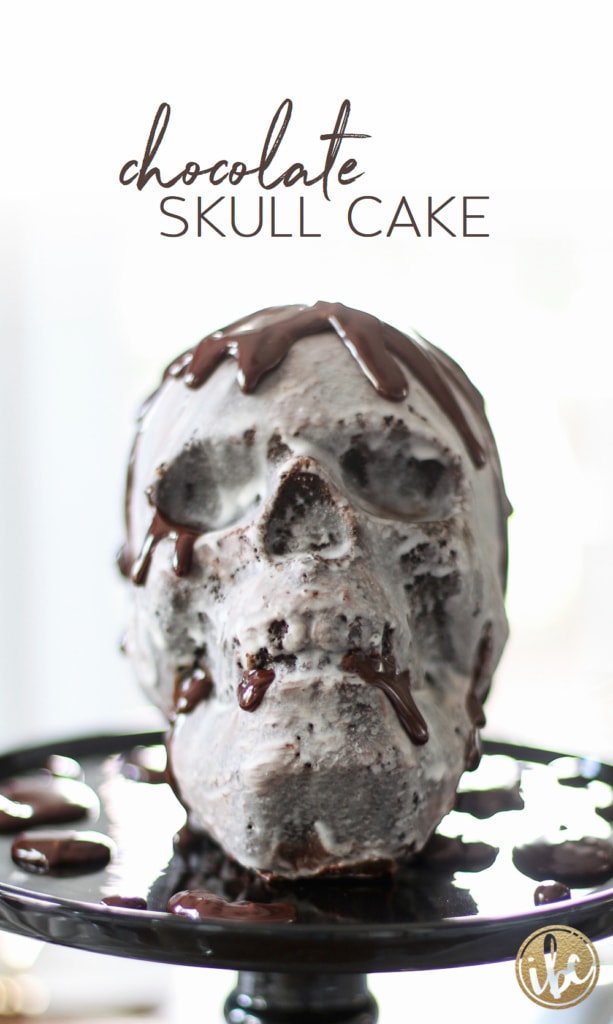
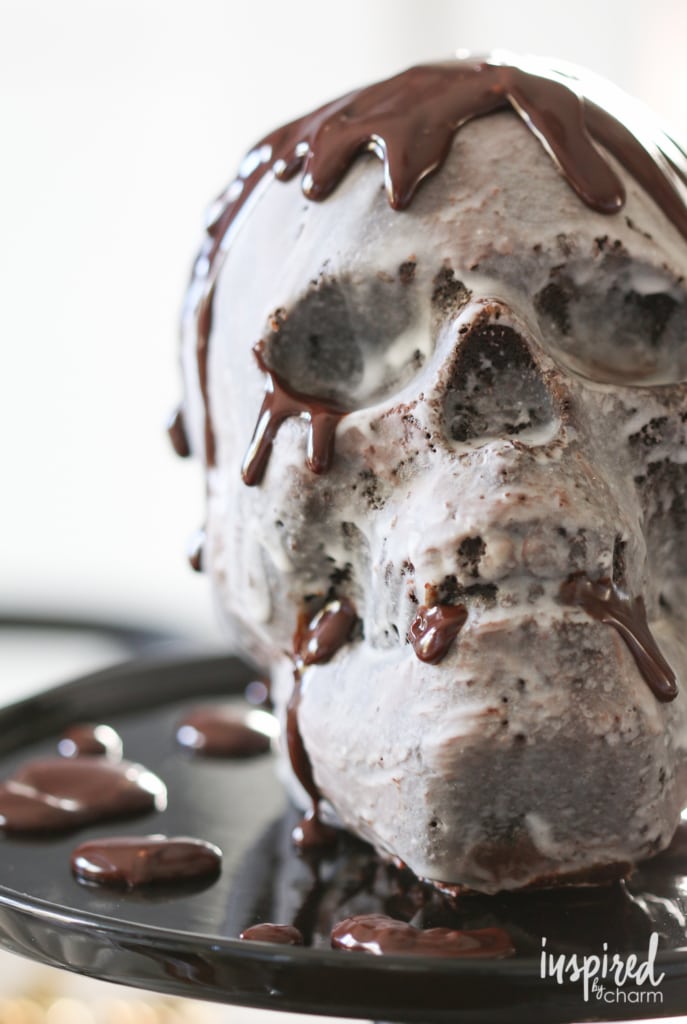
This Chocolate Skull Cake is the ultimate Halloween dessert! With a rich, chocolatey flavor and spooky skull shape, it’s the perfect treat to impress your guests. Follow this step-by-step recipe to create a moist and delicious cake that’s ideal for any Halloween party or celebration. You’ll be amazed at how easy it is to make this festive and frightfully fun dessert.
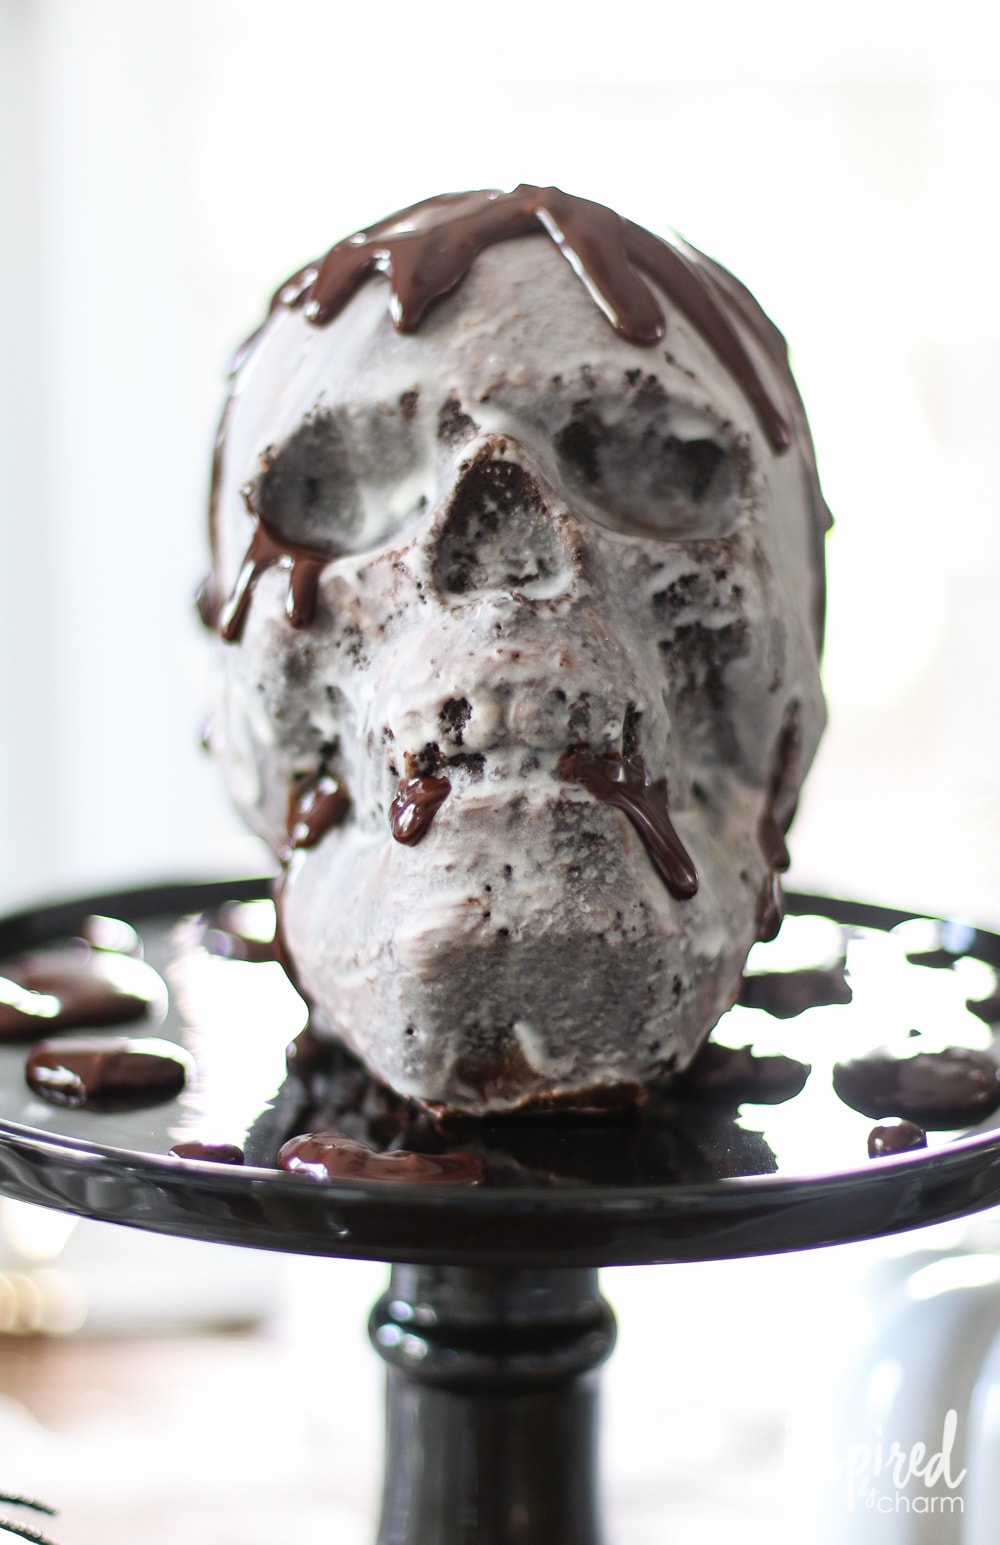
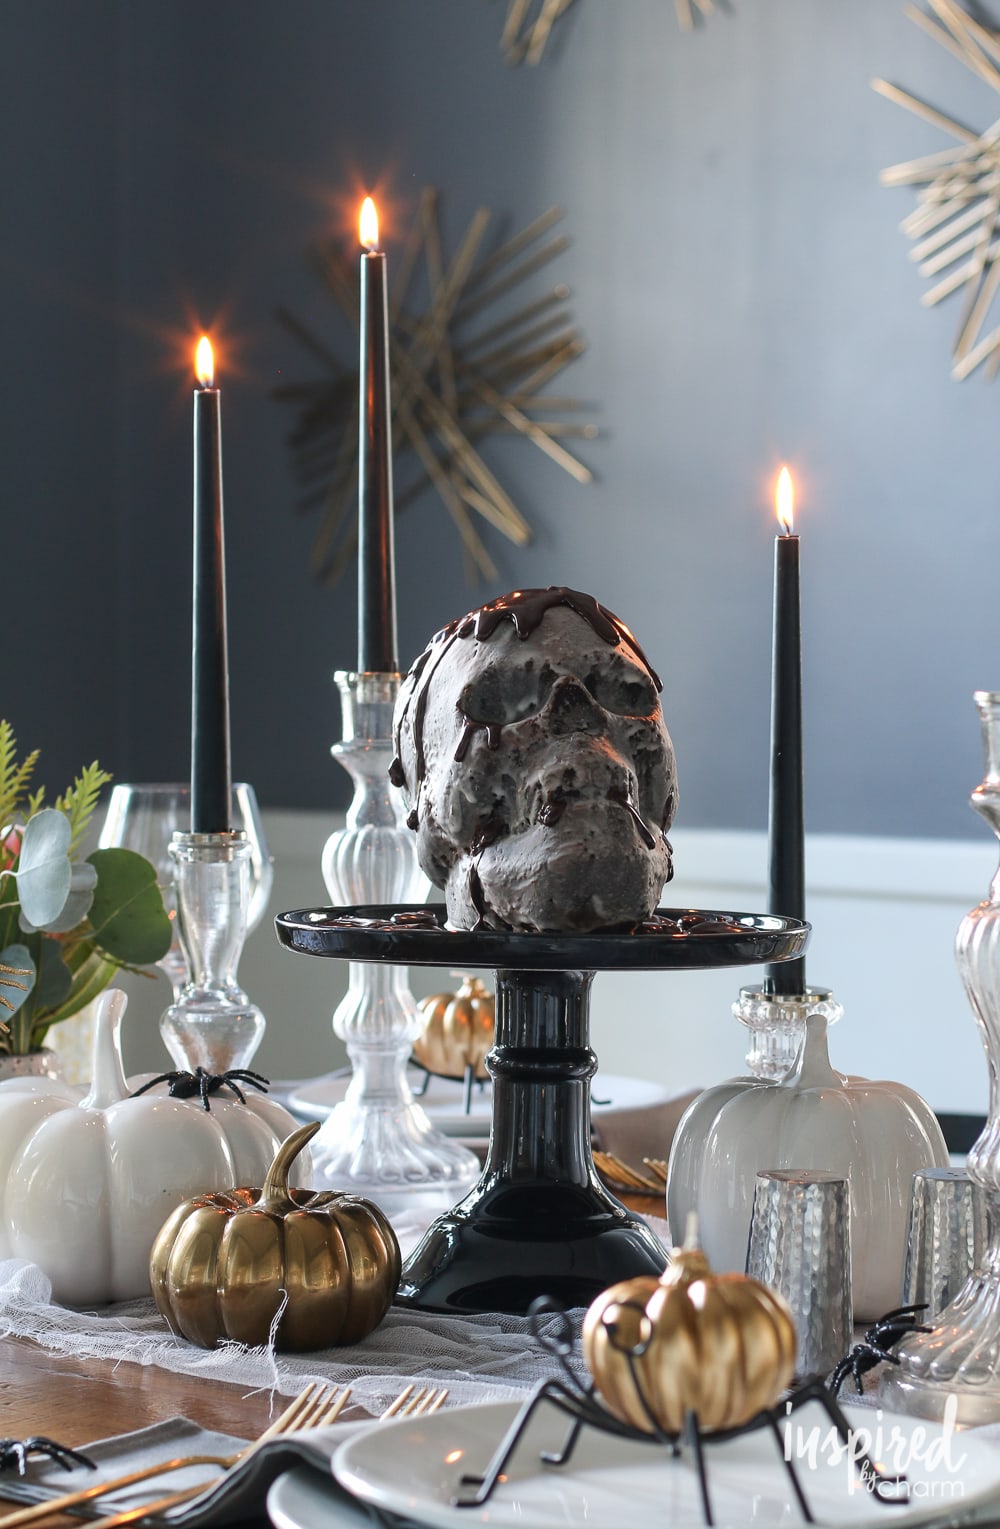
Halloween is creeping up, and if you’re looking for a dessert that’s a real thriller, this Chocolate Skull Cake will haunt your taste buds—in a good way! It’s not just a treat for the eyes; the rich, chocolatey flavor will have everyone under your spell. The skull-shaped cake adds the perfect dose of spooky charm to your holiday table, and while it may look like it came from the witch’s kitchen, it’s actually easy enough for anyone to make. This is one dessert that’ll definitely put a spell on you.
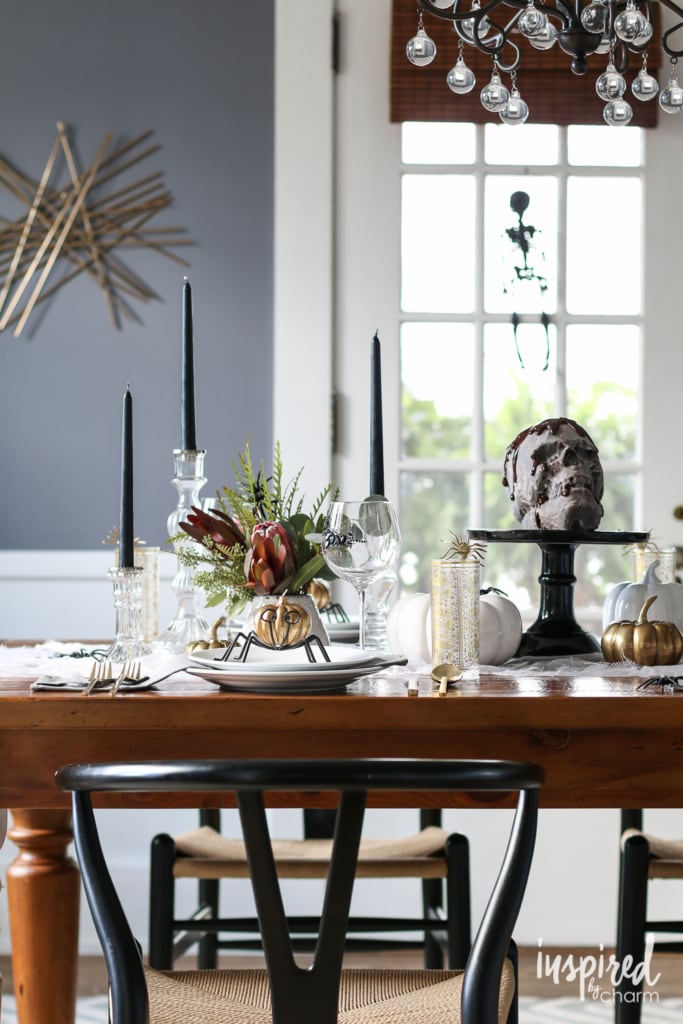
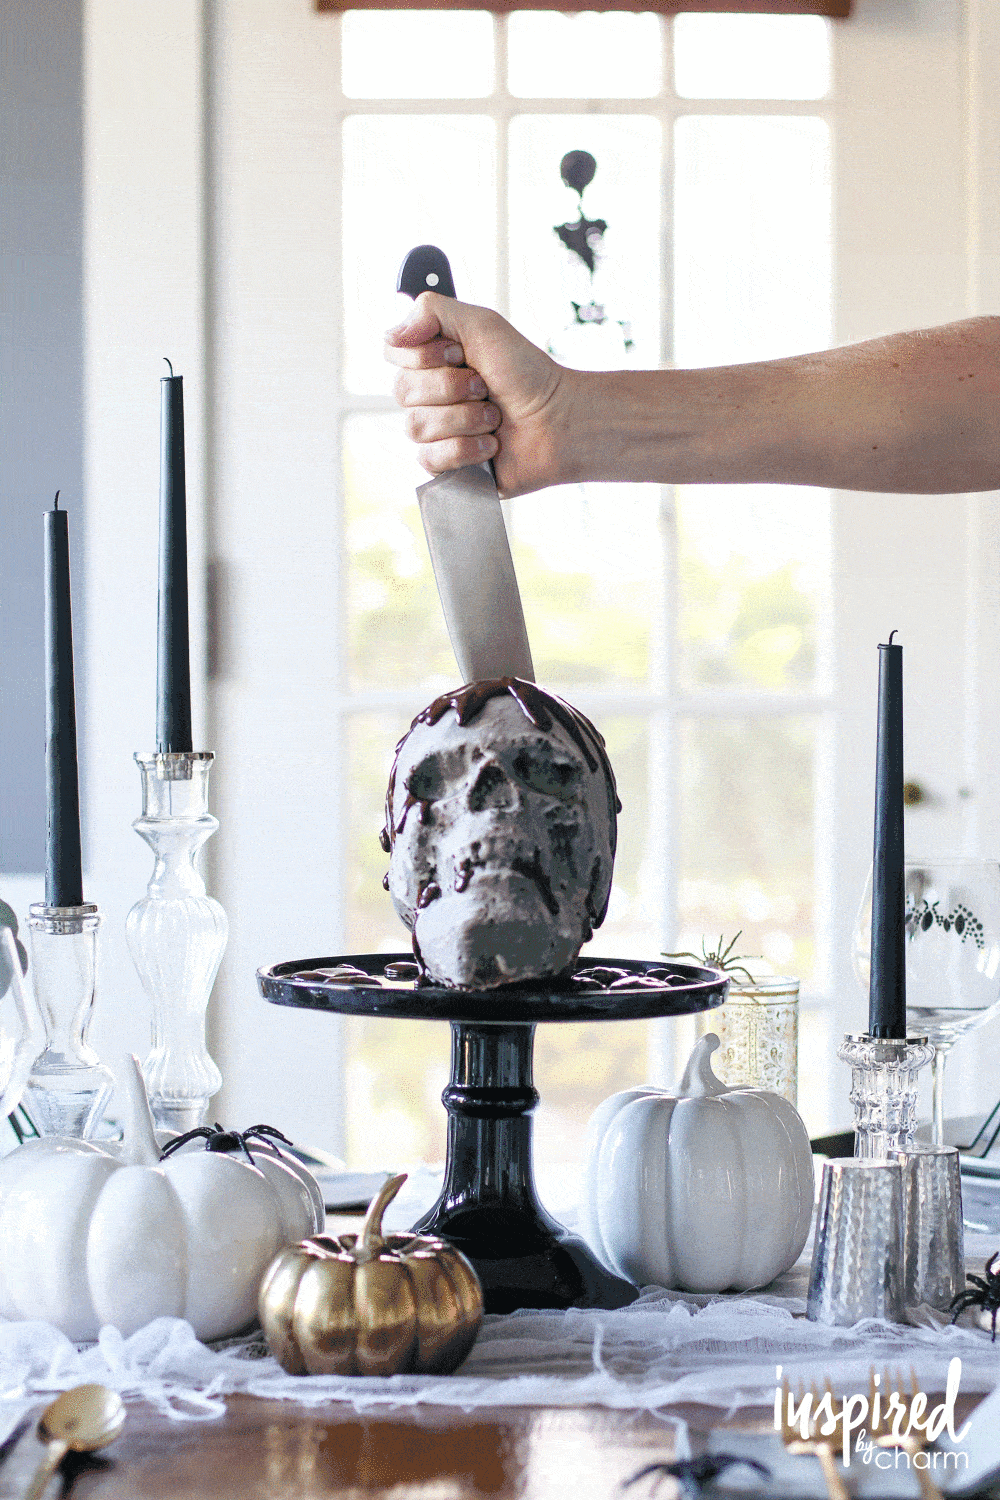
Last week I was so thrilled to share my haunted Halloween table with you. You may have noticed the centerpiece: a very eerie but totally delicious Chocolate Skull Cake. Today I want to show you how to make that Skull Cake. Let’s get going.
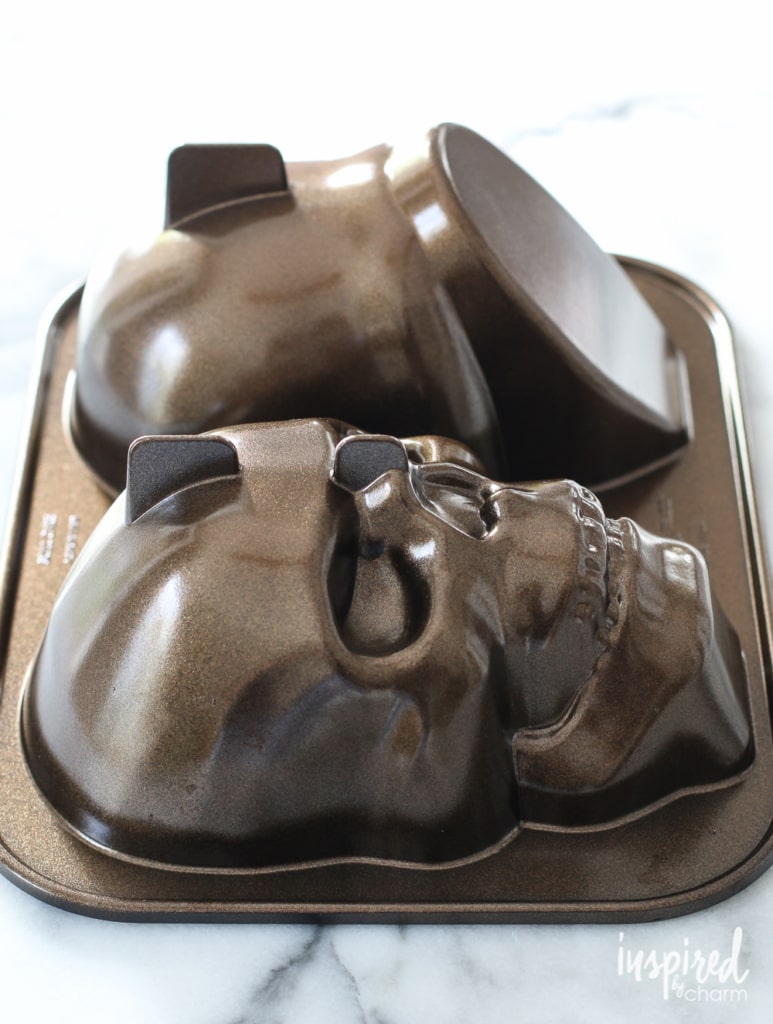
As I mentioned, the idea for this cake came from a skull cake pan I found out shopping. As soon as I spotted it, I knew it would be the crowning jewel in my tablescape.
Oh, and if you need some beautiful recipe cards to jot down the recipe, you can get my free printable Halloween Recipe Cards. They are so fun!
Why You’ll Love This Recipe
- This cake is a showstopper for any Halloween celebration. The detailed skull shape adds a spooky touch that’s sure to impress your guests, while the rich chocolate flavor delivers on both taste and appearance. It’s the kind of dessert that makes your party extra memorable.
- Despite its intricate look, this cake is easier to make than you might think. The step-by-step instructions guide you through each stage, ensuring that even if you’re new to baking, you can still achieve stunning results. It’s a fun challenge that’s worth the effort.
- The recipe offers versatility for creative decoration. Whether you want a classic look with a powdered sugar glaze or prefer to drizzle extra chocolate for a more dramatic effect, you can customize it to fit your Halloween vibe. It’s a chance to get a little crafty in the kitchen.
- The combination of moist chocolate cake and luscious glaze creates a satisfying treat that’s rich but not overly sweet. It’s the perfect balance, making each bite indulgent without being overwhelming.
Looking for more halloween treats? I have them! Check out this collection of my best Spooktacular Halloween Snacks and Recipes!
Ingredients
Before we can make this cake we will need to gather up a few ingredients. Let me walk you through the full list.
- Unsalted butter – Provides rich flavor and moisture, making the cake tender and delicious.
- Dark chocolate cocoa powder – Adds a deep, intense chocolate flavor that gives the cake its signature taste.
- Salt – Balances the sweetness and enhances the overall flavor profile of the cake.
- Water – Helps to combine the dry ingredients and creates a smooth cake batter.
- All-purpose flour – The base of the cake, giving it structure while keeping it soft and moist.
- Granulated sugar – Sweetens the cake and helps achieve a tender crumb.
- Baking soda – A leavening agent that helps the cake rise just enough for a perfect texture.
- Eggs – Add richness and moisture while binding the ingredients together.
- Sour cream – Adds moisture and a subtle tang, keeping the cake incredibly moist.
- Vanilla extract – Enhances the chocolate flavor with a hint of warmth and sweetness.
- Bittersweet chocolate – Used for the glaze, it brings a slightly more intense chocolate flavor.
- Corn syrup – Adds a bit of shine to the glaze and helps it stay smooth.
- Heavy cream – Makes the glaze rich and luscious, perfect for drizzling over the cake.
- Confectioners’ sugar – Used in both glazes, it helps create a smooth texture.
- Milk – Thins the powdered sugar glaze, making it easy to brush over the cake.
- Clear vanilla extract – Adds a touch of sweetness to the powdered sugar glaze without adding color.
How to Make
Ready to get this skull cake in the oven? I’ll walk you through the steps below. For your convenience, I’ve also provided a full ingredient list and detailed instructions in the printable recipe card below.
- Begin by preheating your oven to 350 degrees F. Butter and flour your skull cake pan and set aside.
- In a small sauce pan, heat the butter, cocoa powder, salt, and water over medium heat. Cook and stir just until melted and evenly combined. Remove from heat and set aside.
- In a large bowl, whisk together the flour, sugar, and baking soda to combine. Add half of the melted butter mixture and whisk until blended. The mixture will be thick. Add the remaining butter mixture and whisk to combine. Add the eggs, one at a time, whisking in between until completely blended. Finally, mix in the sour cream and vanilla until smooth.
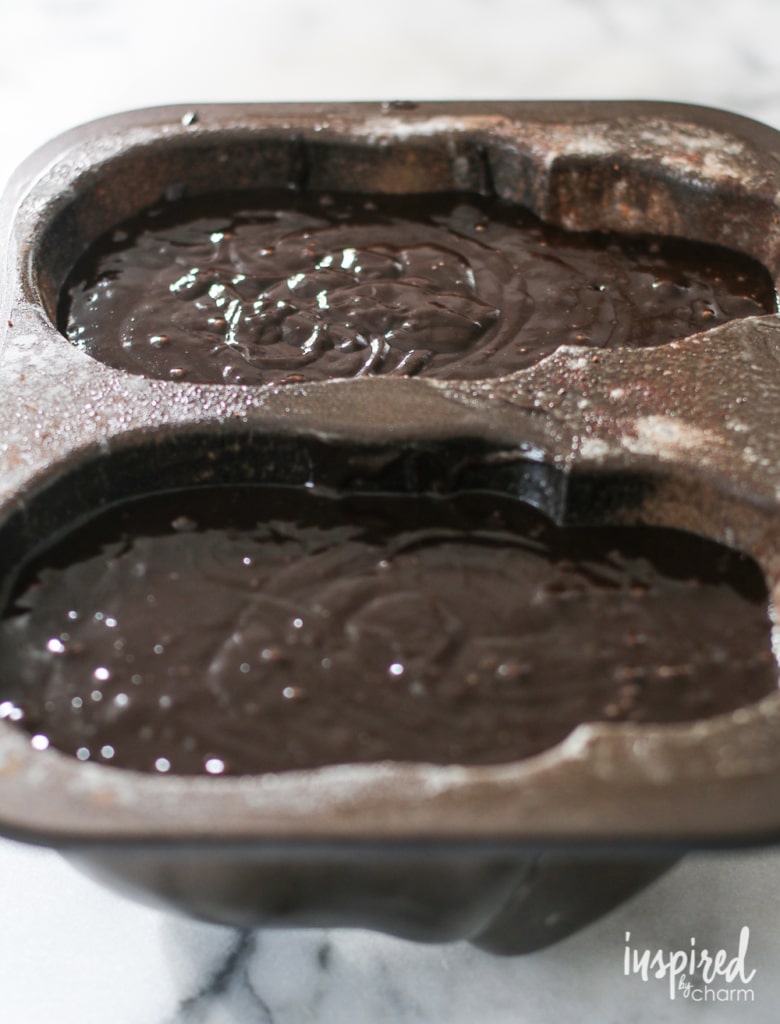
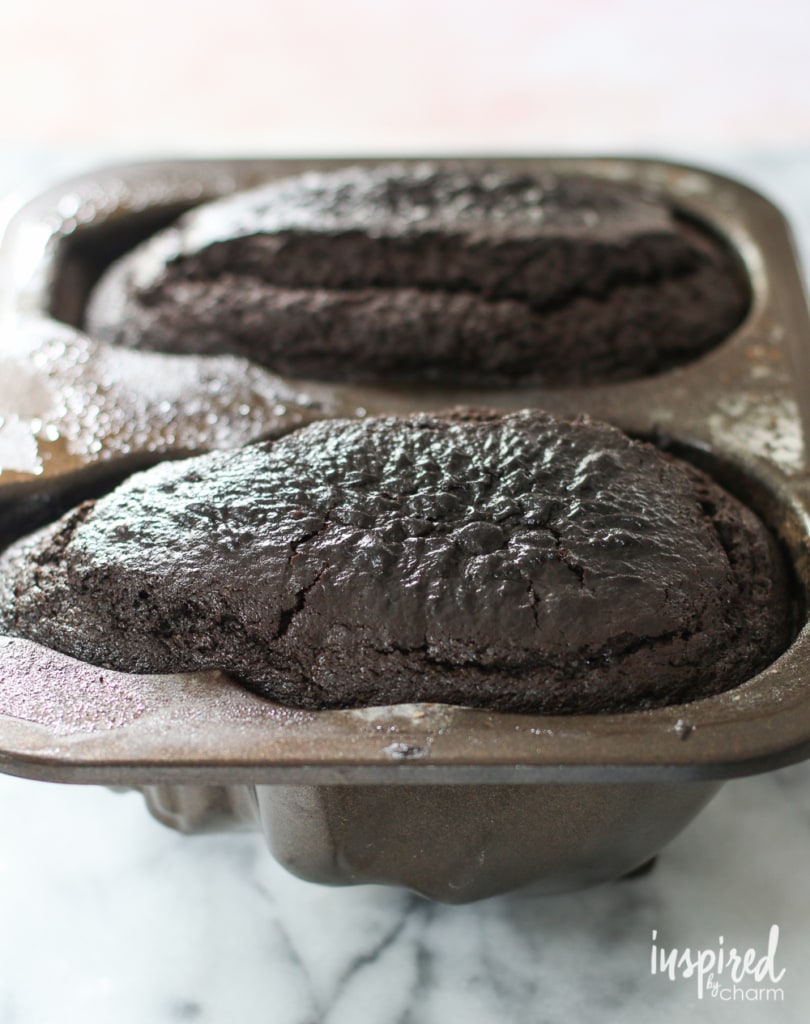
- Add the batter to the prepared pan, filling each side to about 90% full. (You may have a little extra batter.) Bake until a wood skewer inserted near the center comes out clean (45 to 50 minutes). Let the cake cool completely in the pan.
- While the cake cools, prepare the chocolate glaze. To a large bowl, add the chocolate and corn syrup. Set aside. In a small sauce pan, combine the heavy cream and granulated sugar. Stir over medium heat until the cream is hot and the sugar is dissolved. Pour the hot cream over the chocolate and whisk until smooth.
- In a small bowl, whisk together 1 cup of the prepared chocolate glaze with 1/2 cup confectioners’ sugar until combined.
- In another bowl, prepare the powdered sugar glaze by whisking together the confectioners’ sugar, milk, and vanilla until smooth. For a thinner glaze, use additional milk.
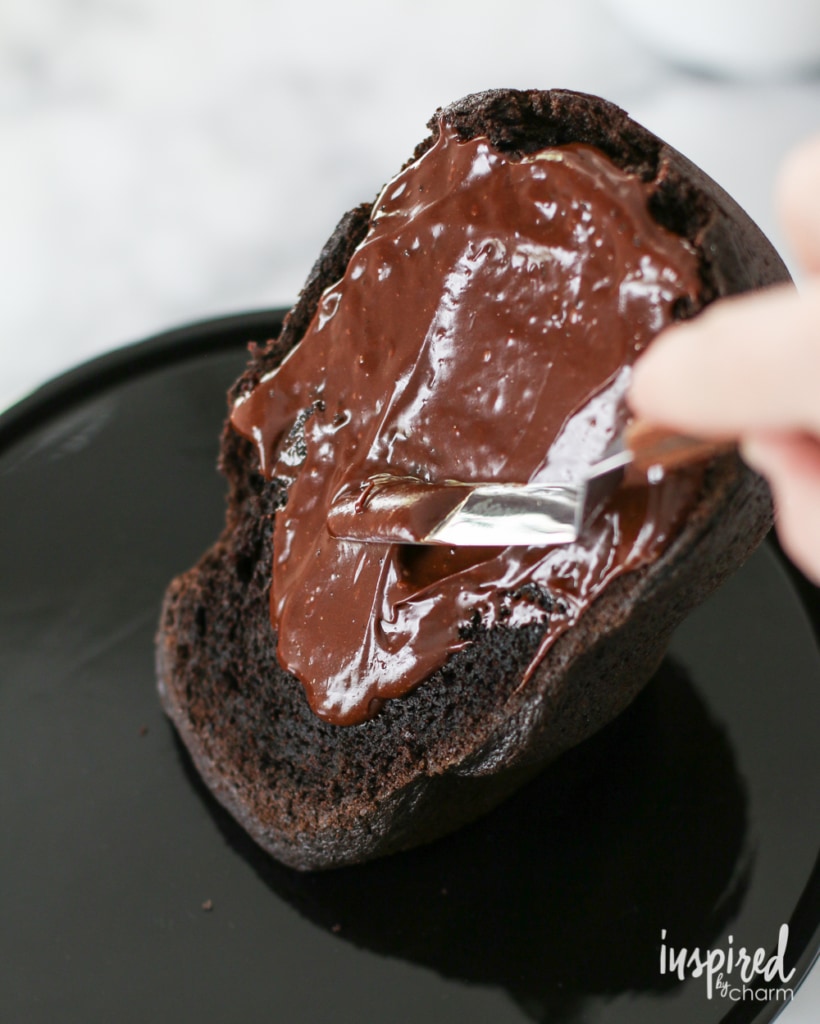
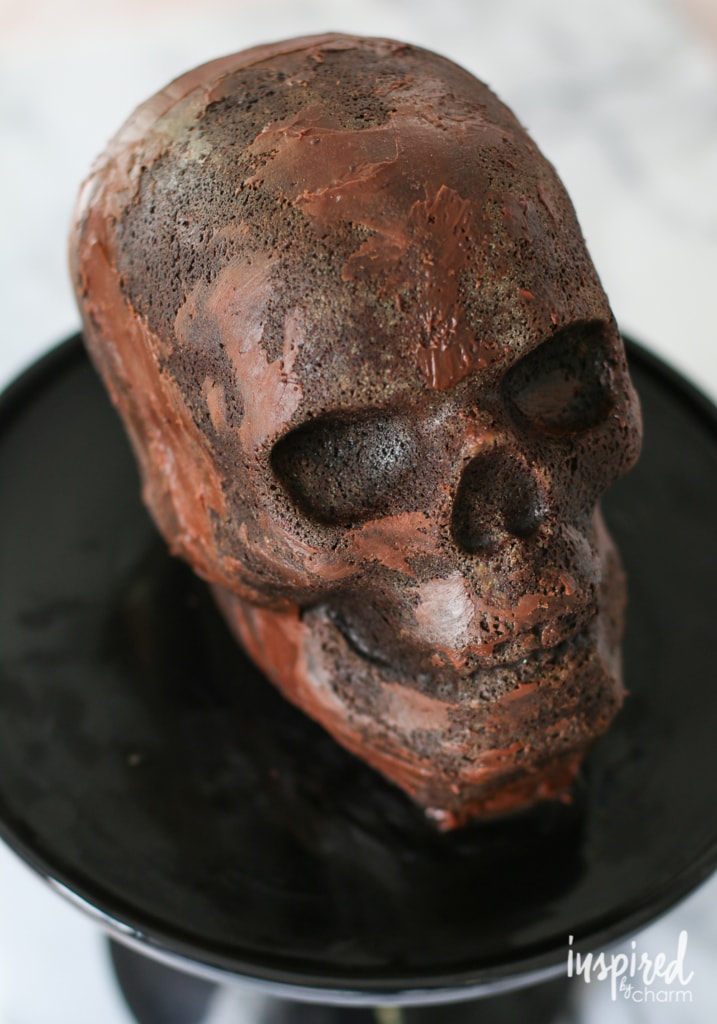
- Once the cake is cooled, trim off any cake that has domed above the top of the pan with a serrated knife to create a flat surface on each piece of cake. Use the chocolate glaze mixed with the confectioners sugar to sandwich the two cake halves together. Fill in any cracks with extra glaze. Refrigerate for about 30 minutes.
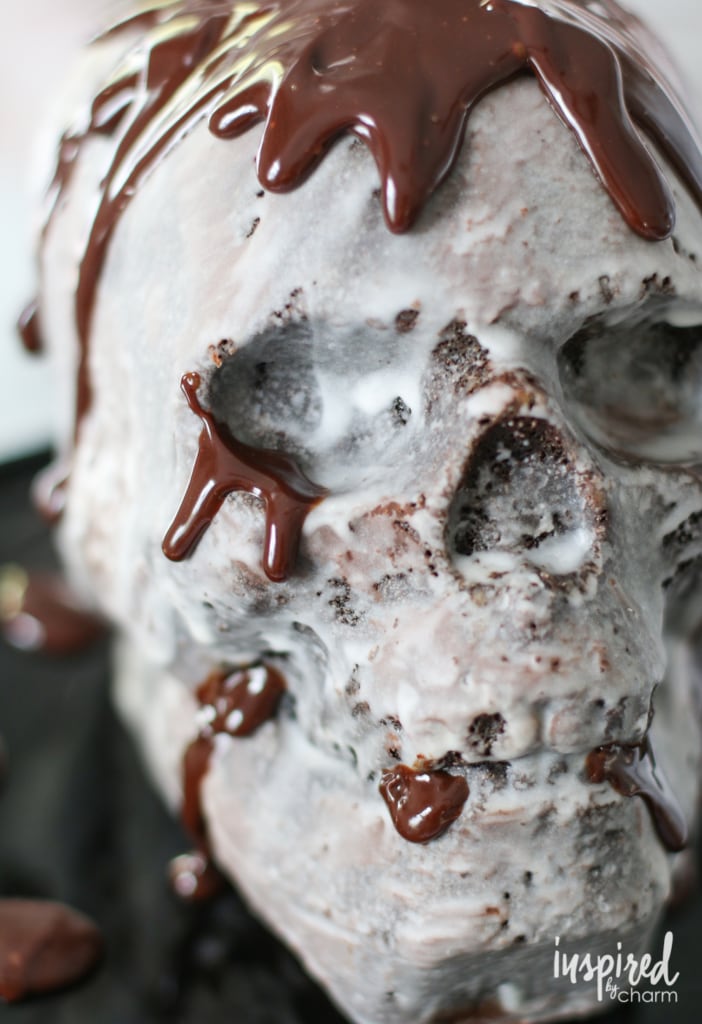
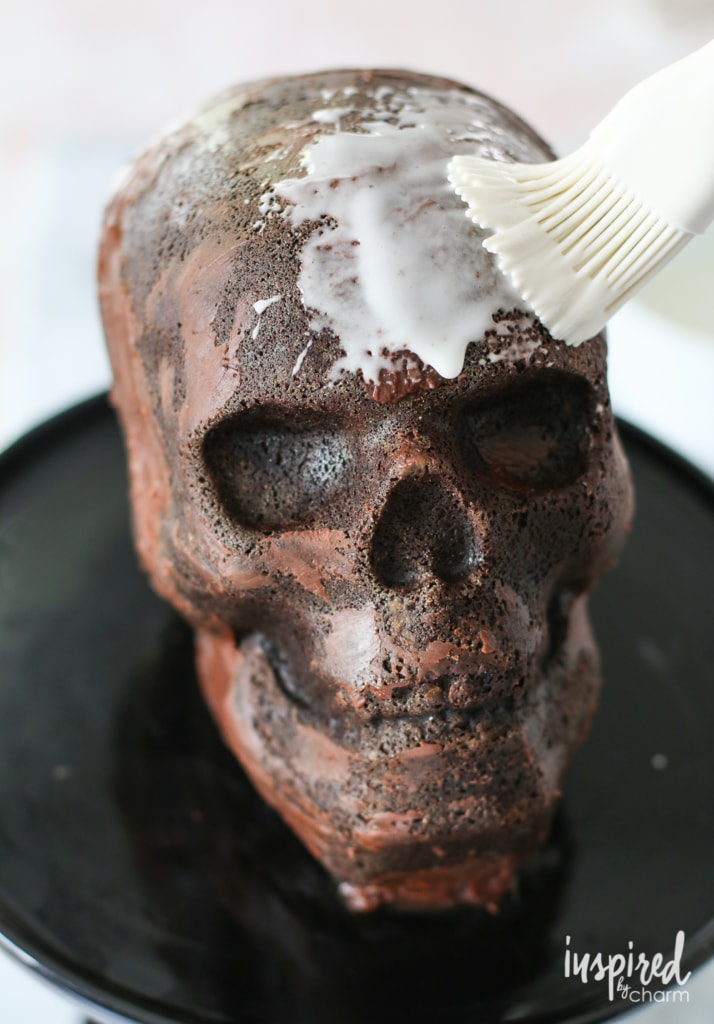
- Place the cake on a baking rack that’s on top of a baking sheet. Use a pasty brush to apply the powdered sugar glaze. Allow any excess glaze to drip off onto the baking sheet.

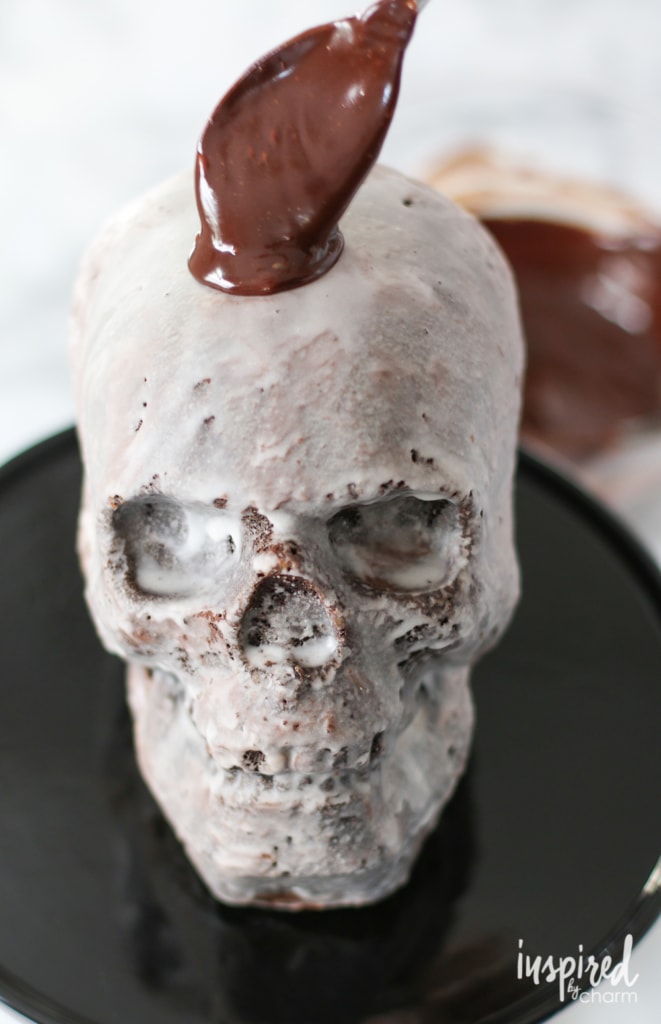
- Move the cake to a cake stand or serving platter. Drizzle with some of the chocolate glaze. Serve the cake with any additional chocolate glaze in a bowl on the side.
💌 SAVE THIS POST / RECIPE!
If you dare to give it a try, I hope it becomes a new Halloween tradition in your home. It’s a great way to add some boo-tiful fun to the kitchen, and who knows? You might just conjure up some new fans with this spooky delight. I’d love to hear how it turned out for you—witching you a spooktacular time baking!
Frequently Asked Questions
Can I use a different type of pan if I don’t have a skull cake pan?
Absolutely! While the skull-shaped pan adds a spooky touch, you can make this cake in a standard Bundt pan, loaf pan, or even as cupcakes. Just keep in mind that the baking time may vary depending on the pan you choose, so be sure to check for doneness with a toothpick or cake tester.
How do I prevent the cake from sticking to the skull pan?
To ensure the cake releases easily, thoroughly butter and flour the pan, making sure to get into all the crevices of the skull shape. You can also use a baking spray that contains flour for extra insurance. Let the cake cool in the pan for about 10-15 minutes before carefully turning it out onto a cooling rack.
Can I make this cake ahead of time?
Yes, this cake can be made 1-2 days in advance. To keep it fresh, store it in an airtight container in the refrigerator. For the best presentation, wait to apply the final chocolate and powdered sugar glazes until just before serving.
Can I add flavor variations to the chocolate cake?
Definitely! You can mix in a teaspoon of espresso powder for a deeper chocolate flavor, or add a splash of flavored extract like almond or orange to complement the chocolate. If you’d like a little crunch, stirring in some finely chopped nuts or chocolate chips could be a tasty addition.

Oh, and if you like this skull cake recipe, you’ll really dig my chocolate tombstones snack cakes. You can see those here.
I hope you enjoyed this Halloween dessert idea. As always, if you give it a try this All Hallows’ Eve, please let us know. In case you missed my Haunted Halloween Table, you can check that out here.
More Haunted Halloween Recipes You’ll Love
- Tombstone Snack Cakes
- Ghost Cupcakes
- Halloween Cocktails
- Sweet and Salty Fall Snack Mix
- Creamy Pumpkin Dip
- Pumpkin Shaped Mini Cheese Balls
- Halloween Pretzels
- Vampire’s Kiss Halloween Shot
And there you have it—this Chocolate Skull Cake is to die for! It’s spooky, scrumptious, and just the right amount of wicked for your Halloween celebrations. If you make them, please stop back and leave a comment and a 5-star rating below.
Want more from Inspired by Charm? Join the IBC Mailing List for inspiration in your inbox! Follow along on Instagram and TikTok for daily updates and behind-the-scenes looks at my processes. There’s even more inspiration on Facebook and Pinterest!
Chocolate Skull Cake
Ingredients
- 1 1/2 cups unsalted butter
- 2/3 cup dark chocolate cocoa powder
- 1 teaspoon salt
- 1 1/2 cups water
- 3 cups all-purpose flour
- 2 1/2 cups granulated sugar
- 2 teaspoons baking soda
- 3 large eggs
- 3/4 cup sour cream
- 1 teaspoon vanilla extract
Chocolate Glaze:
- 8 ounces bittersweet chocolate finely chopped
- 3 tablespoons corn syrup
- 3/4 cup heavy cream
- 3 tablespoons granulated sugar
- 1/4 cup confectioners’ sugar
Powdered Sugar Glaze:
- 1 1/2 cups confectioners’ sugar
- 3 tablespoons milk
- 1/2 teaspoon clear vanilla extract
Instructions
- Begin by preheating your oven to 350 degrees F. Butter and flour your skull cake pan and set aside.
- In a small sauce pan, heat the butter, cocoa powder, salt, and water over medium heat. Cook and stir just until melted and evenly combined. Remove from heat and set aside.
- In a large bowl, whisk together the flour, sugar, and baking soda to combine. Add half of the melted butter mixture and whisk until blended. The mixture will be thick. Add the remaining butter mixture and whisk to combine. Add the eggs, one at a time, whisking in between until completely blended. Finally, mix in the sour cream and vanilla until smooth.
- Add the batter to the prepared pan, filling each side to about 90% full. (You may have a little extra batter.) Bake until a wood skewer inserted near the center comes out clean (45 to 50 minutes). Let the cake cool completely in the pan.
- While the cake cools, prepare the chocolate glaze. To a large bowl, add the chocolate and corn syrup. Set aside. In a small sauce pan, combine the heavy cream and granulated sugar. Stir over medium heat until the cream is hot and the sugar is dissolved. Pour the hot cream over the chocolate and whisk until smooth.
- In a small bowl, whisk together 1 cup of the prepared chocolate glaze with 1/2 cup confectioners’ sugar until combined.
- In another bowl, prepare the powdered sugar glaze by whisking together the confectioners’ sugar, milk, and vanilla until smooth. For a thinner glaze, use additional milk.
- Once the cake is cooled, trim off any cake that has domed above the top of the pan with a serrated knife to create a flat surface on each piece of cake. Use the chocolate glaze mixed with the confectioners sugar to sandwich the two cake halves together. Fill in any cracks with extra glaze. Refrigerate for about 30 minutes.
- Place the cake on a baking rack that’s on top of a baking sheet. Use a pasty brush to apply the powdered sugar glaze. Allow any excess glaze to drip off onto the baking sheet.
- Move the cake to a cake stand or serving platter. Drizzle with some of the chocolate glaze. Serve the cake with any additional chocolate glaze in a bowl on the side.
the cake came out perfect and was loved by many. i skipped sugar glaze and it looked still spooky. I did use dutch process cocoa since it was not clear on the recipe and I looked up original recipe this was based on and linked to. I also used silicon mould from Joann.
So glad it worked out for you! Thanks!
xo Michael
Can’t wait to make this! Could you please share the source of the tall cake stand? Thank you!
This recipe is excellent! I saw this pan at Home Goods and almost bought it but decided against it. The next day I came across this post and ran back to buy it! I subbed coffee for the water in the recipe & it came out fantastic! I had a little trouble getting it out of the oan but luckily only the back of the head stuck just a little but it actually made the effect creepier! I put it in the freezer immediately after coming out of the pan & it made it easier to handle when putting it together. I used the thickened chocolate ganache & a boba straw cut in half to make 2 dowels to assemble it then put it back in the freezer again before glazing it. After the glaze, back in the freezer to set up and it looked spectacular! No one wanted to cut into it! The cherry on top? It was absolutely delicious!! I forgot the extra ganache at home but it didn’t even need it. It was moist & rich but it didn’t fall apart at all. Thanks for a showstopping recipe!
I am excited to recreate your skull recipe for our Halloween dance on the 29th. I have this pan and usually do a Red Velvet cake in mine, but was looking for something different; so glad I ran across your blog (which I am following you now via Pinterest)! Can’t wait to see how good the recipe is, as it looks absolutely fabulous!!!
My cake fell apart when I tried to “glue” the halves together. Any suggestions?
You could use some wood dowels or skewers to hold things in place.
xo Michael
You are right! This might be the perfect Halloween dessert. I love it!
I loved the whole tablescape but especially the cake so I ran down to my local Home Goods where they still had a few molds. Score! Can’t wait to make this and this recipe sounds delicious.
Yay!! I’m so glad you found one!
xo Michael
Michael, your cake it a great example of disgusting and awesome all at once! You are truly a master and I bow down to you!!
Yay! Goal achieved. Thank you!
xo Michael
EEK…but YUM! Thank you, Michael. Cheers, Ardith
I have this same pan (purchased last year at Home Goods). The cakes were a big hit last year and I can’t wait to try your spooky white coated version this year! Thanks for the inspiration!
Holy Halloween! This is AHMAZING!!!
Michael you are so brilliant. I love this a millions times and I can’t wait to try this for my Halloween gathering.
That was absolutely gruesome! Creeps me out, especially with a knife stuck in the skull. Great job! This was over the top.
Love it!