Abstract Art DIY Valentine
This Post May Contain Affiliate Links. Please Read Our Disclosure Policy
Let’s turn abstract art into an adorable Valentine’s Day card. This Abstract Art DIY Valentine is fun, easy to make, and the perfect way to spread a little love this February 14th!
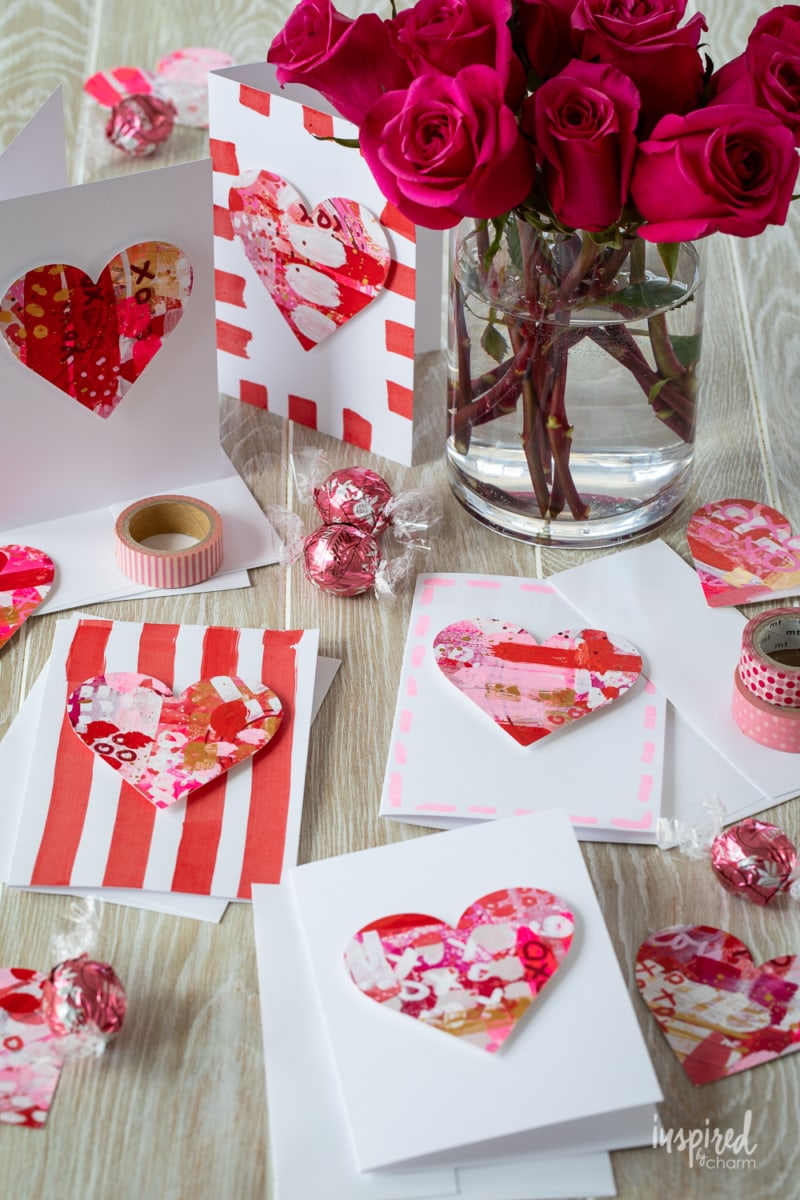
Grab some paper, paint, and scissor because we’re making some DIY Valentines! I created some fun and colorful abstract art and, with a little creativity, turned it into festive homemade valentines.
If you’re a faithful IBC follower, you might remember that back in December I did a similar project where I created abstract art to make some fabulous holiday gift tags. That little DIY project was so much fun that I was inspired to do it again, but in a new way for Valentine’s Day!
These DIY Valentine Cards were the result of that endeavor. I couldn’t be more pleased with how they turned out and I’m so excited to share the process with you. These cards are so simple to make and who wouldn’t like to get a homemade valentine versus store-bought? I’ll take homemade any day!
I realize that Valentine’s Day is only once a year. However, another reason I love this project so much is that you can use it for any occasion or celebration.
Sometimes I find the greeting card aisle can be so disappointing. They never say the right thing and then when you do finally find the perfect card, it’s $8. Craft up a bunch of these cards and you’ll save yourself time, frustration, and money.
Why You’ll Love This Project
- Unleash Your Inner Artist: No need to be a Picasso for this project. It’s all about having fun with colors and shapes. Let your creativity flow and watch as each brush stroke adds a unique touch to your valentine.
- Personalized Touch: In a world full of mass-produced items, a handmade card is a rare treasure. Your DIY valentine will carry a piece of your heart and your unique signature style.
- Joy of Crafting: There’s something special about taking the time to make something by hand. It’s not just a card; it’s an experience, a labor of love, and a joyful way to spend an afternoon.
- Spread the Love: These cards aren’t just fun to make; they’re even more enjoyable to give. Brighten up someone’s day with a splash of color and a dash of love, all wrapped up in your one-of-a-kind valentine.
Okay, ready to get painting and crafty? Me too! Let’s get to it!
Materials
Before I share the list of supplies, I wanted to mention that the items that I used were based (other than the punches) on what I had on hand. There is no need to go out and buy all of the same things that I used. Simply use what you have as this project can work with a variety of supplies.
Here’s What You Will Need
- heavy art paper (This is what I used, but any heavy [300 lb] art paper will do.)
- paint
- markers
- wax pastels
- paintbrushes
- kraft paper
- heart craft punch*
- blank greeting cards
- foam mount pop dots
Additional (but not necessary) Materials
- Liquitex acrylic paints
- Liquitex soft body acyclic paints
- Posca pens
- metallic watercolor paints
- Caran d’Ache Water-Soluable Pastels
- Liquitex acrylic paint markers
- Pilot Juice paint marker pen
*I love using these big punches. The 3″ inch size is perfect for this project. Here are a few additional punch shapes to consider for other holidays:
Yes, these punches can be expensive. If you want to save some money and you have a steady hand, just cut out your own designs with a pair of scissors. It may take a little longer, but it’s totally doable and will ease the strain on your wallet.
Instructions
I’m going to walk you through the basic assembly steps for these festive handmade napkin rings below. I’ve also provided a materials list and detailed instructions in the printable recipe card below.
💌 SAVE THIS POST / RECIPE!
- Start by prepping your work surface with kraft paper. This will help to keep things clean while you create your art.
- Lay out a single sheet of paper or use a watercolor paper block as I did here.
- Begin painting!
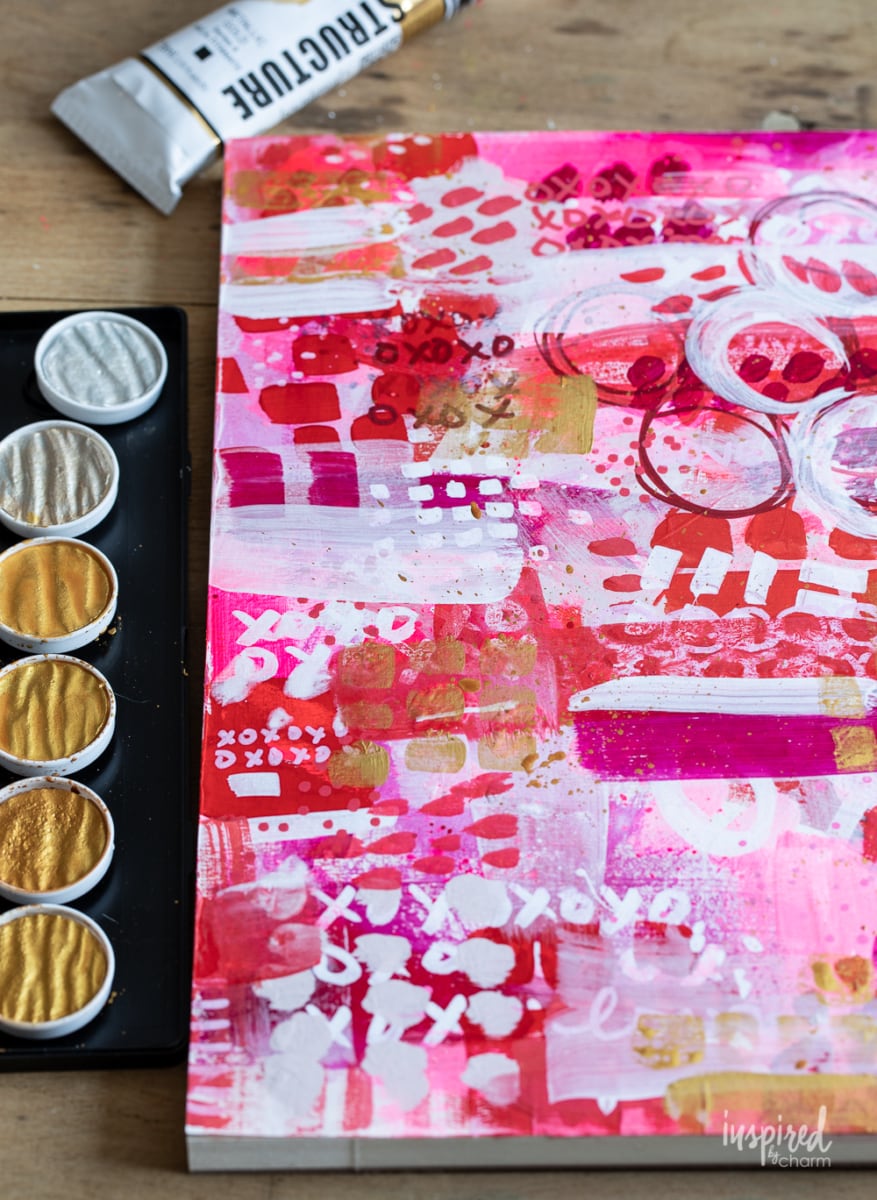
- Work in layers and continue to add paint, marks, splatters, etc. until you are happy with the look. I chose colors to match my wrapping paper. You can do the same or keep it more random.
- This is the part where you can let loose, have fun, and get messy. Allow the layers and paint to dry to avoid colors getting messy/muddy.
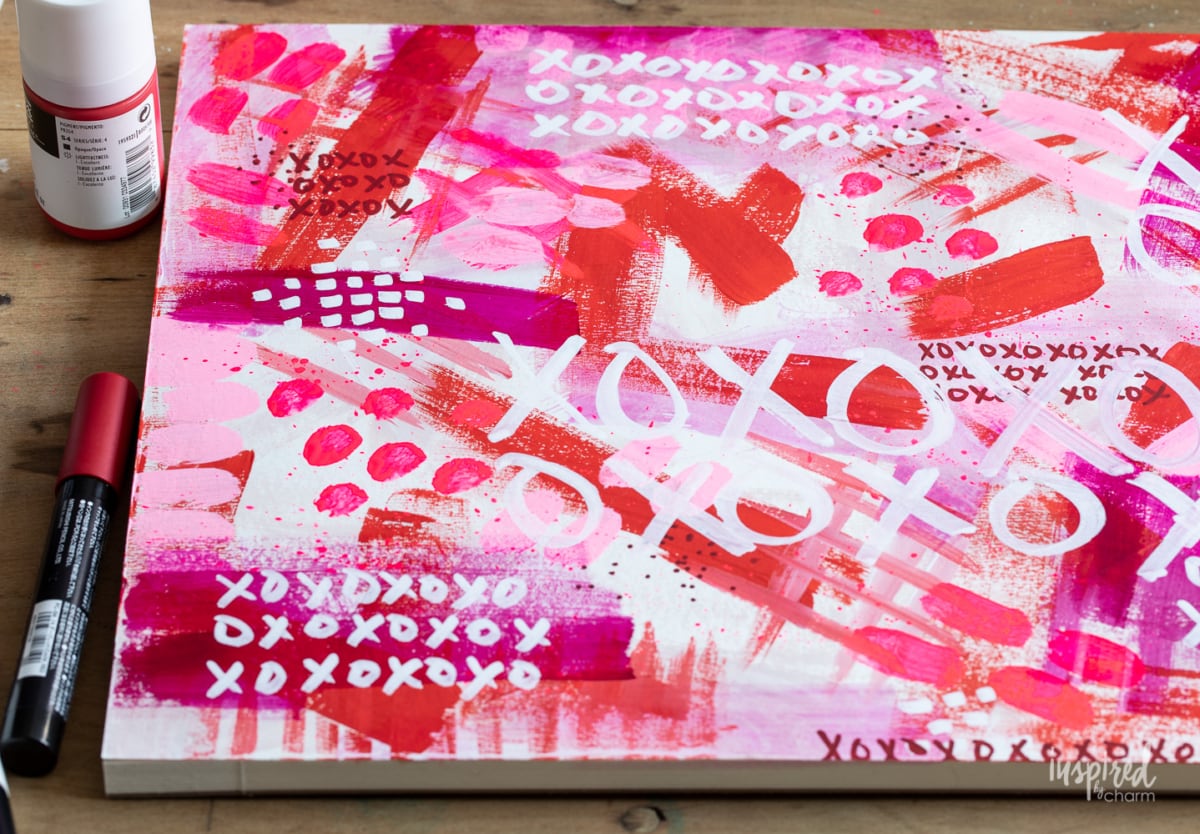
- I used acyclic paint for larger marks of the different colors. Wax pastels and colored pencils were used for smaller rustic marks. I even used some Posca paint markers to add little dots.
- Let everything completely dry, then remove the tape.
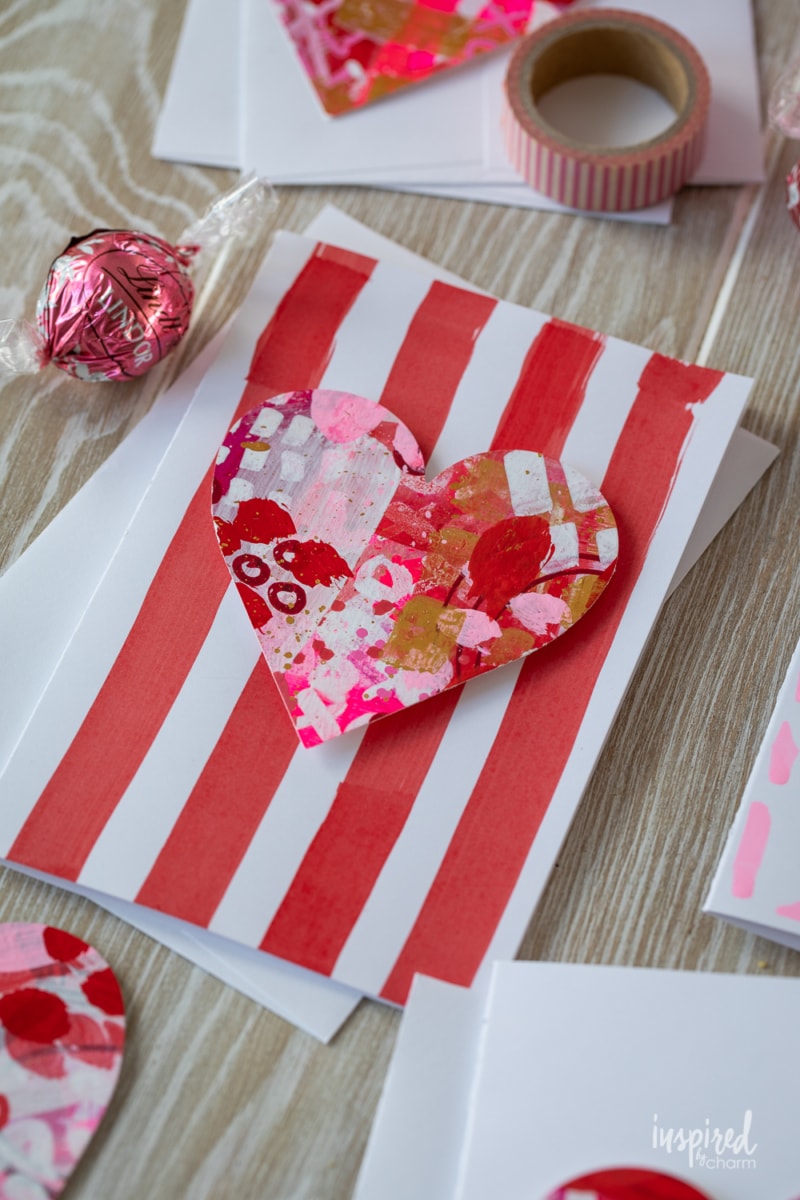
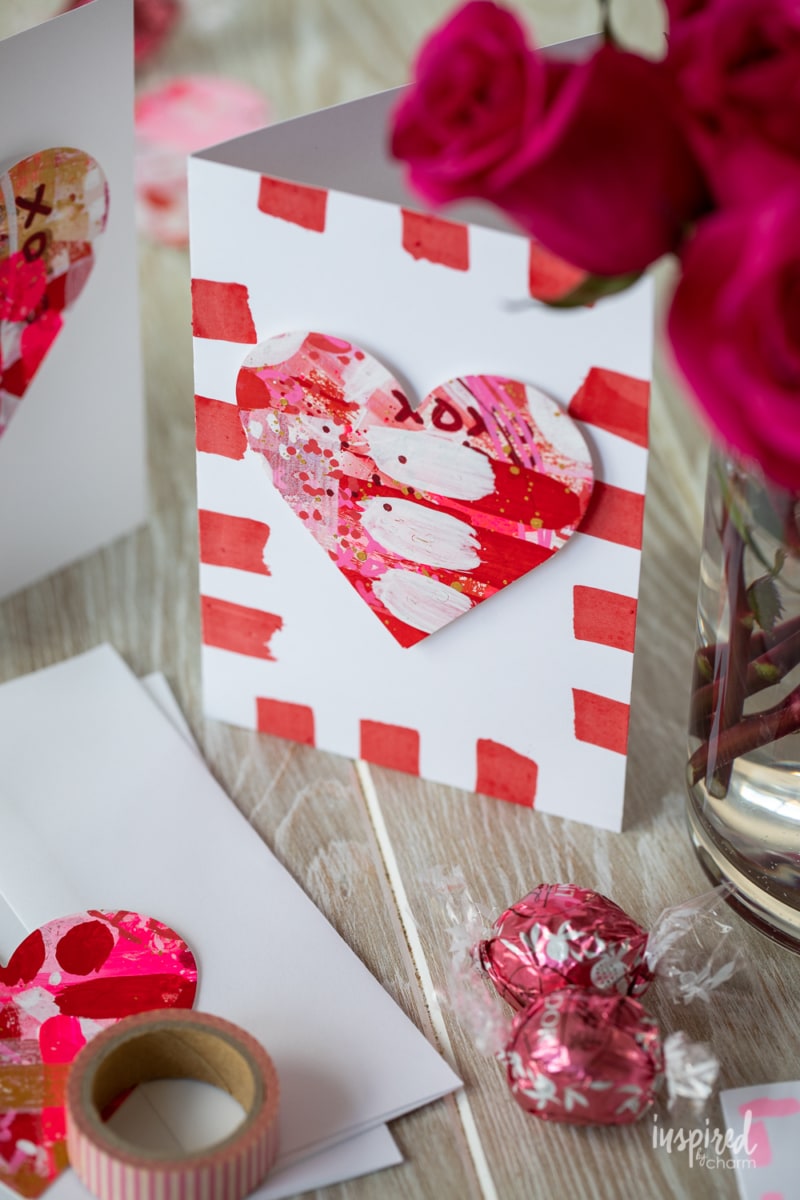
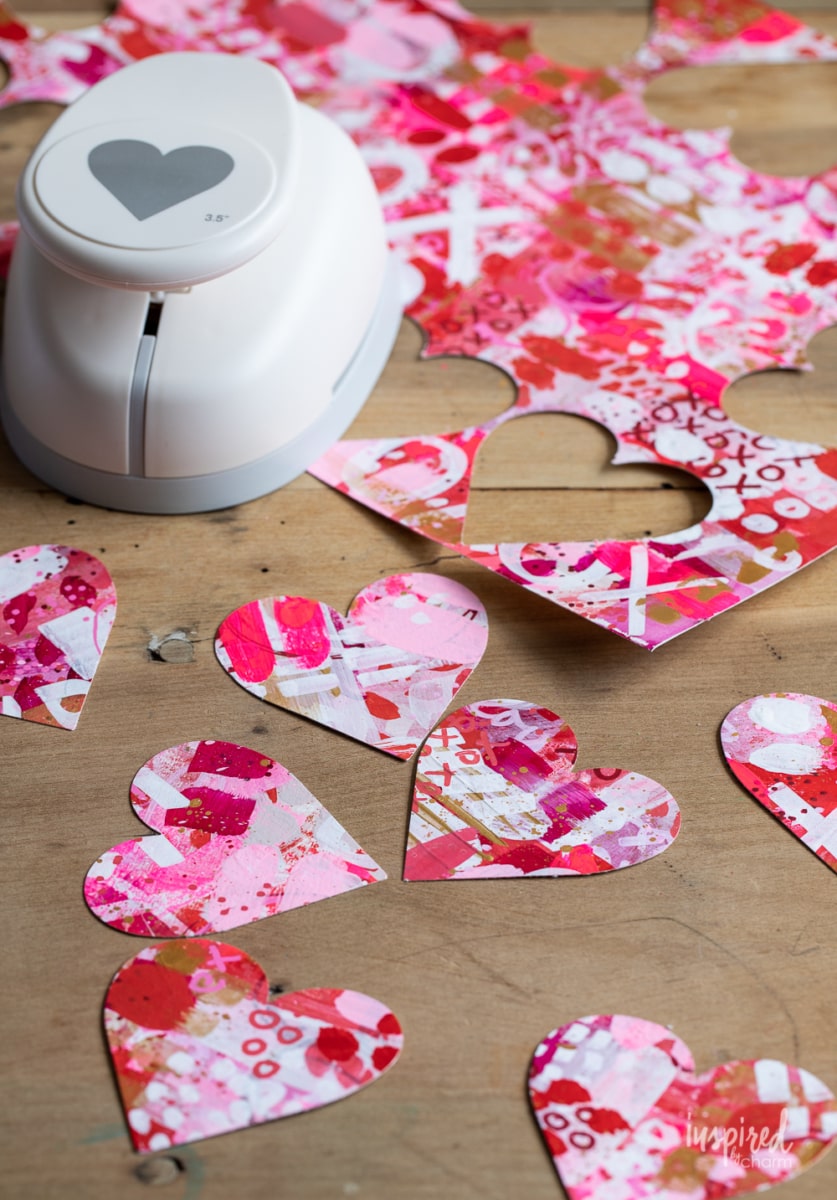
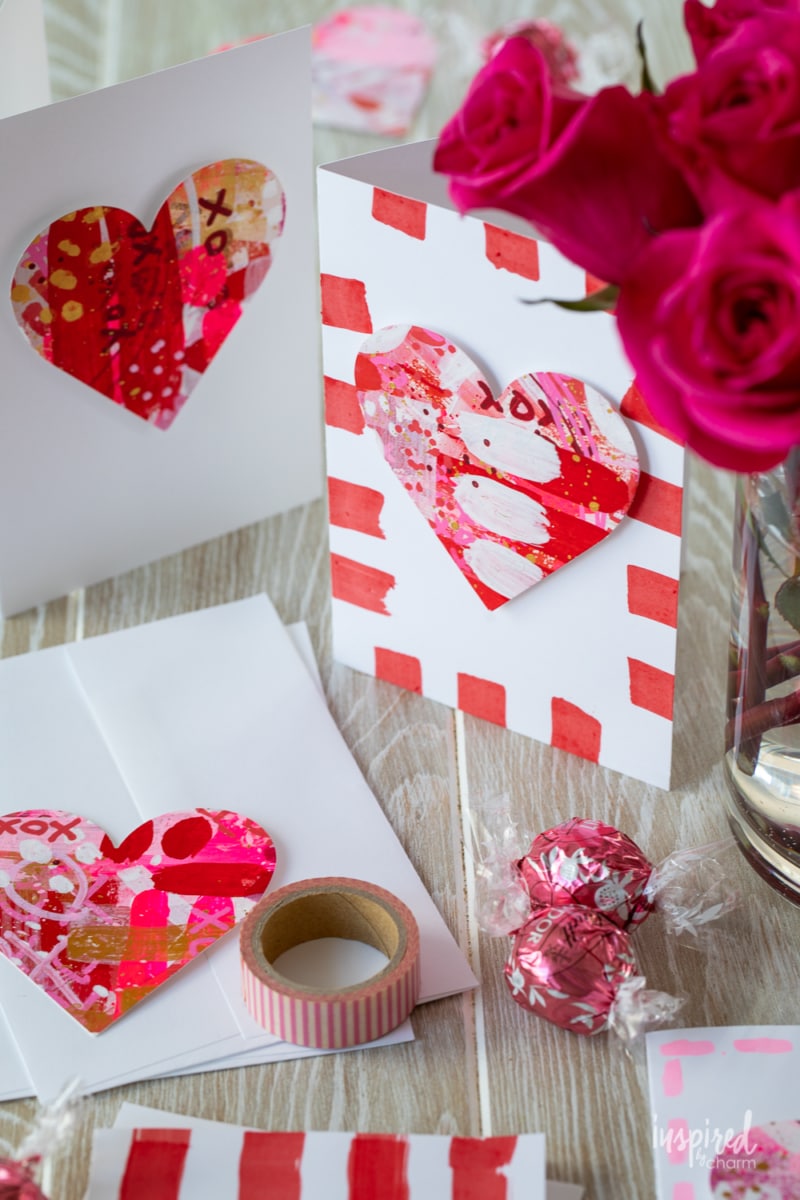
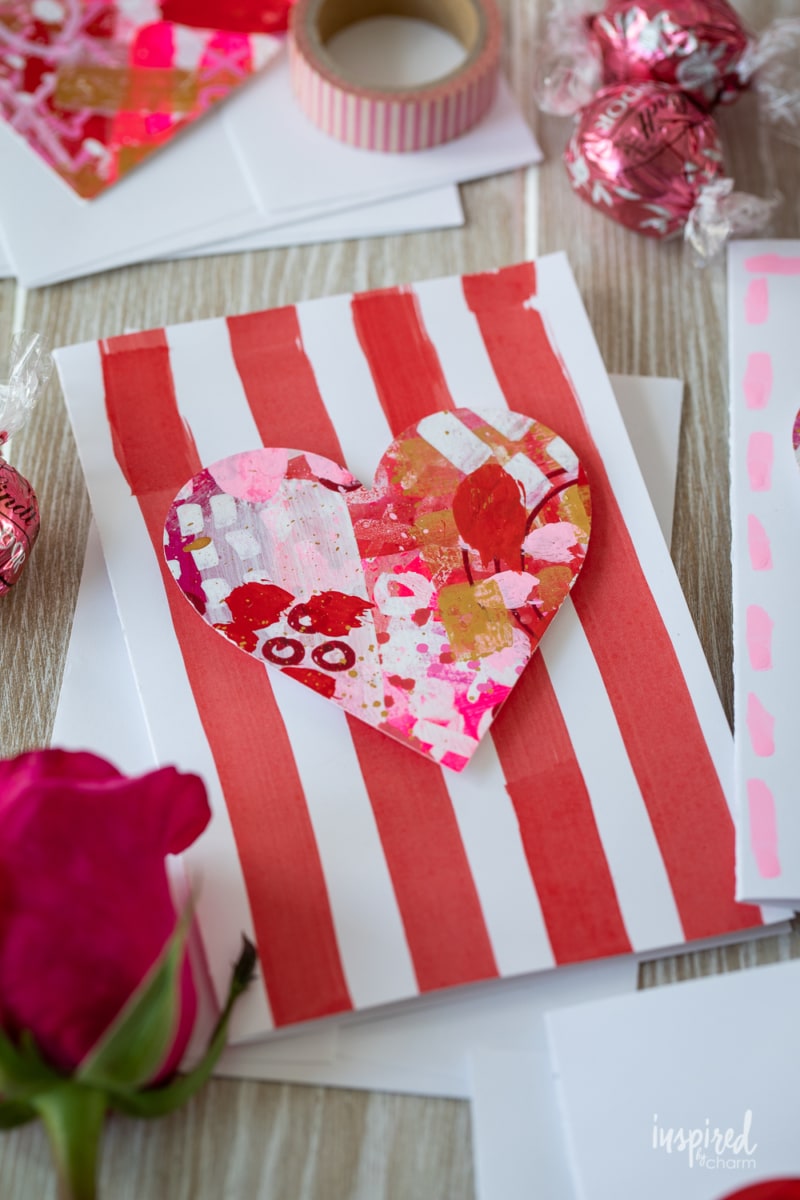
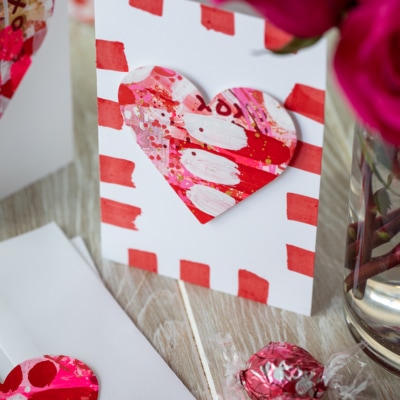
- Use the large paper punch to cut out your hearts. If you don’t have a punch, you can cut things out by hand with scissors. I was able to create about 15 tags using 1 sheet of 12″ x 16″ paper.
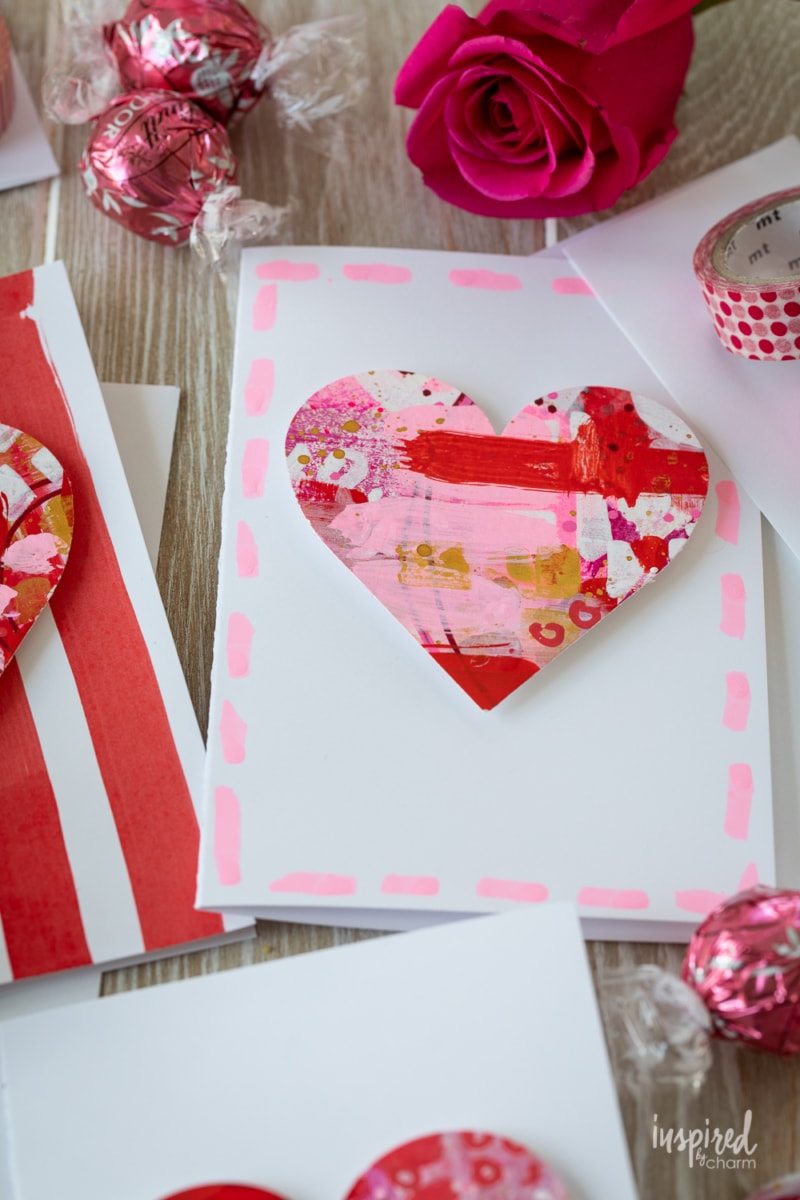
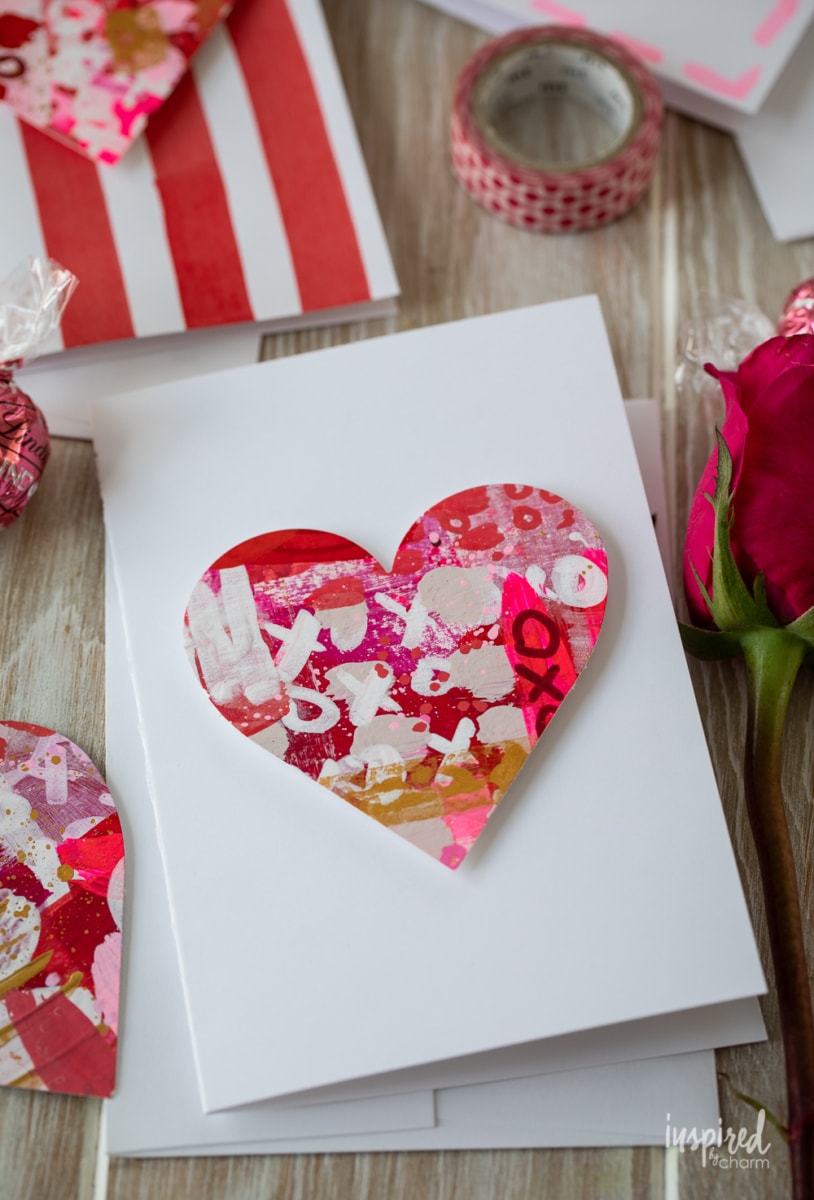
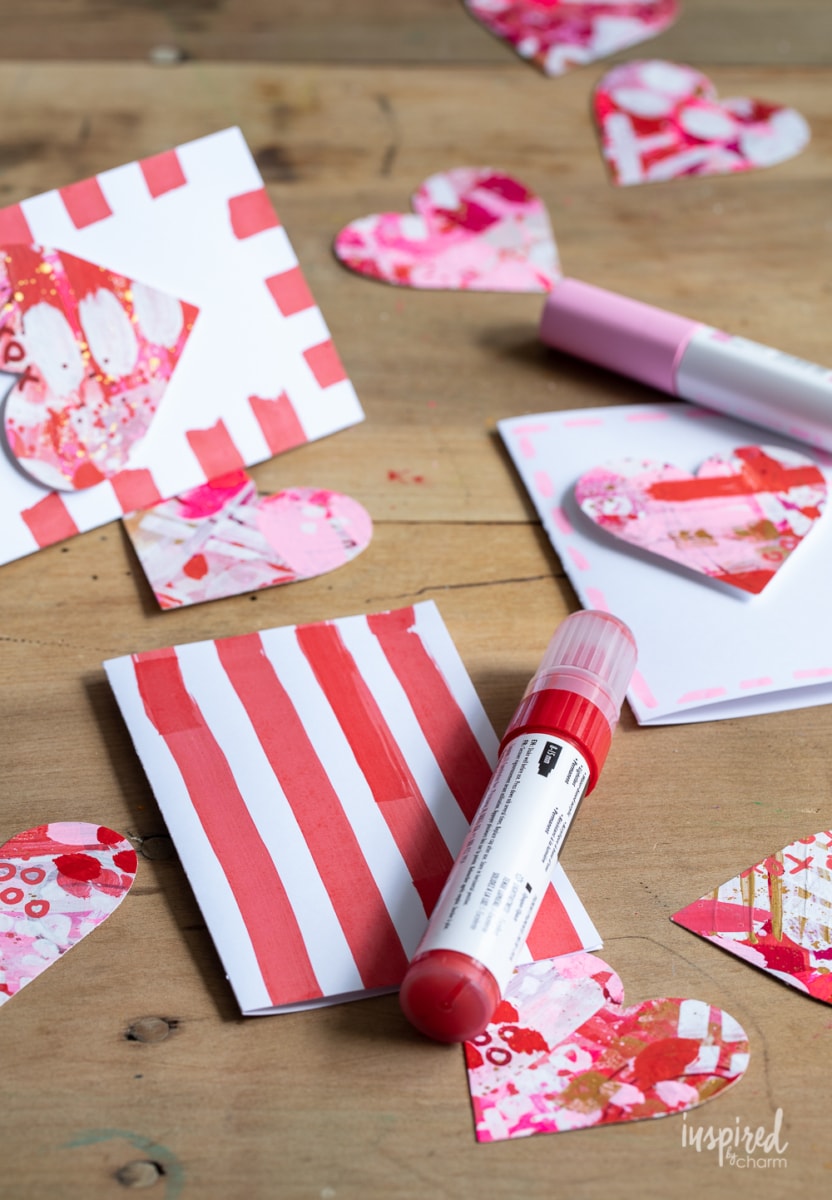
- Next, you’re ready to attach the hearts to your blank greeting cards. At this point, feel free to add a little decoration to the front of your cards if you’d like. I used some paint markers (linked below) to add borders and stripes.
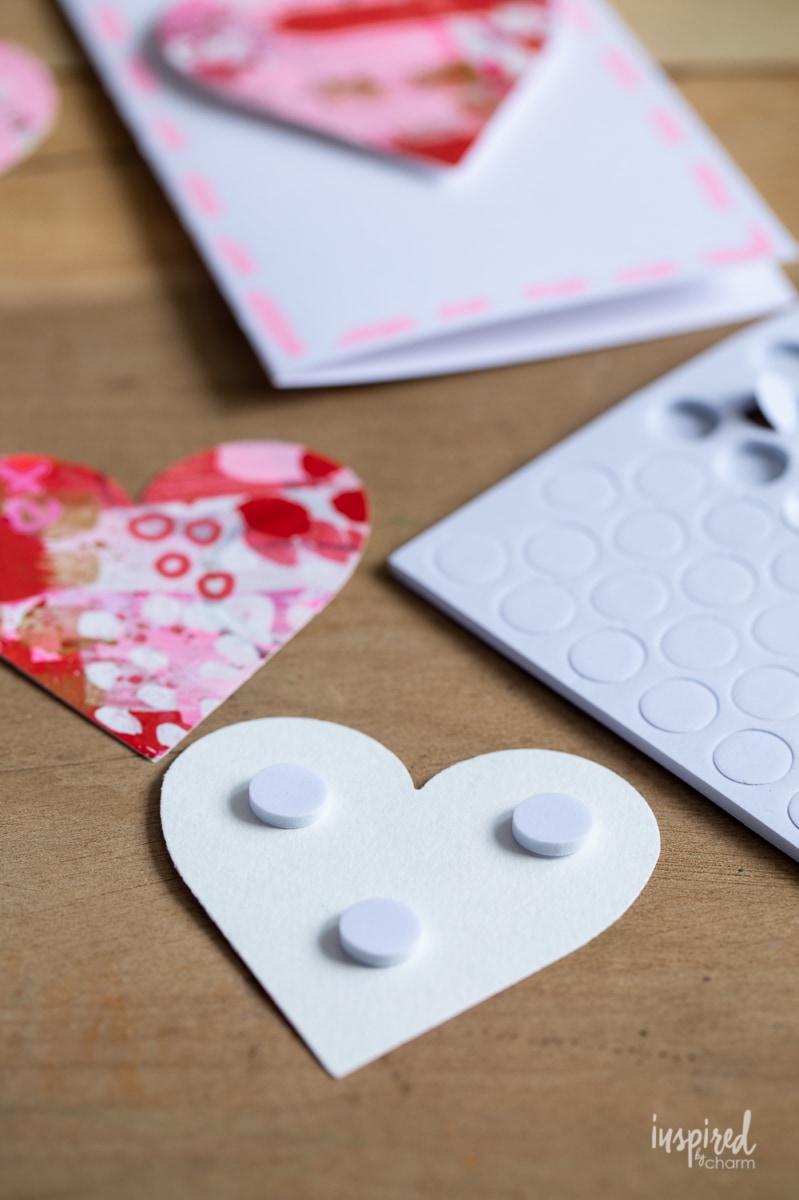
- Once your cards are the way you’d like, add three foam dots to the back of your heart. Then, press the heart onto the front of your card.

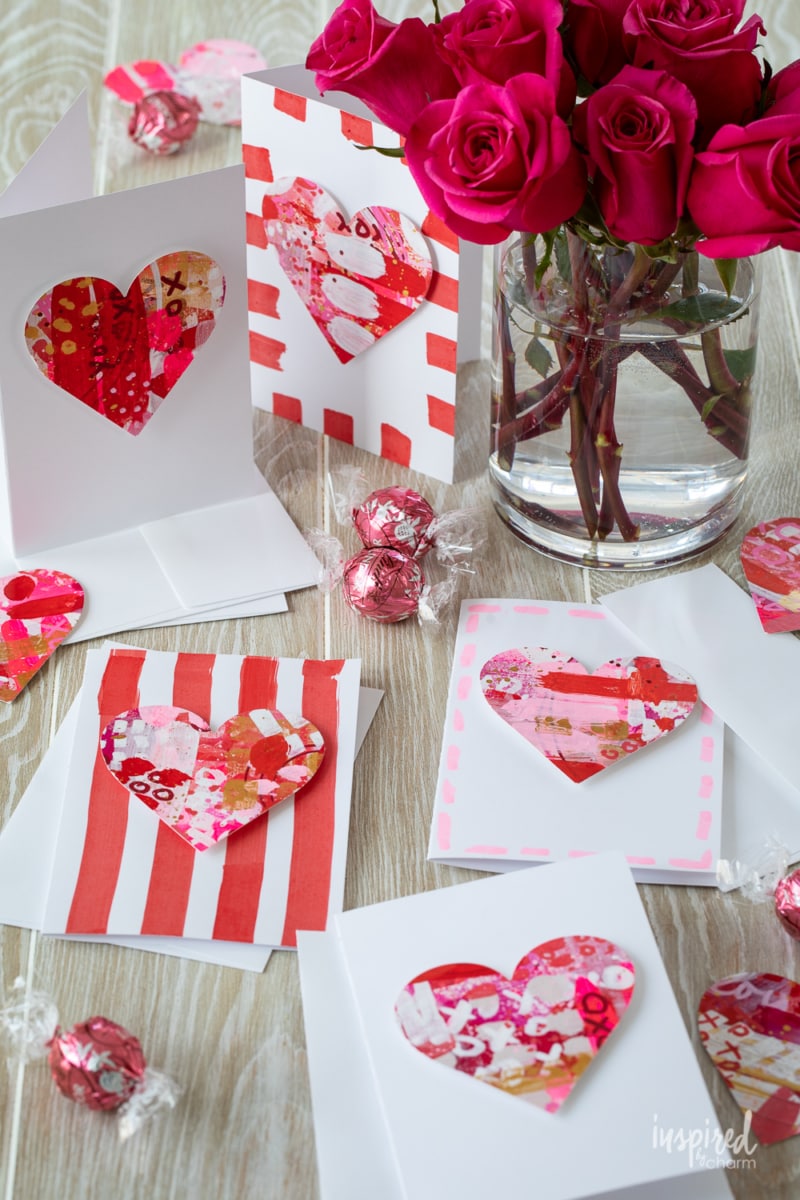
Voila! Your Abstract Art DIY Valentine is complete! All that’s left to do is write a little love note inside,… then sign, seal, deliver – I’m yours!
I am thrilled with my final product as I think the cards turned out SUPER CUTE! (And I am sure your’s will too!)
Wouldn’t these be a fun project for a Galentine’s Day party?
Project Variations
- Color Your World: Don’t feel limited to traditional Valentine’s Day colors. Go wild with a neon palette, opt for serene pastels, or even monochrome with metallic accents. The sky’s the limit!
- Mixing Materials: Combine different textures for an unexpected twist. Think about using fabric scraps, pieces of ribbon, or even incorporating a bit of nature with pressed leaves or flowers.
- Shapes and Sizes: Hearts are just the start. Why not try other shapes like stars, circles, or even abstract forms? And when it comes to size, imagine everything from tiny note-sized cards to grand, poster-sized declarations of love.
- A Sprinkle of Sparkle: A little glitter goes a long way. Add a shimmer to your cards for that extra pizzazz. Just remember, a bit of glitter can make your valentine’s day, and your craft space, shine.
- Photo Memories: For an extra personal touch, include a photo in your design. Whether it’s a funny selfie or a cherished memory, it’ll turn your card into a keepsake.
- Sweet Sayings: Sometimes it’s the words that count. Add a handwritten poem, a joke, or just a simple ‘I love you’ to make your card speak volumes.
- 3D Elements: Give your card some depth by adding layers. Use foam spacers or folded paper to create a 3D effect that literally stands out.
- Interactive Surprises: Why not make your card interactive? Include little pockets with secret messages, or create a card that unfolds into a poster or a beautiful print they can display.
More Valentine’s Day Projects You’ll Love
- White Chocolate Chex Mix
- DIY Valentine’s Treat Bags
- Valentine’s Day Candy “Charcuterie” Board
- Galentine’s Day Party Ideas
And remember, as I mentioned above, this idea can also work for holiday cards, all-occasion cards, birthday cards, thank you cards and so many more.
If you’re looking to have some fun and create something totally unique, I definitely recommend giving these Abstract Art DIY Valentines a try. I hope you enjoy this creative project as much as I did. If you give it a try, please stop back and leave a comment and a 5-star rating below.
Want more from Inspired by Charm? Join the IBC Mailing List for inspiration in your inbox! Follow along on Instagram and TikTok for daily updates and behind-the-scenes looks at my processes. There’s even more inspiration on Facebook and Pinterest!
Abstract Art DIY Valentine
Equipment
- heavy art paper
- paint
- markers
- wax pastels
- paintbrushes
- kraft paper
- heart craft punch*
- blank greeting cards
- foam mount pop dots
- Liquitex acrylic paints
- Liquitex soft body acyclic paints
- Posca pens
- metallic watercolor paints
- Caran d’Ache Water-Soluable Pastels
- Liquitex acrylic paint markers
- Pilot Juice paint marker pen
Instructions
- Start by prepping your work surface with kraft paper. This will help to keep things clean while you create your art.
- Lay out a single sheet of paper or use a watercolor paper block as I did here.
- Begin painting!
- Work in layers and continue to add paint, marks, splatters, etc. until you are happy with the look. I chose colors to match my wrapping paper. You can do the same or keep it more random.
- This is the part where you can let loose, have fun, and get messy. Allow the layers and paint to dry to avoid colors getting messy/muddy.
- I used acyclic paint for larger marks of the different colors. Wax pastels and colored pencils were used for smaller rustic marks. I even used some Posca paint markers to add little dots.
- Let everything completely dry, then remove the tape.
- Use the large paper punch to cut out your hearts. If you don’t have a punch, you can cut things out by hand with scissors. I was able to create about 15 tags using 1 sheet of 12″ x 16″ paper.
- Next, you’re ready to attach the hearts to your blank greeting cards. At this point, feel free to add a little decoration to the front of your cards if you’d like. I used some paint markers (linked below) to add borders and stripes.
- Once your cards are the way you’d like, add three foam dots to the back of your heart. Then, press the heart onto the front of your card.
- Fill out the card with a personal greeting, place in an envelope, and seal.
Hi Michael, I love this idea and I’m preparing to order the supplies. For paper, you suggested any 300-lb paper, however the link is to 140-lb paper. Which one is preferable for painting and cutting out the hearts? Thank you!
I LOVE this idea!!! Thank you 💗
I love this! Thank you!
Love your homemade Valentine cards
These cards are so adorable!!
Thanks for the great idea. My kids are making these this weekend!
These are so pretty!
Thank you so much, Becca!
xo Michael
Love Love Love!
Thank you! Thank you!!
xo Michael
Such a fun project! Thank you for sharing this!
So glad you enjoyed it!! Thank you!
xo Michael