DIY Decorative Taper Candles
This Post May Contain Affiliate Links. Please Read Our Disclosure Policy
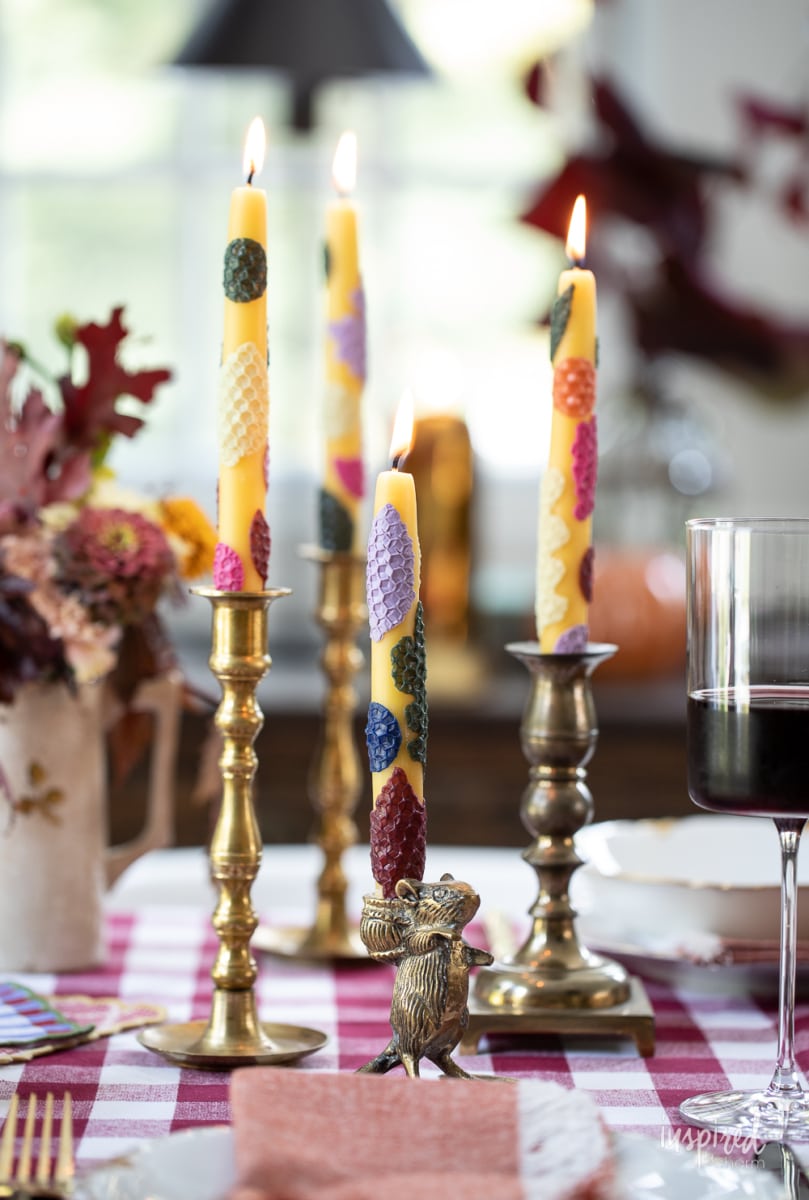
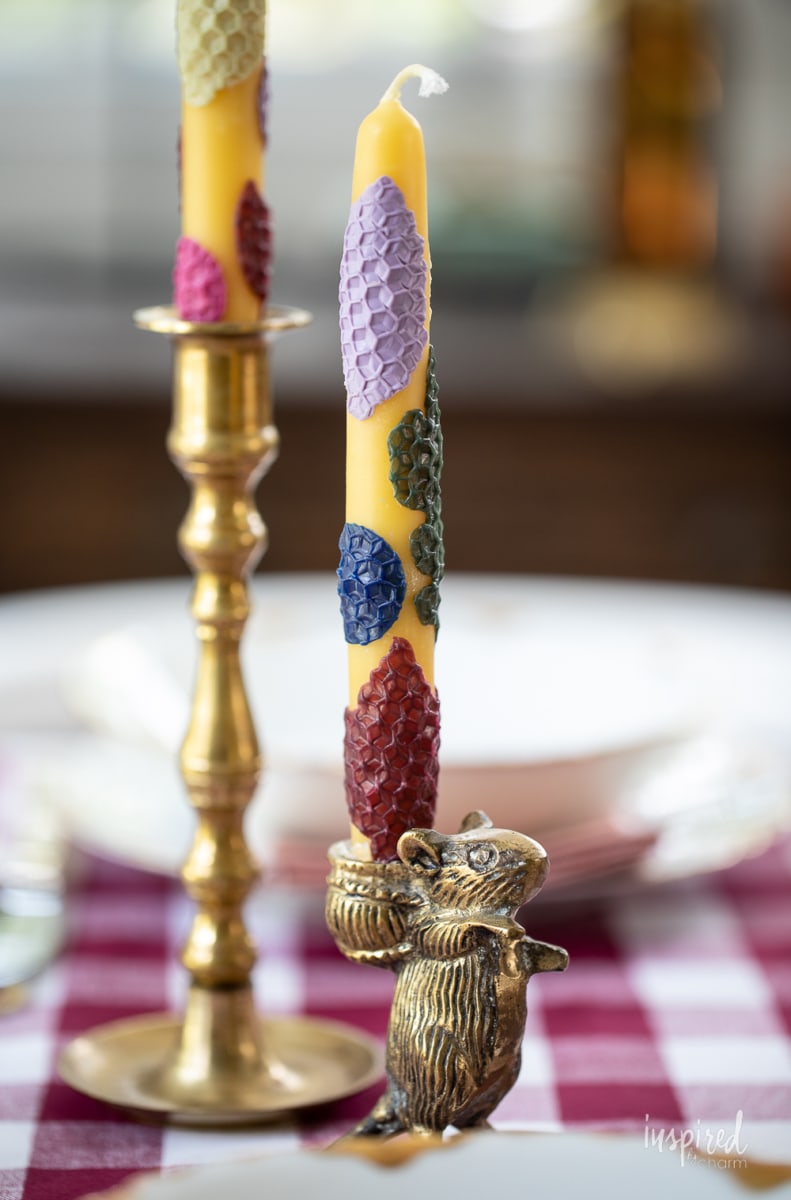
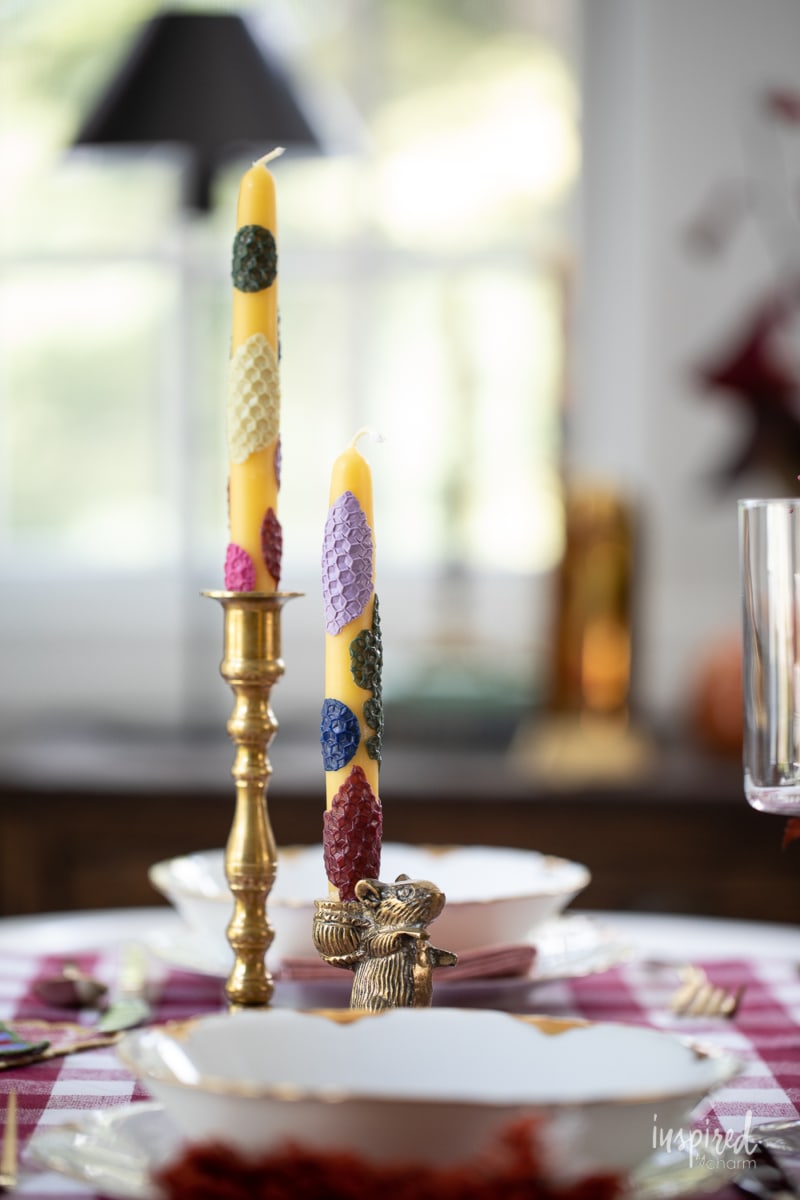
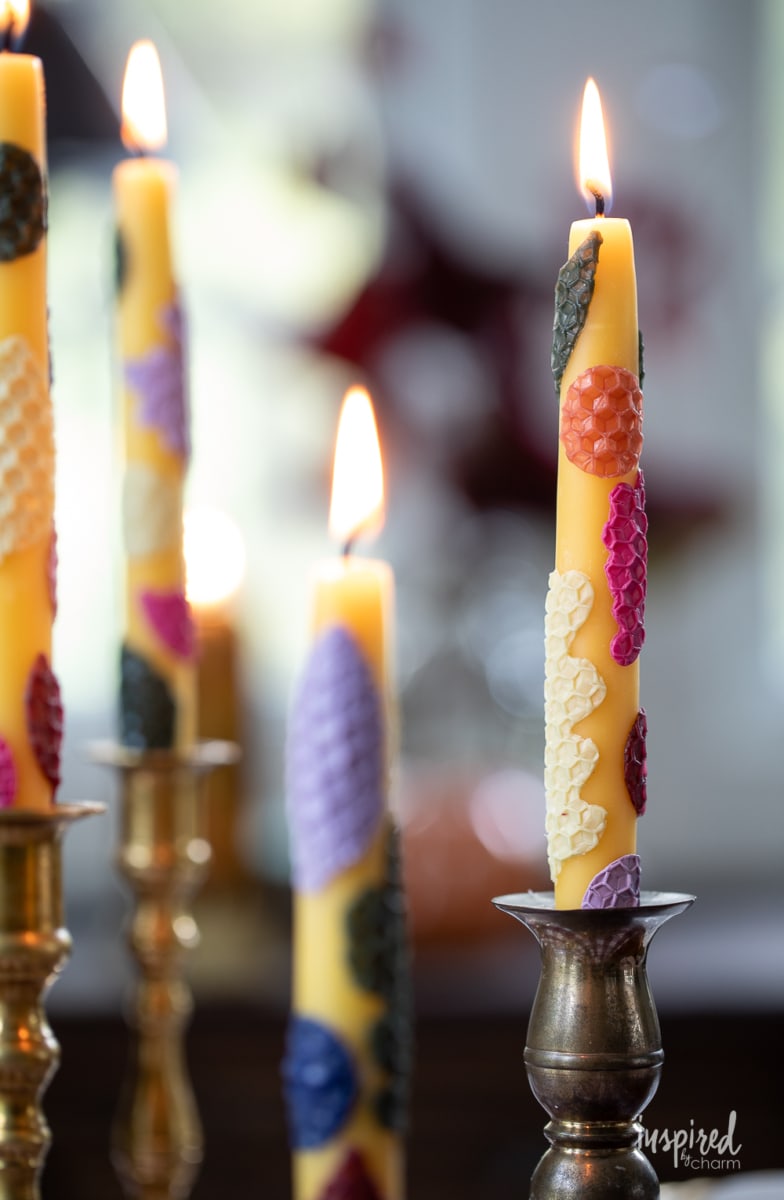
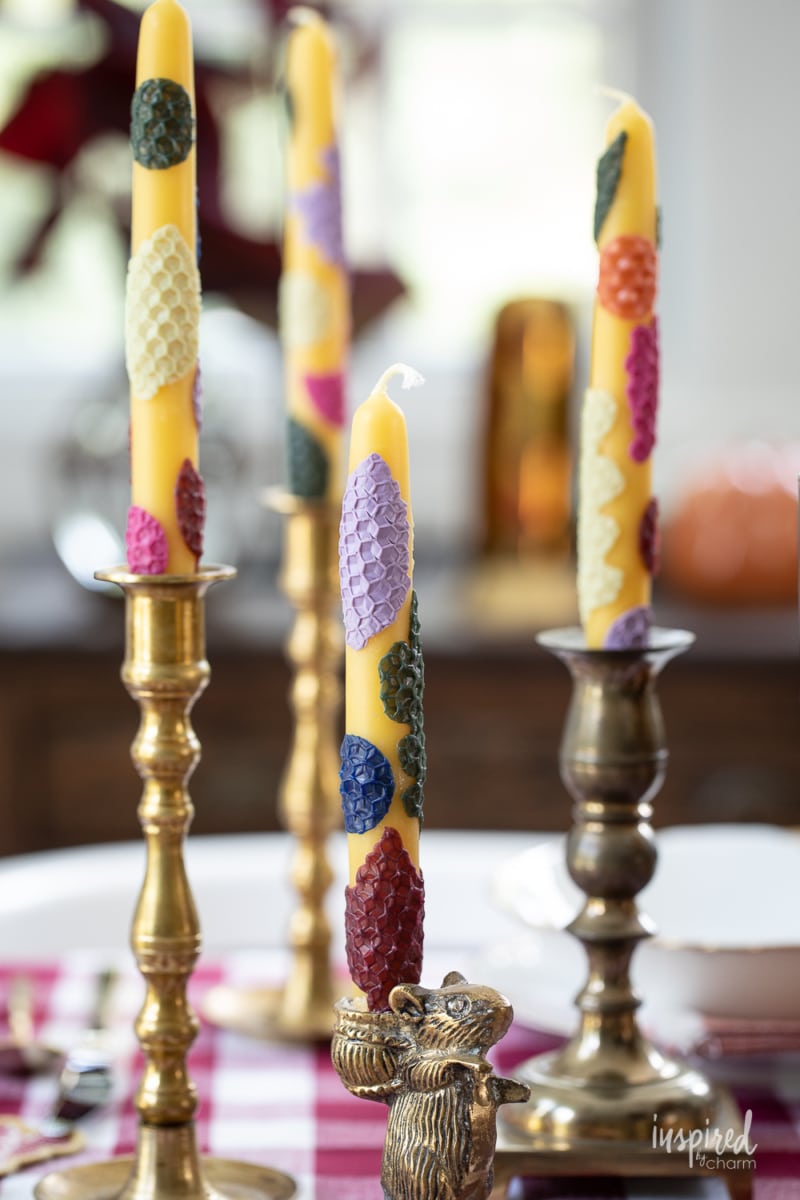
Let’s dress up ordinary, everyday taper candles with colorful shapes. I’m showing you how simple it is to make these DIY decorative taper candles. You can design them to match any color scheme, holiday, or celebration. These candles are a unique and personal way to dress up any space or table.
Taper Candles: Boring to Bold
Lately, I’ve been thinking a lot about color and pattern. I’ve been feeling a need to add more of both to my home decor. I’ve also had the idea of making these DIY decorative taper candles lingering in my mind for quite some time. With both of these thoughts twirling in my brain, I was able to create some really unique, pretty, and colorful taper candles (that I’m quite honestly obsessed with).
Side note: In this post, I’m back with my Season of Home blogger friends for even more fall candlelight decorating inspiration. Each of us is sharing how we use candles and their beautiful glow to create magic during the fall season. You really don’t want to miss any of these posts. This is one of my favorite posts that we do. I will link to the bloggers at the end of this post.
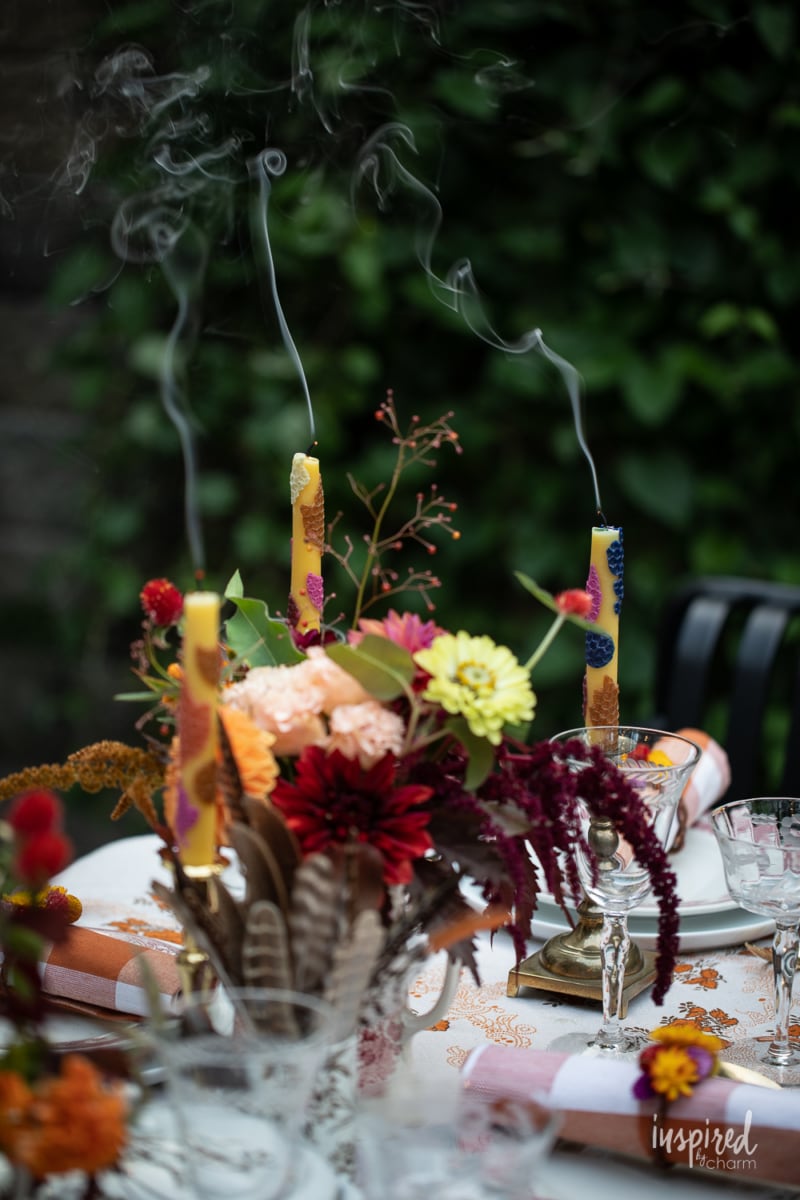
These decorative taper candles might look familiar to you if you’ve been following my blog closely. I recently used them in my outdoor fall tablescape that I shared several weeks ago.

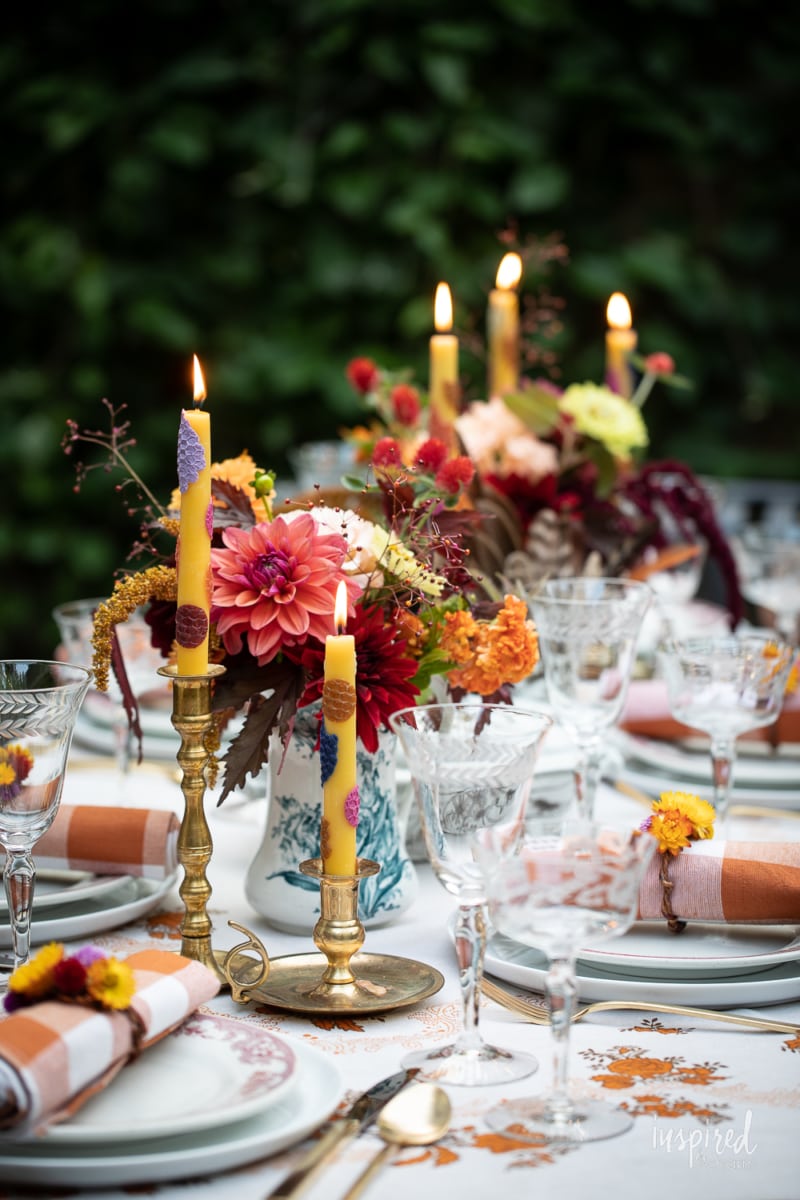
When I was making these candles I had no intention of using them for the tablescape. In fact, I made these candles back in August when I hadn’t even decided on a plan for the table setting. It was quite serendipitous that my table incorporated many colors thus allowing these candles to be a perfect fit.
Want more fall DIY projects? Try these:
- Colored Wrapped Wheat
- Vintage-Inspired Halloween Treat Bags
- Dried Flower Napkin Rings
- Feather Wreath for Fall
- Halloween Paint Can Bucket and Luminary
Why I Love These DIY Taper Candles:
Here are a few reasons why I love these candles and the things you need to make them.
- While these candles work perfectly on my table, I’ve also used them throughout my home. They add such beautiful color and pattern … just what I was hoping for.
- You can custom design them to suit YOUR tastes. Don’t like the leaf shapes, use circles. Want something more graphic, make stripes. Don’t like my color scheme, switch it up.
- Give them as a gift. Wouldn’t these make a lovely gift? Tie them up in pairs of two with a piece of twine or string. Done!
- Use this idea during a craft night with your friends. This project is so simple; anyone can do it. Get a group of friends together, whip up a delicious cocktail, and have fun crafting.
Lots of good reasons, right?
Okay. Now, let’s get into the supply list and the instructions on how to assemble them. Ready? Let’s go.
Supply List:
You only need three things to craft these decorative taper candles. I’m going to walk you through the list. I’ve also shared links to the specific products I used to bring this project to life.
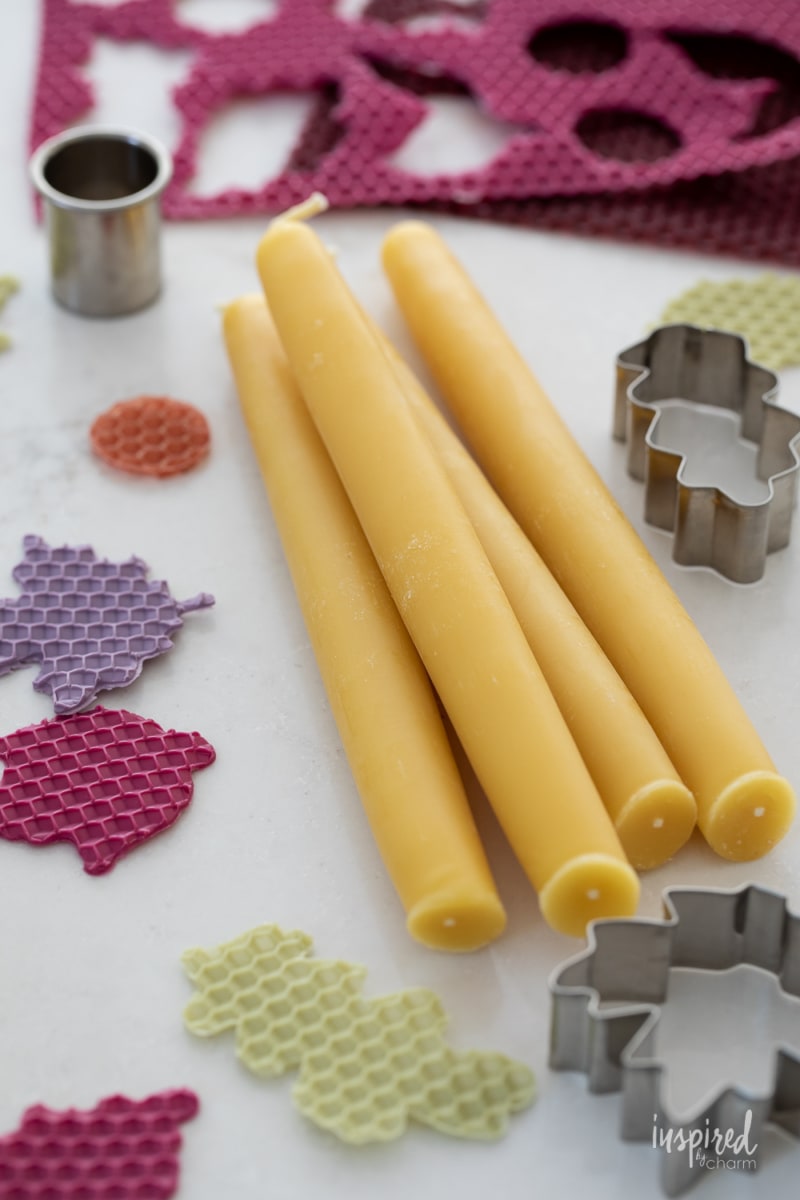
beeswax candles – You want to start with beeswax candles. Experience has taught me that this is very important to the project. I tried some candles that were not beeswax and I found that the sheets did not stick to them well. I used THESE candles. (They come in white HERE.)
beeswax sheets – I bought mine HERE and HERE. I got two different sets, so I was able to have all of the color options, but one set would be plenty.
various cookie cutters – Many of these I already had on hand from various other projects (most were from my cinnamon and sugar pie crust cookies). Some of the cookie cutters were a bit large, but they still worked. Pro tip: The smaller the cookie cutter, the better. If you’re ordering online, pay attention to the measurements. You can find the ones I used HERE and HERE. Again, you don’t need all of the sets, one is fine.
How To Assemble:
Below, I will walk you through the assembly process step-by-step. (Don’t worry; it’s easy.) I’ve also provided a printable supply list and instruction card at the end of this post.
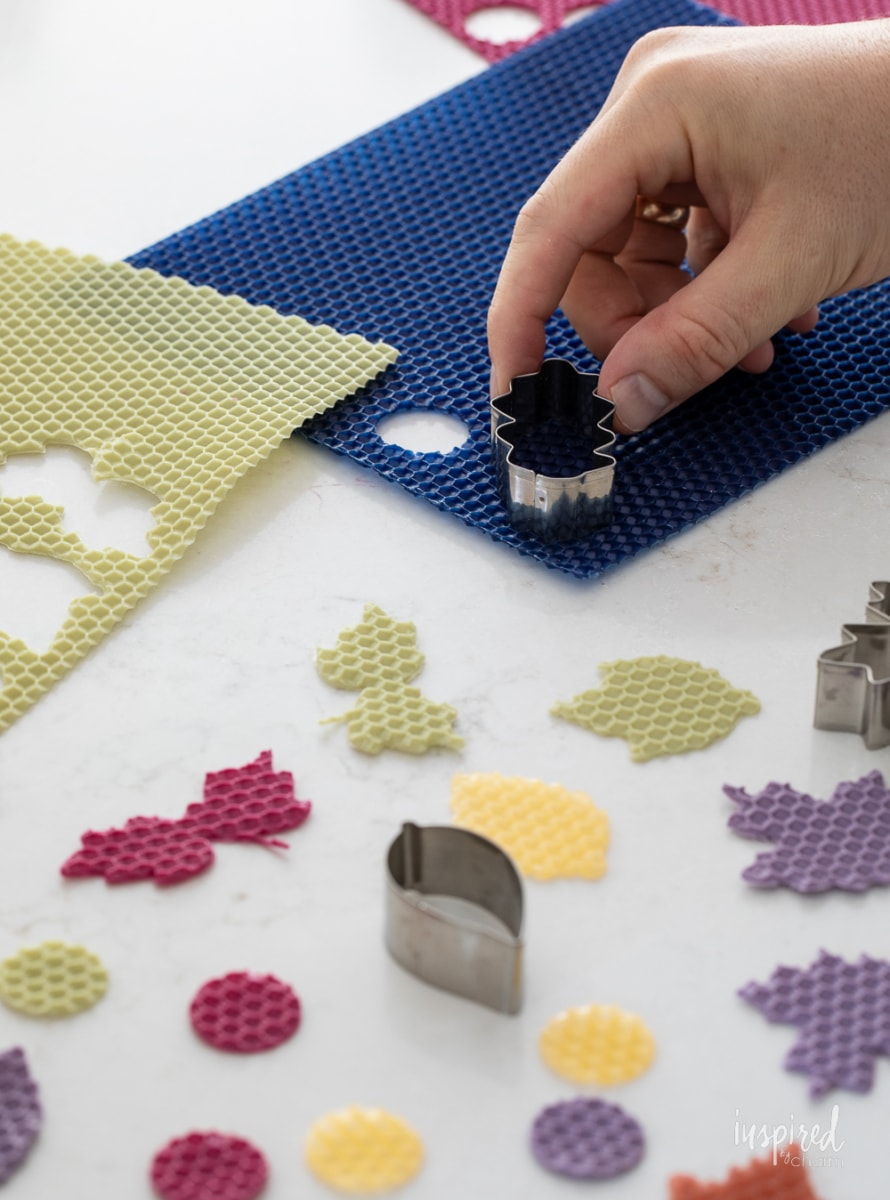
- Begin by selecting which colors of beeswax sheets you’d like to use. You can take inspiration from the season, a specific celebration, a sports team, a holiday, etc.
- Then, use the cookie cutters to cut shapes from your beeswax sheets. I recommend doing this on a surface you don’t care much about because the process will leave some wax residue on your surface. Alternatively, you could work on a piece of parchment paper.
💌 SAVE THIS POST / RECIPE!
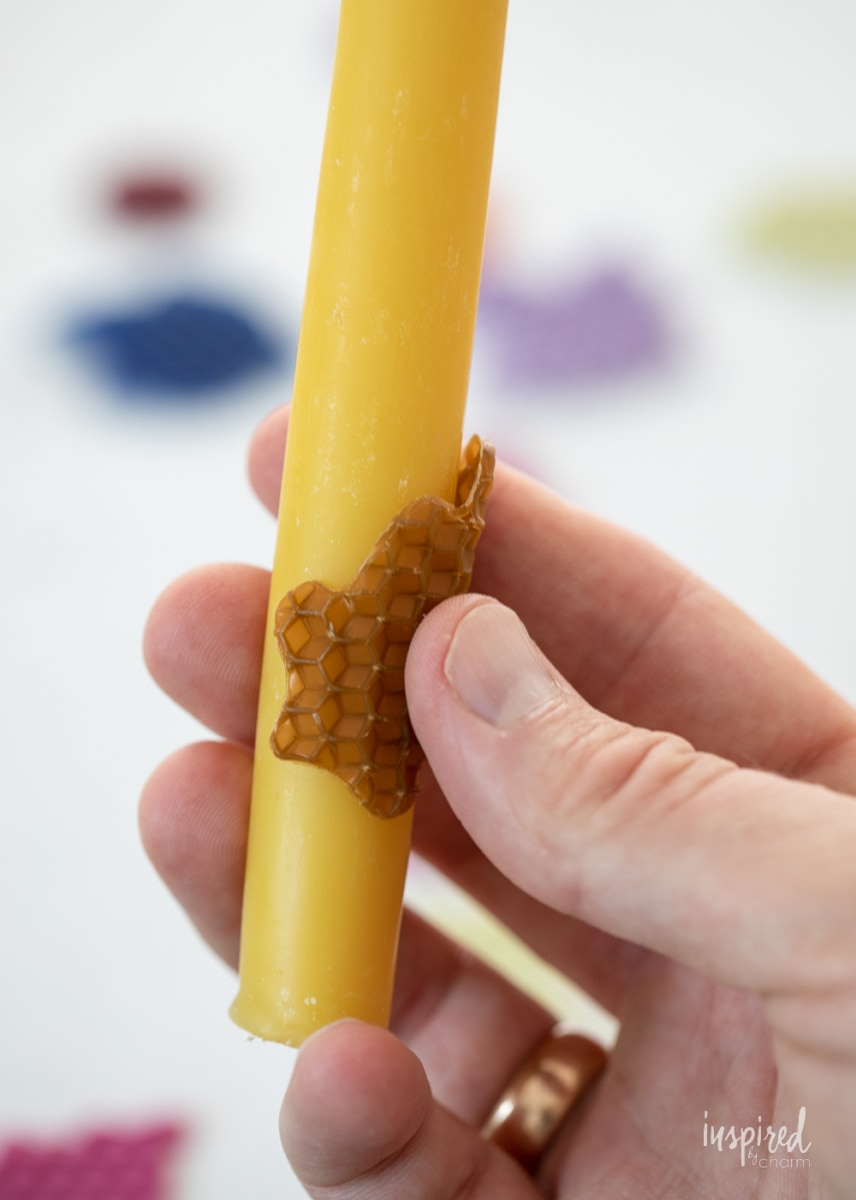
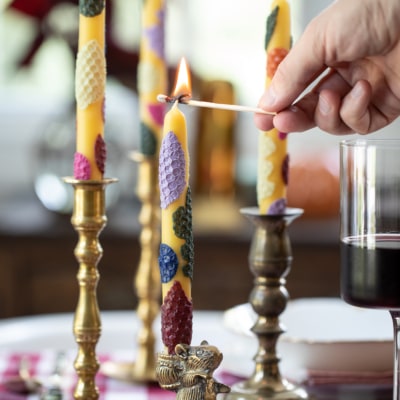
- Once all your shapes are cut out, pick up one piece and decide where you want to place it onto your taper candle. Set it in place. Then use your fingers to press the shape onto the candle. (I like the checked texture of the beeswax sheets so I focus more on pressing the edges down in order to save that texture.) Continue to press onto the candle until the shape feels well attached. As I mentioned above, I recommend using beeswax candles for the best adherence.
- Continue working around your candle with more shapes repeating the process until the candle is as full as you’d like it to be.
Voila! You’re done. You can repeat the entire process with as many candles as you’d like.

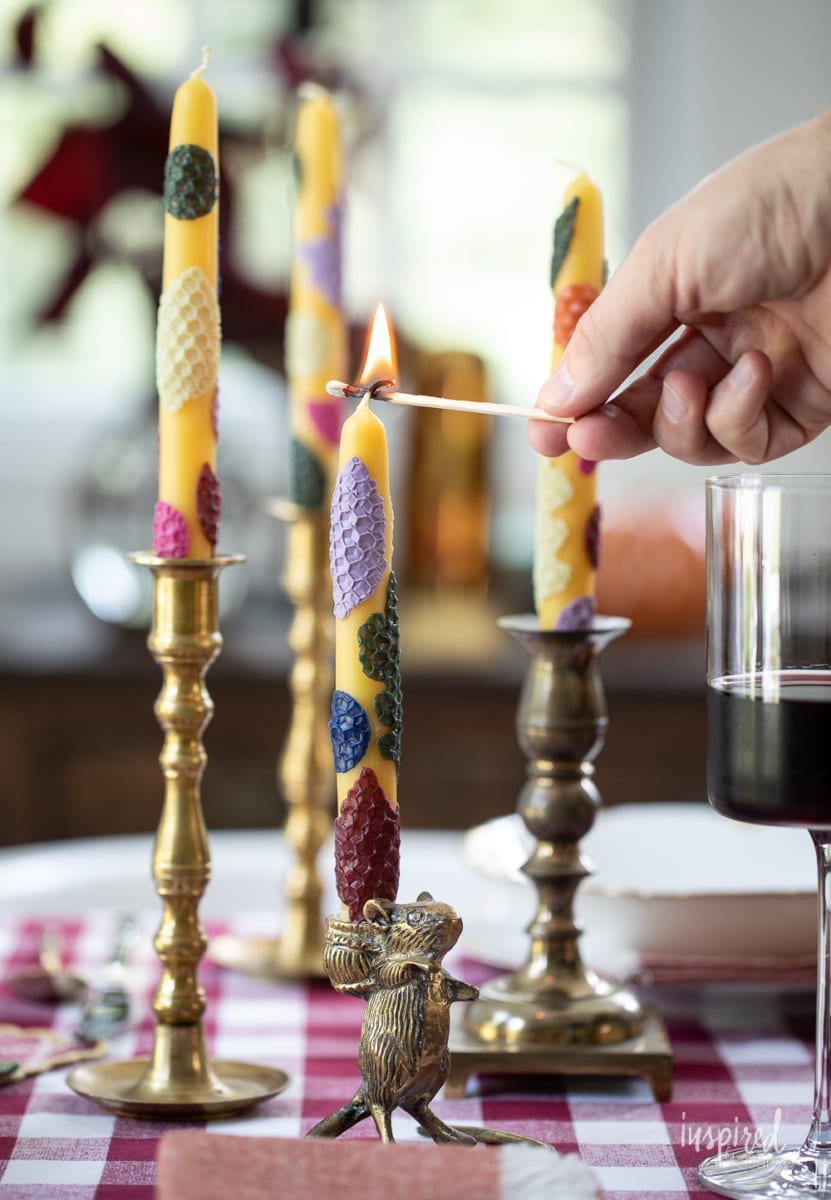
All that’s left to do is …
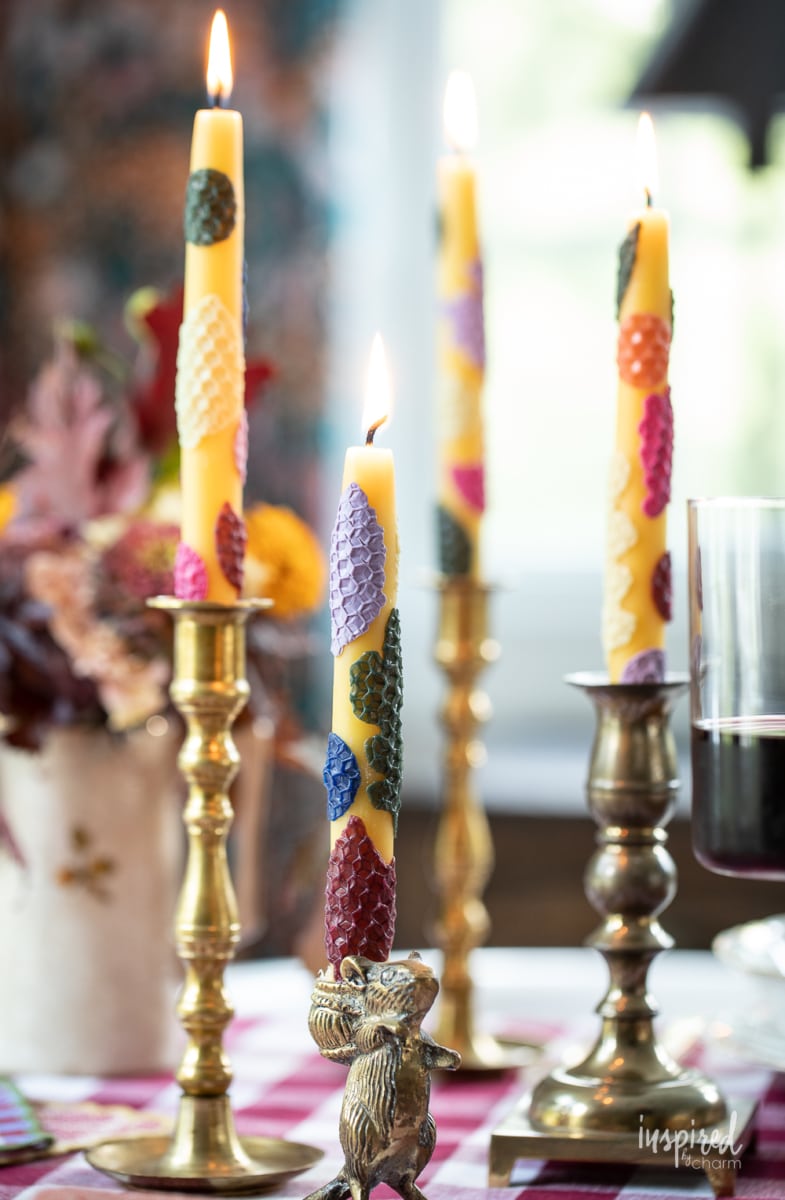
Light and enjoy the results!
And that’s it! Pretty simple, right? I told you! And, can you imagine the possibilities? Virtually endless.
I couldn’t believe how easy this project was to complete. I’d say you could have a set of 12 candles finished in under an hour. (Maybe even quicker.)
I hope you liked this project and are excited to give it a try. Thank you so much for joining me again today.
Before you click away…
Seasons of Home Magical Fall by Candlelight:
… be sure to visit my Season of Home blogger friends and see how they used candlelight to add a little coziness and magic to their spaces.
Free Printable Fall Candle Wraps by Ella Claire & Co. | DIY Inexpensive Fairy Light Lanterns by Handmade Farmhouse | Fall Picnic by Candlelight by Azure Farm
Autumn Candlelight Table by French Country Cottage | Magical Fall Candlelight by Zevy Joy | DIY Decorative Taper Candles by Inspired by Charm

Happy Crafting!
Enjoy this project and want more?
Join the IBC Mailing List to get all of my recipes, projects, and ideas sent straight to your inbox! I hope you’ll also join me on social media (Instagram, Facebook, Pinterest, and Twitter) for daily updates and behind-the-scenes looks at my work and adventures.
Have you tried this recipe? Follow me on Instagram, then share YOUR dish with #myIBC and tag @inspiredbycharm. It’s fun to see how folks are using recipes from IBC.
DIY Decorative Taper Candles
Ingredients
- beeswax candles
- beeswax sheets
- various cookie cutters
Instructions
- Begin by selecting which colors of beeswax sheets you’d like to use. You can take inspiration from the season, a specific celebration, a sports team, a holiday, etc.
- Then use the cookie cutters to cut shapes from your beeswax sheets. I recommend doing this on a surface you don’t care much about because the process will leave some wax residue on your surface. Alternatively, you could work on a piece of parchment paper.
- Once all your shapes are cut out, pick up one piece and find where you want to place it onto your taper candle. Set it in place. Then use your fingers to press the shape onto the candle. (I like the checked texture of the beeswax sheets, so I focus more on pressing the edges down in order to save that texture.) Continue to press onto the candle until the shape feels well attached. As I mentioned above, I recommend using beeswax candles for the best adherence.
- Continue working around your candle with more shapes repeating the process until the candle is as full as you’d like it to be.
These look really fun and creative. Going to make these with my daughter on our next visit… I do have one question??? How is the burn level? Do they burn lopsided with the beeswax detail?
These are so cute! I love they they are completely customizable.
Very pretty! So creative! It’s a must try 🙂