Board and Batten
This Post May Contain Affiliate Links. Please Read Our Disclosure PolicyWelcome to my second update on the One Room Challenge (ORC)! Today I’m showing you how I added interest and detail to my bedroom with a board and batten treatment.
As I mentioned last week, I’m giving my bedroom a makeover as part of the Spring 2019 ORC. You can check out my before pictures and plans for the space here.
When I was reenvisioning this space, I knew that simply painting the walls wouldn’t give this room the look and feel it deserved. As I sourced inspiration photos, I noticed that a lot of the images that drew my attention featured some sort of picture molding, wainscoting, or trim detail.
After considering several options, I decided on a board and batten treatment. I thought it would suit the modern country colonial aesthetic I’m going for here at Bayberry House. I also liked the cozy feel it would give my bedroom. – To me, board and batten is sort of like wrapping a room in a big hug.
With my decision made, I started researching how to do board and batten. I learned that there are lots of ways to get the look. Initially, my plan involved removing all of the baseboards and window molding and routing the edges of lumber to create details. A pretty intense process, to say the least. And even though I have experience installing molding and trim, I was feeling overwhelmed at what needed to be done. But this is supposed to be a challenge, right?
With all of that swirling in my brain, I reached out to Metrie, one of my sponsors for this ORC. If you’re not familiar with Metrie, they offer beautiful trim moldings and doors for any style or home. I explained my plans to them, and we chatted about materials. They suggested that I check out The Gold Hive’s board and batten treatment in her Fall 2018 ORC.
They told me she used thin lattice strips to avoid having to remove window trim and baseboards. I was a little skeptical at first, but after looking at Ashley’s lovely makeover, I thought this method could work in my space.
(Sidenote: Ashley from The Gold Hive is crazy talented and has such a great eye. I love her style. I definitely recommend giving her a follow.)
As you might be aware, I tend to overthink things, and that’s exactly what I did in this situation. Part of me wanted to forge ahead with my original, intricate, and laborious plans for new thick and detailed trim molding, and another part of me was intrigued by the simple yet beautiful technique Ashley had used. After thinking it over and chatting with friends, I opted for the simpler approach. It’s not that I’m afraid of a challenge, but I needed to be realistic about my skill level and available time, plus the fact that I’m working alone. (Spoiler alert: BEST. DECISION. EVER. I’m so pleased with the results.)
How to Install Board and Batten:
This post isn’t a step-by-step guide or a how-to for installing board and batten. There are great tutorials for that online. A couple videos I recommend: this one from The Gold Hive and this one from Lowe’s.
However, I did want to give you a general sense about how I installed my board and batten and share a few notes and tools to help you achieve a similar look.
For this project I used the following products from Metrie:
3-5/8″ solid pine crown molding
1-3/4″ solid pine lattice
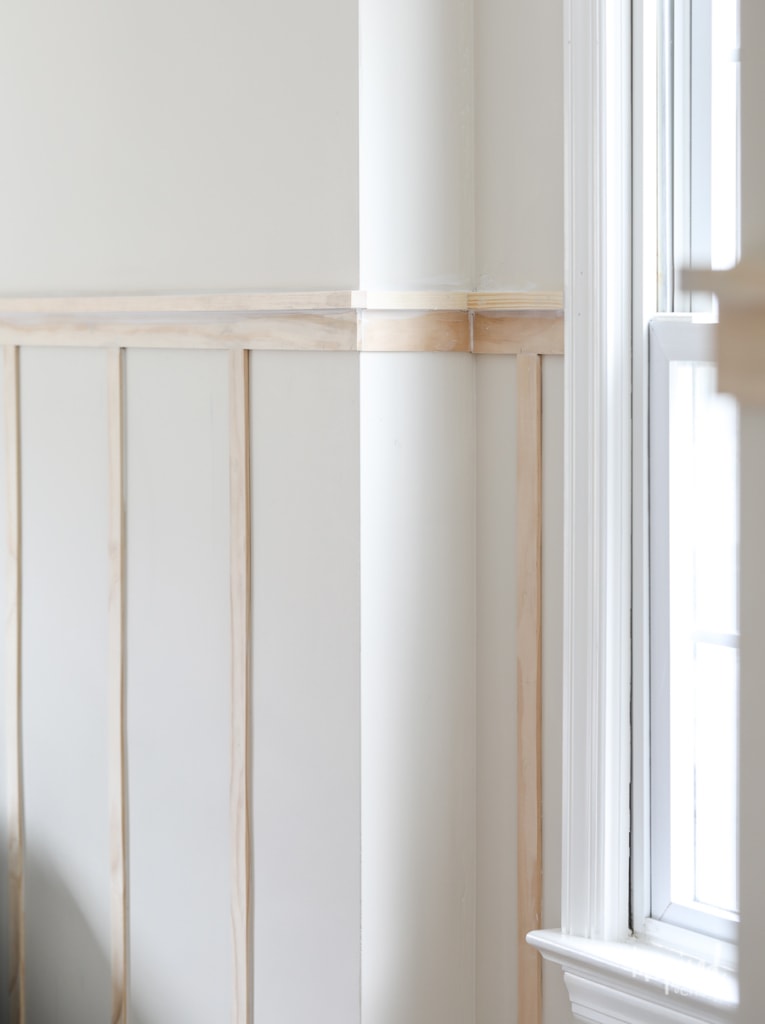
I also purchased this square trim molding for the finishing ledge or topper on my board and batten.
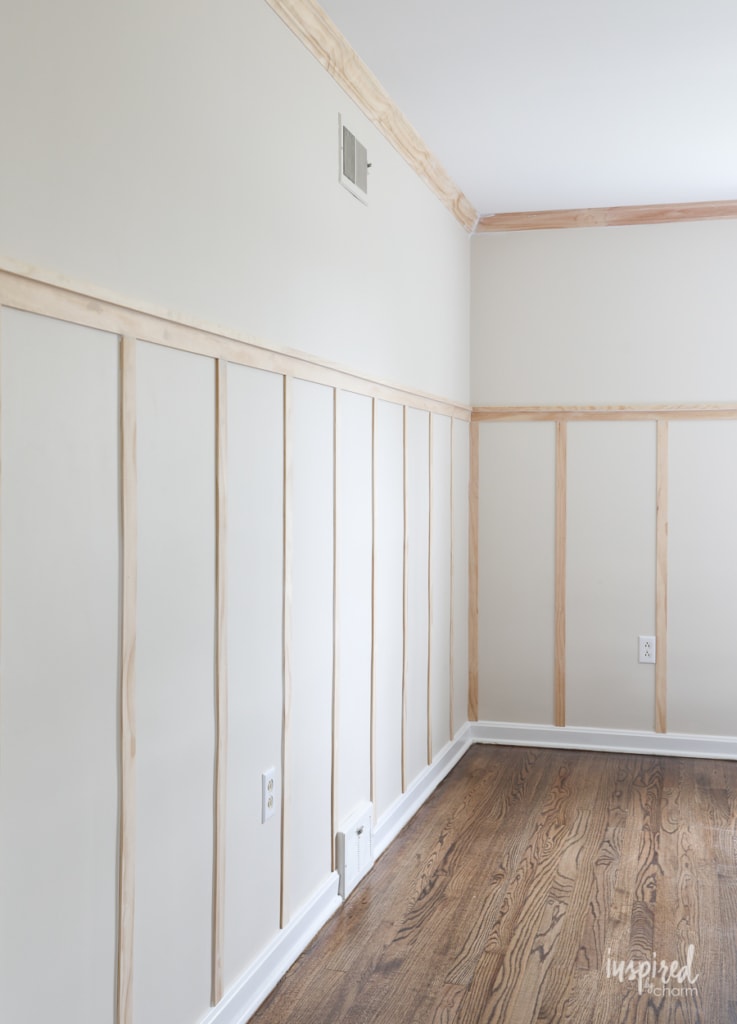
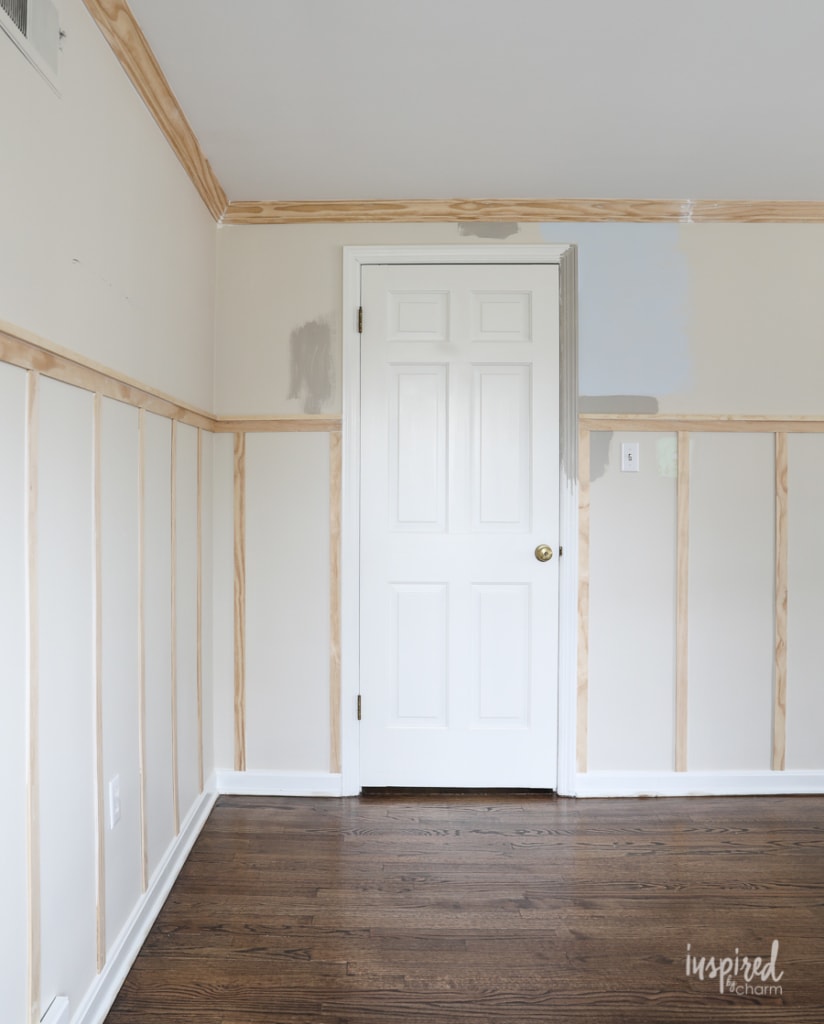
Once I had my supplies, I got to work. I decided to not only do this trim treatment in my bedroom but also the adjoining open closet. I started with the crown molding. (You may remember that I installed crown molding in the kitchen, bedroom, and stairwell of my previous home. I also recently added chair molding to the entryway in my current home.) I enjoy the process, even though my corner joints are never as good as I’d like. (Not-So-Pro Tip: I’ve always painted my crown molding. It’s amazing what caulk and paint can do to hide less-than-perfect joints.)
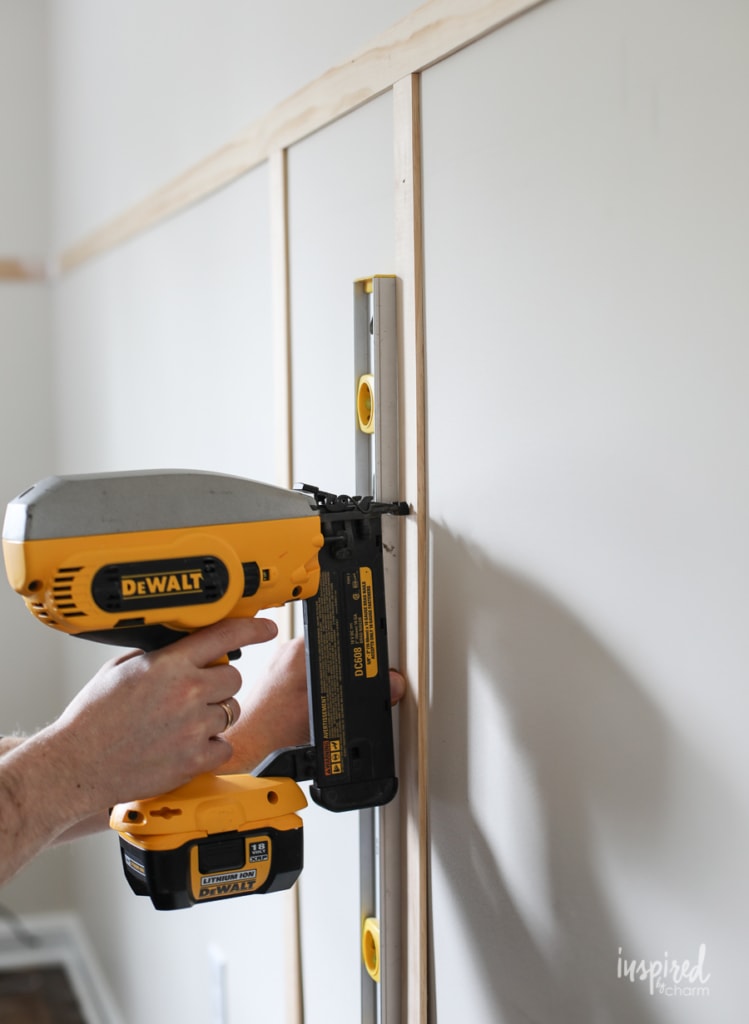
For projects like this, I use this battery powered nail gun. I have had mine for several years and used it for the previously mentioned molding projects. It’s never let me down. For trim projects, I typically use 2″ nails.
One thing to note here: If at all possible, put up crown molding with help from a friend. I did the installation by myself, and I’m still not sure how I managed to accomplish it. Installing a 12-foot length of molding while getting joints to line up perfectly is super challenging. Working with a friend will eliminate many extra steps and lessen your stress.
With the crown up, I moved on to the board and batten.
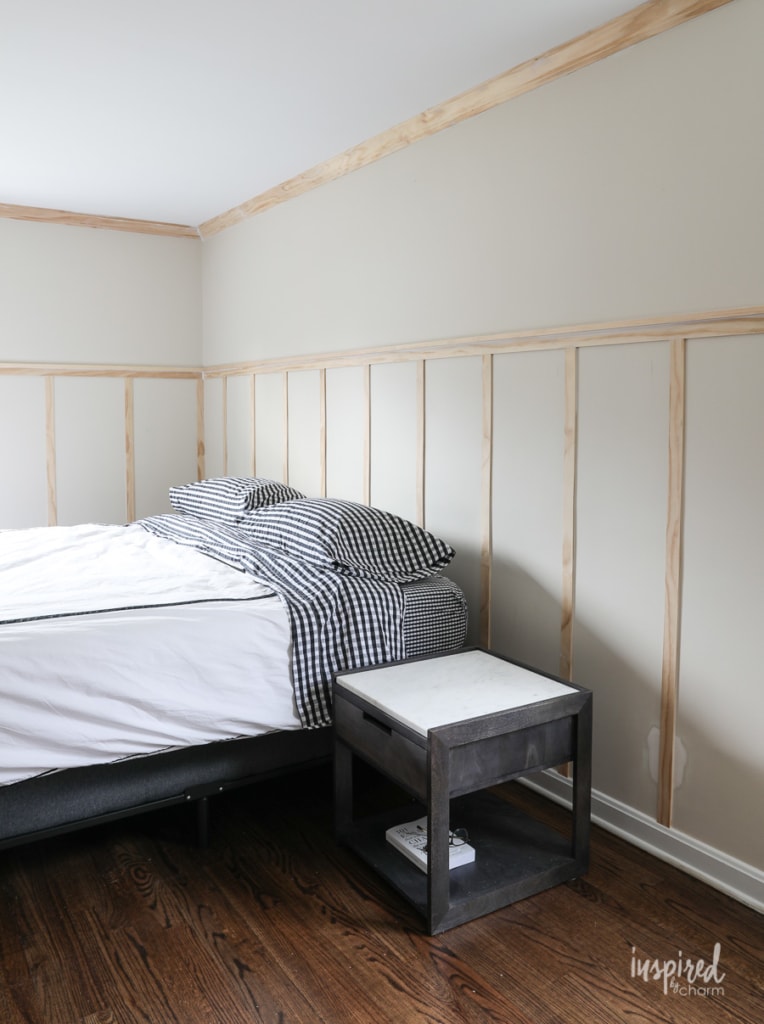
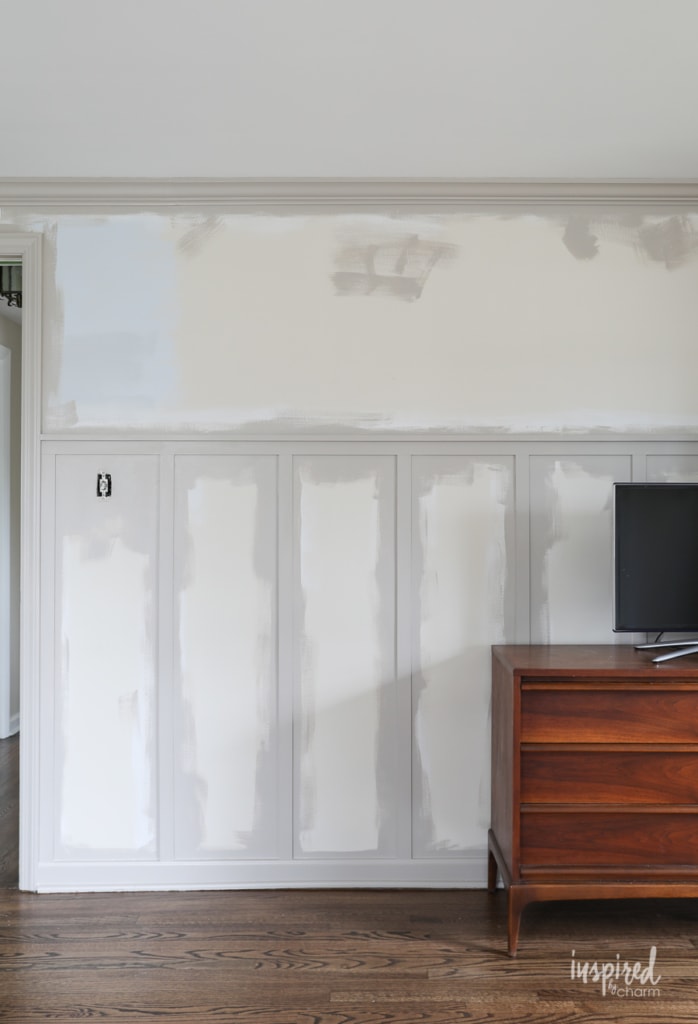
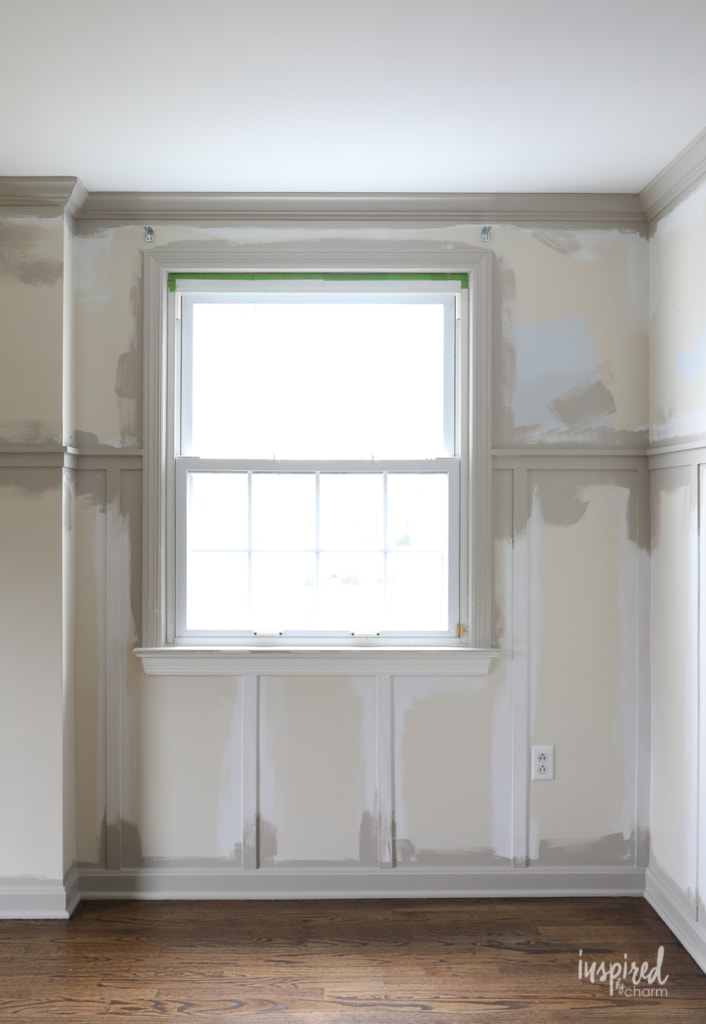
I researched the “proper” height for board and batten and found a variety of recommendations. I decided on 58″ for the height of my board and batten. This was based on the look I was after and the existing placement of my light switches.
With that figured out, I went around the room and marked that height at several points on the wall. Then I used a level to draw a straight line and connect all the points. A good level will become your best buddy for this project.
Once the lines were marked, I used my nail gun to attach the horizontal boards all around the room. You’ll only want to use enough nails to secure the lattice strips to the wall. Be careful not to overdo the nails because you’ll have to patch all of those holes before painting.
When the horizontal boards were in place, it was time to put up the vertical battens. Again, I googled information on spacing and found a variety of ideas. I chose to have 15″ inch spaces between my battens.

I created a spacer from a scrap piece of lattice to ensure everything was evenly spaced as I worked my way around the room. I used the spacer to determine the distance between battens and relied on my level to ensure the battens were straight.
💌 SAVE THIS POST / RECIPE!
A couple of things to note here:
- This is a fairly easy process, but it does take time and lots of trips to and from your saw. Despite all the sawdust it created, I moved my miter saw into my bedroom to make the process a bit faster. (I’ve had this compound miter saw for several years and really love it.)
- Plan ahead. You’ll want to have a plan as to where to start the batten. Use tape or a pencil to mark where the batten will be nailed around the room. If you need to fudge the spacing an inch or two in certain areas, no one will notice. For example, I wanted the battens to be equidistant from each side of the window and door frames, so I adjusted my placement a bit. Now, if you measure my spacing, the battens won’t be exactly 15 inches apart, but the placement is pleasing. And the slightly inconsistent spacing isn’t noticeable to the naked eye.
- Since I decided not to remove my baseboards, I needed to cut the bottom of all of my batten pieces at a 30-degree angle so there wouldn’t be any gaps between the batten and baseboard. Depending on your baseboards, this may not be necessary or your angle may be different.
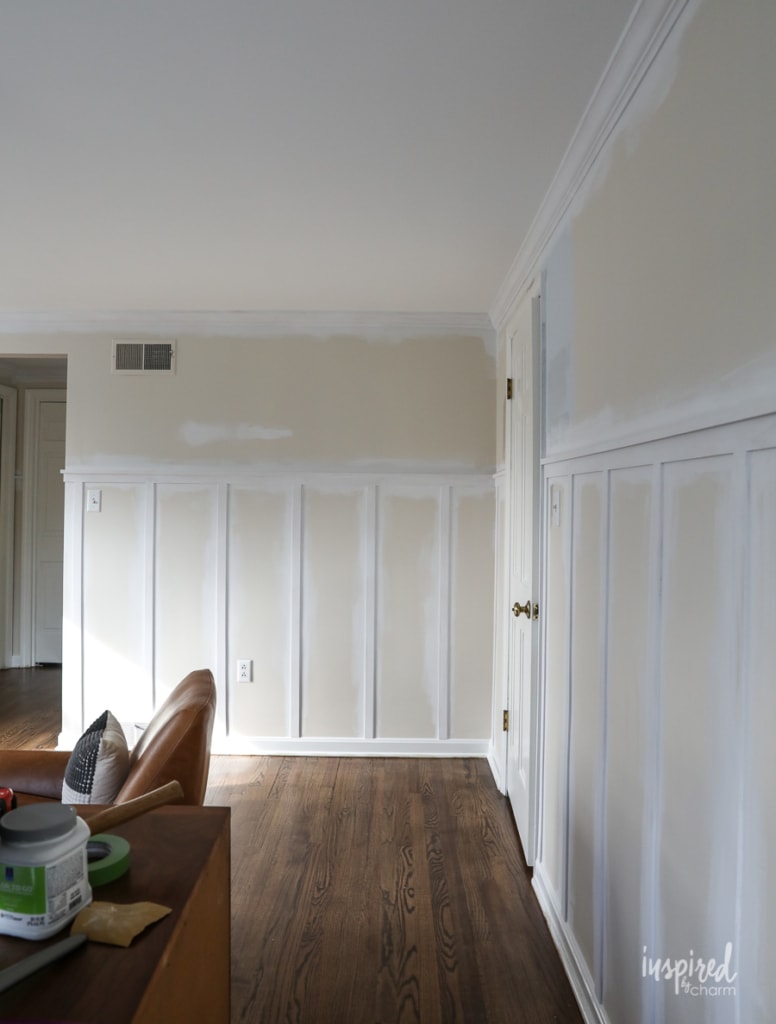
With all of the board and batten installed, you’re ready to patch and caulk.
I used this lightweight spackling for nail holes and this caulking for seams.
Because most walls aren’t perfectly smooth, you’re likely to have a little space between the wall and trim. You need to fill these spaces in to get a clean and polished look. It may be tempting to skip this step but don’t.
Installing the trim and then patching, caulking, and sanding all of it took me three solid days of work.
Because I used raw pine wood, everything needed a coat of primer before painting.
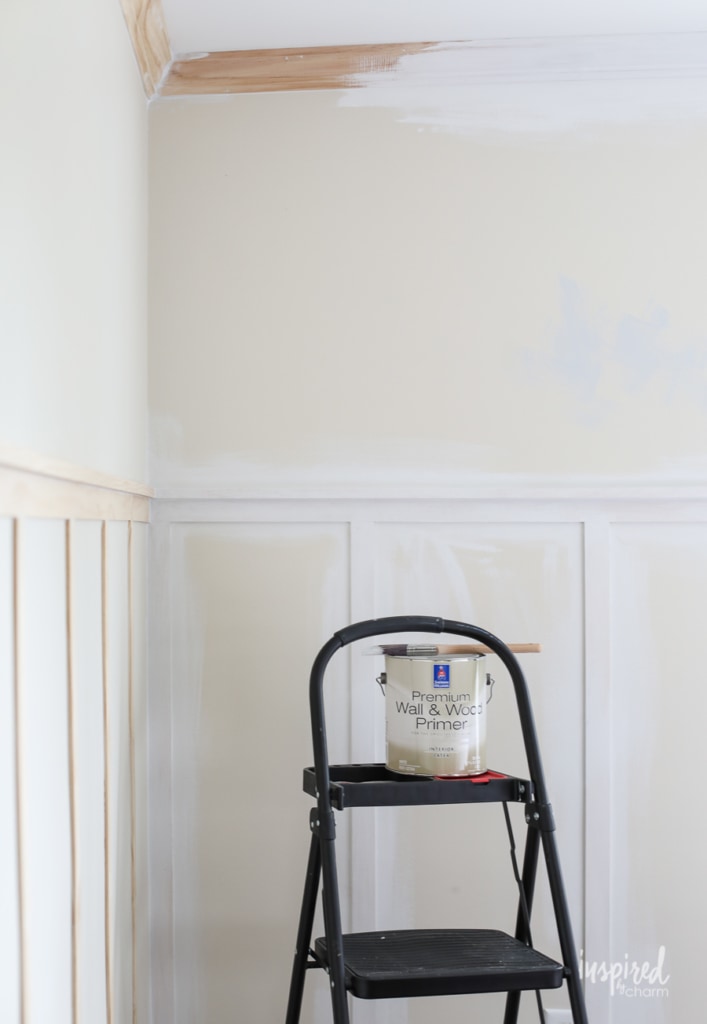
Once all the primer was dry, I followed up with trim paint. I used Sherwin-Williams Emerald®Urethane Trim Enamel in a satin finish. As I mentioned in my first ORC post, the color is Anew Gray SW 7030. And while we’re talking about paint, be sure to swing by the blog tomorrow when I’ll be sharing my method for choosing paint colors along with other details about the paint I used for this project.
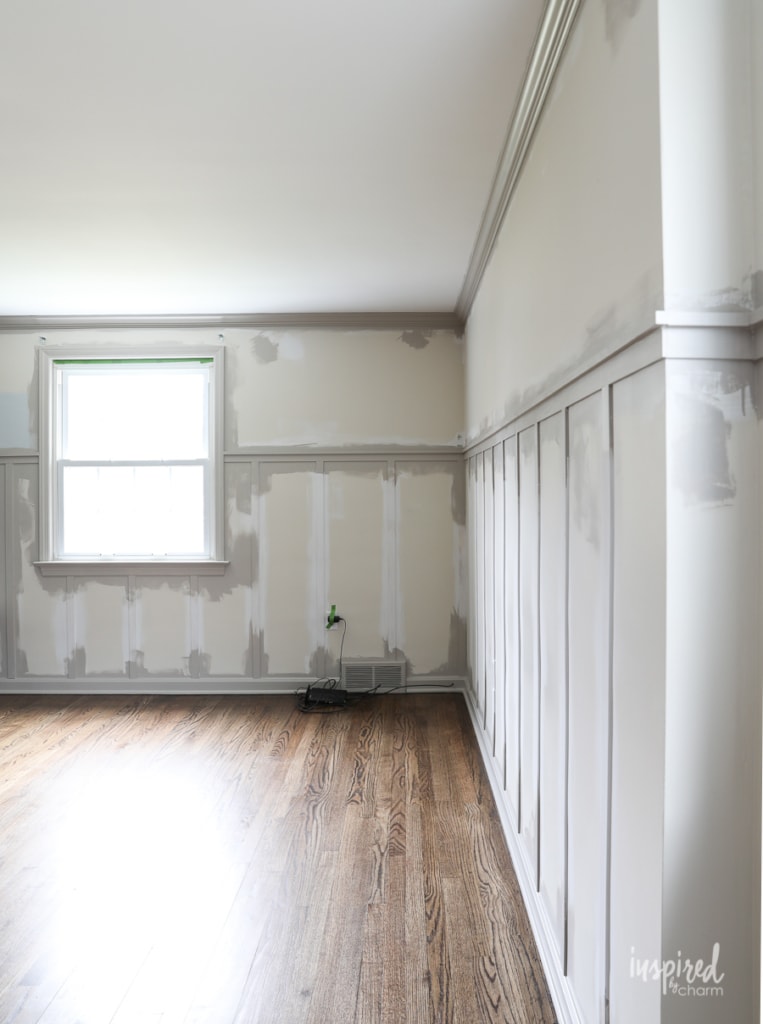
I’m not going to pretend that painting all of this trim plus the walls was a walk in the park. It was work. I wasn’t painting all day every day, but it took me 6 days to complete the project. (Hence, the lack of blog posts last week.)
I enjoy painting and it was satisfying to see the progress I was making, but by day six I was more-than-ready to be finished. The part that took the longest is cutting in all of the edges of the lattice and trim pieces. Also, not getting paint on the ceiling and the floors required exacting work and a steady hand.
Nonetheless, it was totally worth it, and I am obsessed with the results.
As you’ll see, I’m sharing a few sneak peeks of the process, but I’ll be waiting until the final week of this ORC series to show you the finished product. (Spoiler alert: It looks crazy good, and I’m thrilled with the results! I think I already said this.)
I also filmed a few video clips along the way, so I wanted to share those with you as well. They are mostly progress updates rather than full “how-to-style” videos. It was challenging enough putting up the trim, so as a novice YouTuber, filming the entire process at the same time wasn’t happening.
If interested, you can watch the video below. I’d also love for you to join me on YouTube. While you’re there, be sure to subscribe to my channel, so that you don’t miss a video.
Board and Batten ORC Video:
And that’s a wrap on Week 2 of the One Room Challenge. It was a wild week but totally worth it. I think the board and batten will be the biggest change in the room, and I’m grateful I had the time and energy to do it. I can’t wait to share the final look with you.
IBC Master Bedroom Spring ORC:
Week 1 – Before Photos and Design Plan
Week 2 – Board and Batten (You are here!)
Week 3 – Cozy Bedroom Design Ideas
Week 4 – Antique Finds for my Bedroom
Week 5 – Finishing Details
Week 6 – Final Reveal!
Be sure to continue to follow along. I’ll meet you back here every Wednesday for the next four weeks with the latest on my ORC. Also, if you love makeovers, be sure to click through all of the participants’ posts. I’ve linked everyone below.
Thank you for visiting IBC!
Spring 2019 One Room Challenge Designers:
At Home With Ashley | Casey Keasler | Dorsey Designs | The Farmhouse Project | Home Made by Carmona| House of Funk | House of Jade Interiors | House Seven Design | House That Lars Built | Inspired by Charm | Jana Bek | Jessica Brigham | Kelly Golightly | Murphy Deesign | The Pink Pagoda | Sarah Gunn| Sherry Hart Designs | Sugar & Cloth | Veronica Solomon | Vintage Revivals | Media Partner BH&G | TM by ORC
A special thanks to Inspired by Charm’s One Room Challenge Sponsors:
Metrie | Lamps Plus | Barn and Willow | Loloi Rugs | Spoonflower | Emtek | Minted | Jill Ronsenwald
I realize that this video is somewhat “dated”, This being March 2025 as I’m watching, but the content is just spot on. My problem is the video I was looking forward to watching is nothing but ads. First Volvo, then a food ad, then Volvo again followed by another food ad. Am I doing something wrong? I think I would enjoy the video if I can find it. Also I was wondering what size boards and battens you were using. It seems most of the tutorials I’ve watched are !” thickness. I was wanting something less than that. Is a thinner batten a reasonable thing to use?
Omg I can already tell this is going to be so beautiful! Love all the pictures! I would love to add something like this to my master bedroom here in Redding, CA. If I could do board and batten and some hardwood floor refinishing my room would look so much better. Thanks for all the tips and inspo! Can’t wait to give this a try too!
What size wood did you use for the horizontal pieces?
Buddy awesome work and your hard work amazing keep it up:) the tools you use miter saw and drill best for the beginners thanks for sharing:)
This is an awesome work done by you but I would say if you use Dewalt Angle Grinder to remove the spots of glue on sheet then it will come with more shining way. But it still looks beautiful.
Wow! It’s a good idea and very easy to make.
I’m always freaked out about putting nails in drywall. Don’t you have to find the studs?
Typically with molding, finding a stud isn’t necessary as it’s rather light and won’t be supporting any weight. It’s merely decorative.
xo Michael
I really love how this looks! One quick question for you: how did you attach the top ledge? The thin depth of the lattice has me stumped on how best to attach the ledge.
Thanks in advance!
I’m not sure what you mean…
The top ledge is a square piece of molding. I set it right on top of that top horizontal piece of lattice flush with the wall. I then nailed it to the wall.
Does that answer your question.
xo Michael
Ah gotcha! I was thinking somehow you attached the ledge to the lattice below it, rather than directly onto the wall. Are you planning on setting artwork or anything directly on top of the ledge? Any concerns with it holding up? Thanks so much for your reply!
The “ledge” is rather narrow (3/4″ wide) so it’s really not wide enough to properly hold artwork and/or objects. You can see the finished space HERE to see how I’ve hung artwork around in the space.
The ledge and board and batten should hold up beautifully. If you plan on doing this and using the “ledge” as a shelf for lots of objects and art, you’d definitely need a different approach, wider materials, etc.
xo Michael
Oh I love how you placed the artwork! You’ve inspired me to do something similar. Thanks for all the help!
You bet!! <3
xo Michael
“BOARD AND BATTEN – ONE ROOM CHALLENGE WEEK 2” is a woodworking project which can be processed using tools like router tables.
Really interesting project and its worked out very nicely, With minimal power tools needed. For anyone who hasn’t already got power tools but is planning to get DIYing to check a power tool review website like https://toolinspector.com to make sure you buy a good quality one that will be able to stand up to the work, you have planned for it.
I love it, especially the color, but why didn’t you paint the walls and lattice first, then nail up the lattice, caulk and touch up? SO much easier and faster!
Hmm. I didn’t think about that. Though, with filling all the gaps in-between the boards and the nail holes. There would be A MILLION touch-ups. Haha.
xo Michael
Looking good! I can’t wait to see more of the results. Hang in there…getting closer to being done. 🙂
Love this…was going to do the same treatment but couldn’t figure it out without taking down all the window and door casings:( It’s a lot of work but will make a huge difference in the space!
This method should work for you then! I didn’t remove any trim to achieve this look.
xo Michael
Thanks for the love! Your room is lookin’ good – keep it up!!
Of course. Ashley! Thank you for the inspiration!! I love your space!
xo Michael
That already looks so good! I cannot imagine how you managed this by yourself…wow! Good music and a cocktail perhaps?
Haha. Yes! Exactly!
xo Michael
I am looking forward to the final reveal. I love all the paint colors you’ve chosen and most of all the fact that the board and batten is not painted white. I’m loving this one room challenge!
Yes. I’m so glad I chose a color. I’m loving it!
xo Michael
This is going to be spectacular! I am really excited to see the finished result. And board and batten is always a classic choice. Love!
Michael – I love the look of the room. And, I appreciate your straightforward comments about the work involved; I trust your assessment of what it takes to get the job done. Thanks for the pointers to more detailed how-to’s.
Yes, a board and batten treatment is like a big hug! I know this is going to be a cozy and relaxing space for you. Thanks for sharing your process with us!
Yes! That was the goal. Thank you so much!!
xo Michael