How to Make a Marshmallow Wreath
This Post May Contain Affiliate Links. Please Read Our Disclosure Policy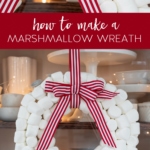
Dive into the holiday spirit with this easy DIY Marshmallow Wreath! With just a few simple supplies, you’ll be crafting a fluffy and festive masterpiece for your home. It’s not just beautiful, but also budget-friendly. Perfect for adding a unique touch to your holiday decor.
Grab a few bags of marshmallows, a wreath form, and some toothpicks because I’m teaching you how to make a fabulous, festive, and fluffy marshmallow wreath!
I love homemade christmas decor! Back in 2014, I crafted my first marshmallow wreath. It was one of those impromptu late-night projects that I created out of passion and for which I failed to write any sort of tutorial. (Oops!) Flash forward to 7 years later and after many, many requests, I’m finally bringing you this Marshmallow Wreath tutorial!
That OG marshmallow wreath that I made back in 2014 has since been put to rest. I made the horrible mistake of putting it in my attic and it melted into a sticky mess that could not be saved. (FYI: Do not be like me. If you make this wreath, store it in a dry, even temperature location.)
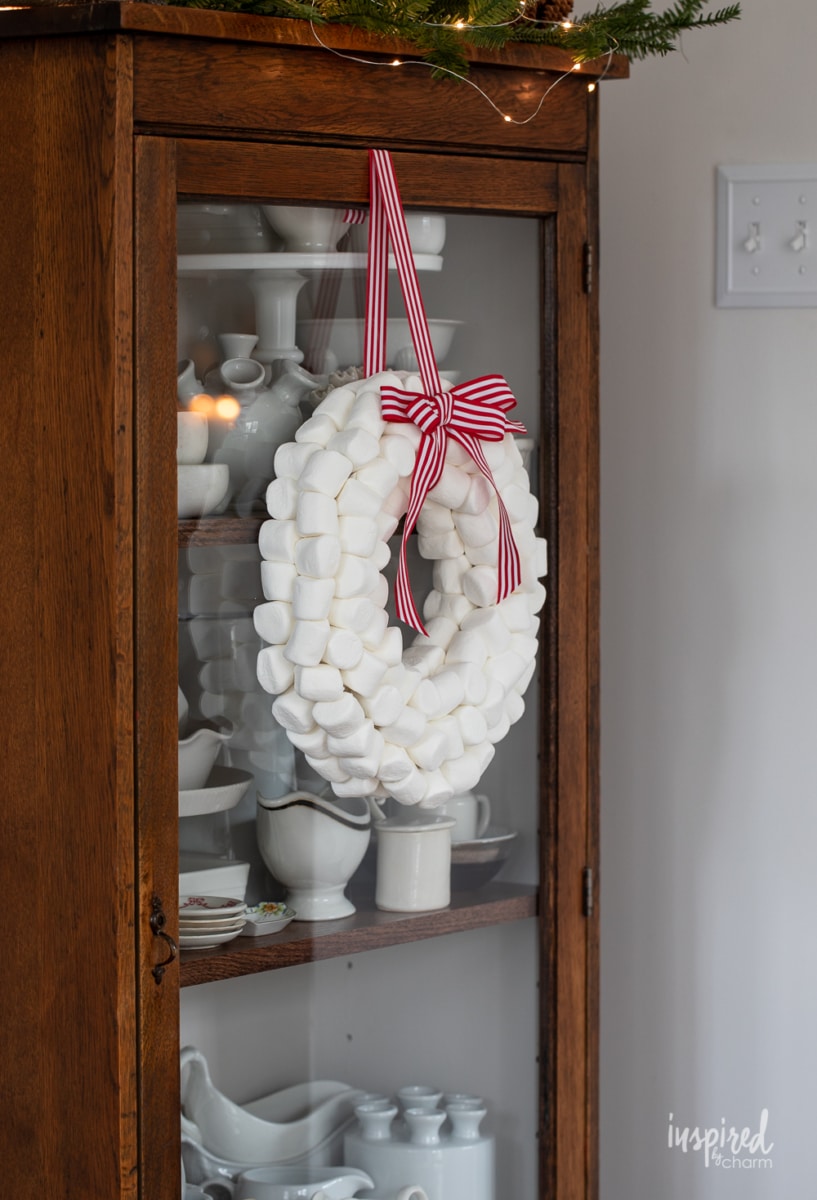
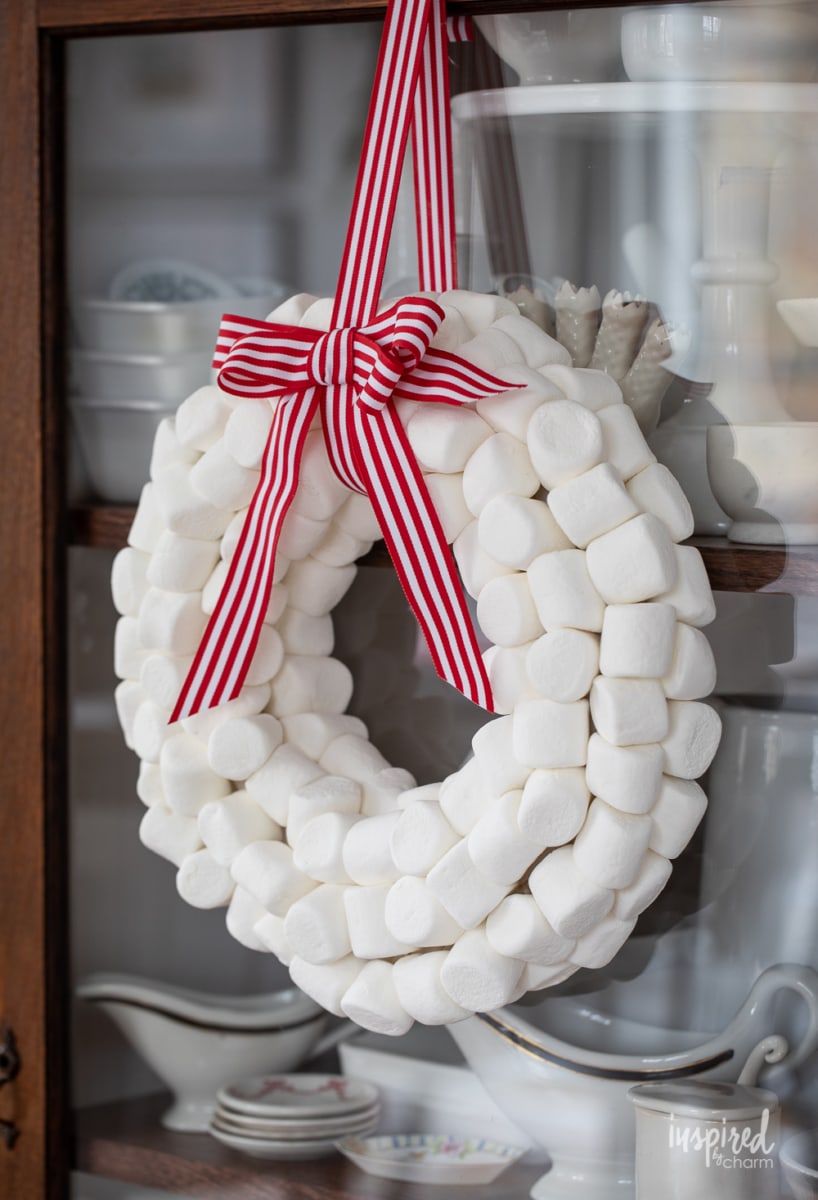
I was kind of bummed about it and my mom came to the rescue and surprised me by making one for me as a Christmas gift two years ago. Here is the one she made:
As you can see, this one is a bit bigger than my original wreath.
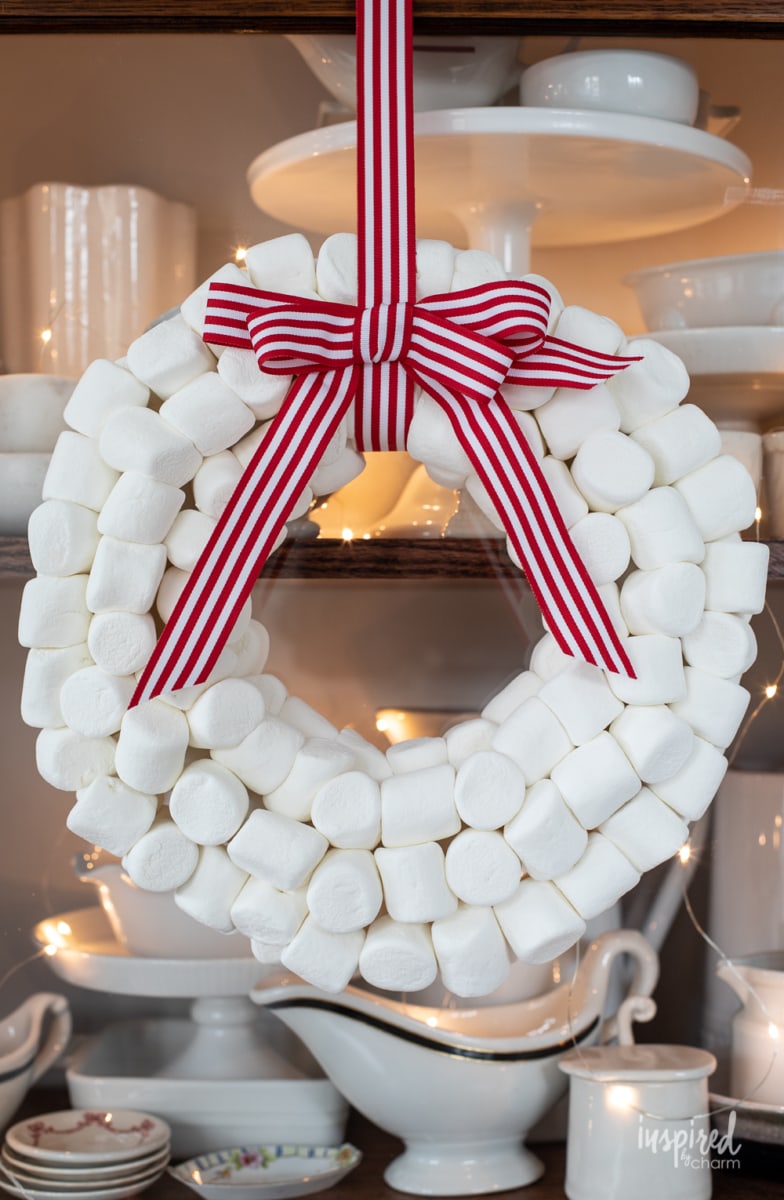
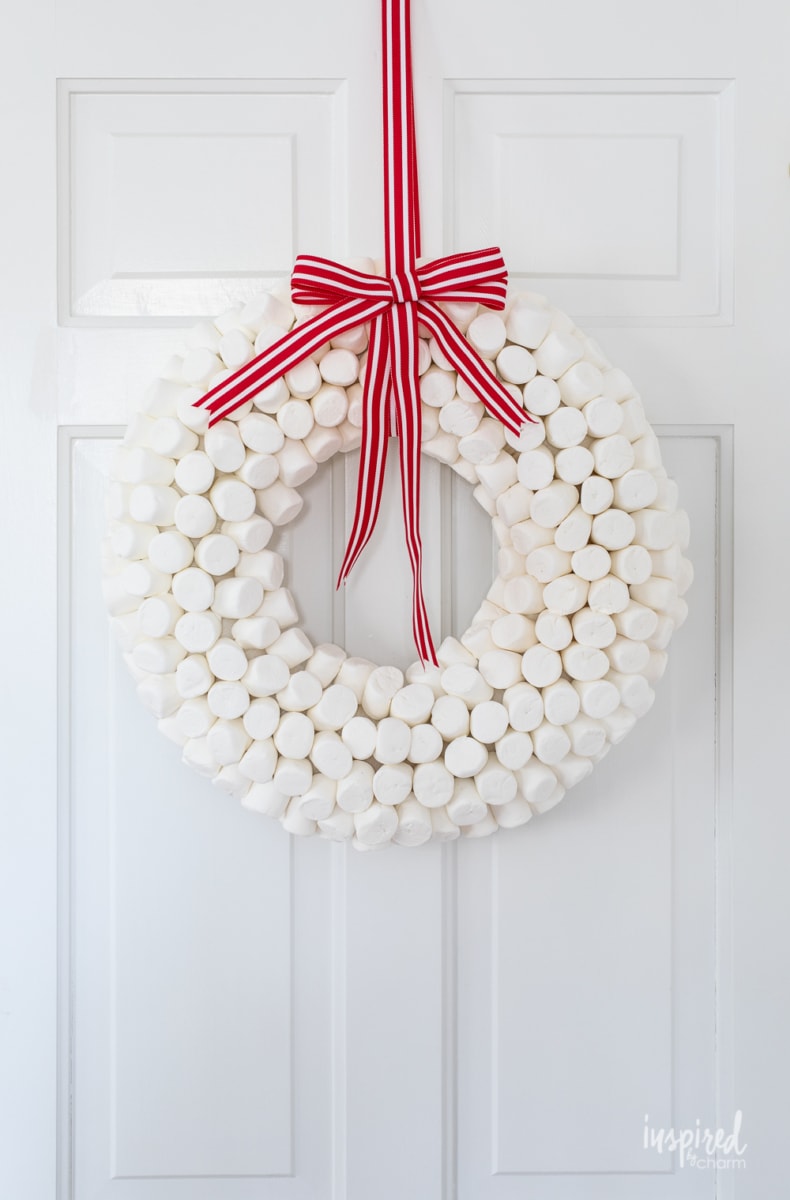
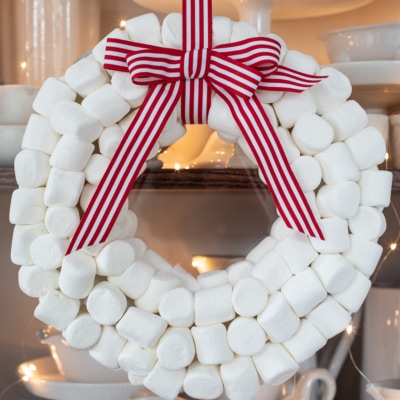
Because I wanted to show you the process from start to finish, I decided to make another marshmallow wreath. I went a bit smaller than the previous two. This way I could share the process with you, and also make something a little different.

Why You’ll Love This Project
- First off, if you’re anything like me, you’re probably always on the hunt for handmade holiday projects that don’t require a PhD in Crafting. With just a few bags of marshmallows, a wreath form, and some trusty toothpicks, you’ll be on your way to creating this fluffy masterpiece. No fancy tools or skills required.
- Let’s face it, sometimes holiday décor can put a dent in our wallets. But this? It’s like getting champagne style on a sparkling water budget. Marshmallows are pretty easy on the purse strings and a wreath form can be found for just a few bucks. Yet the final product looks like something you’d snag from a high-end boutique.
- When friends and family come over and see your creation hanging proudly, trust me, it’ll be a talking point. “You made that?!” they’ll exclaim. And oh, the satisfaction when you can nod and say, “Yep, you bet I did!”
Before we get into the tutorial, it’s worth mentioning that this wreath is really easy to make. I mean REALLY easy. Also, depending on the size of the wreath, I think it comes together quickly. If you have a good hour to dedicate to it, that’s probably an adequate amount of time.
With all this being said, I will get to the heart of things and teach you how to make a marshmallow wreath.
Materials Needed
You only need a handful of things to craft this marshmallow wreath. Here’s what you’ll need:
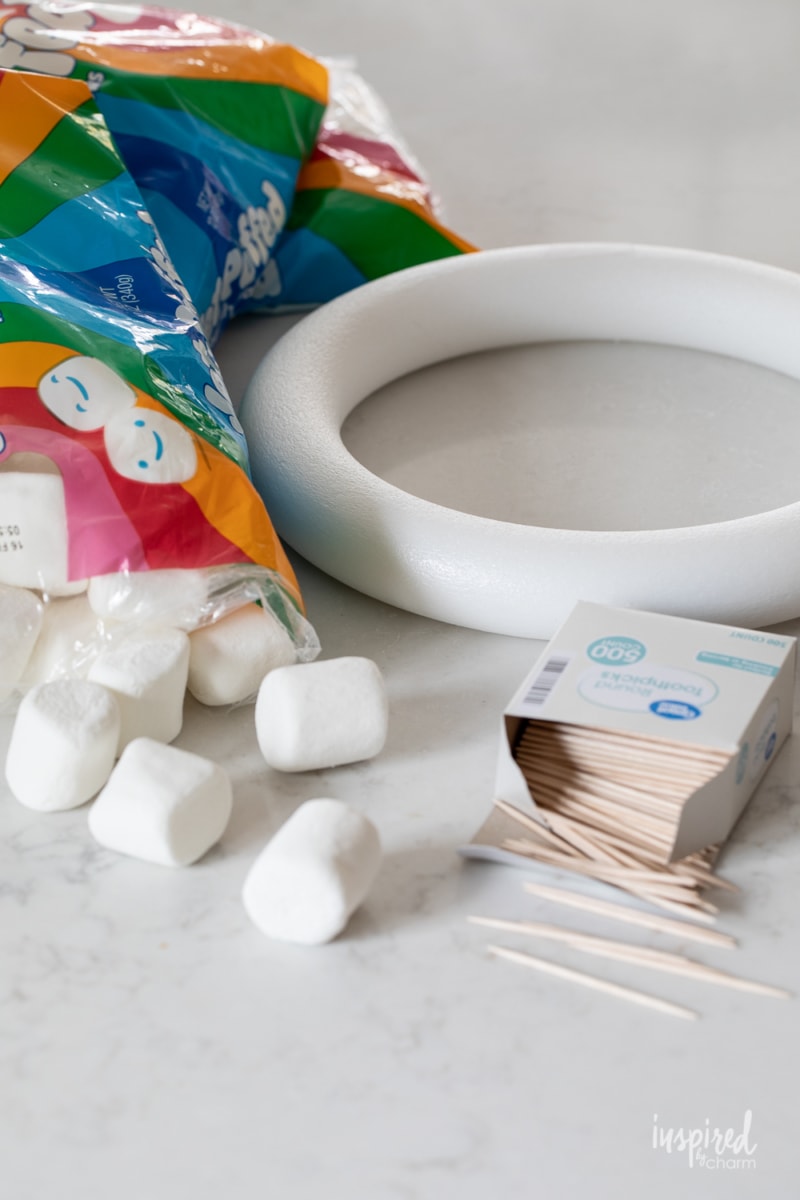
- styrofoam wreath form
- toothpicks
- marshmallows
- ribbon
- hot glue gun – optional, but likely
How To Make
We’re ready to assemble. You can follow along with my instructions beow. I also share them, along with a materials list, in a printable card at the end of this post.
- Start with your wreath form. You can use any size you like. This is a 10-inch form. (It’s likely not needed, but I did include a printable version of this tutorial below if you’d like to print it out to reference as you work.)
- Grab your marshmallows and toothpicks. For this size wreath, I needed almost 3 standard-sized bags of marshmallows and I used standard double-sided toothpicks.
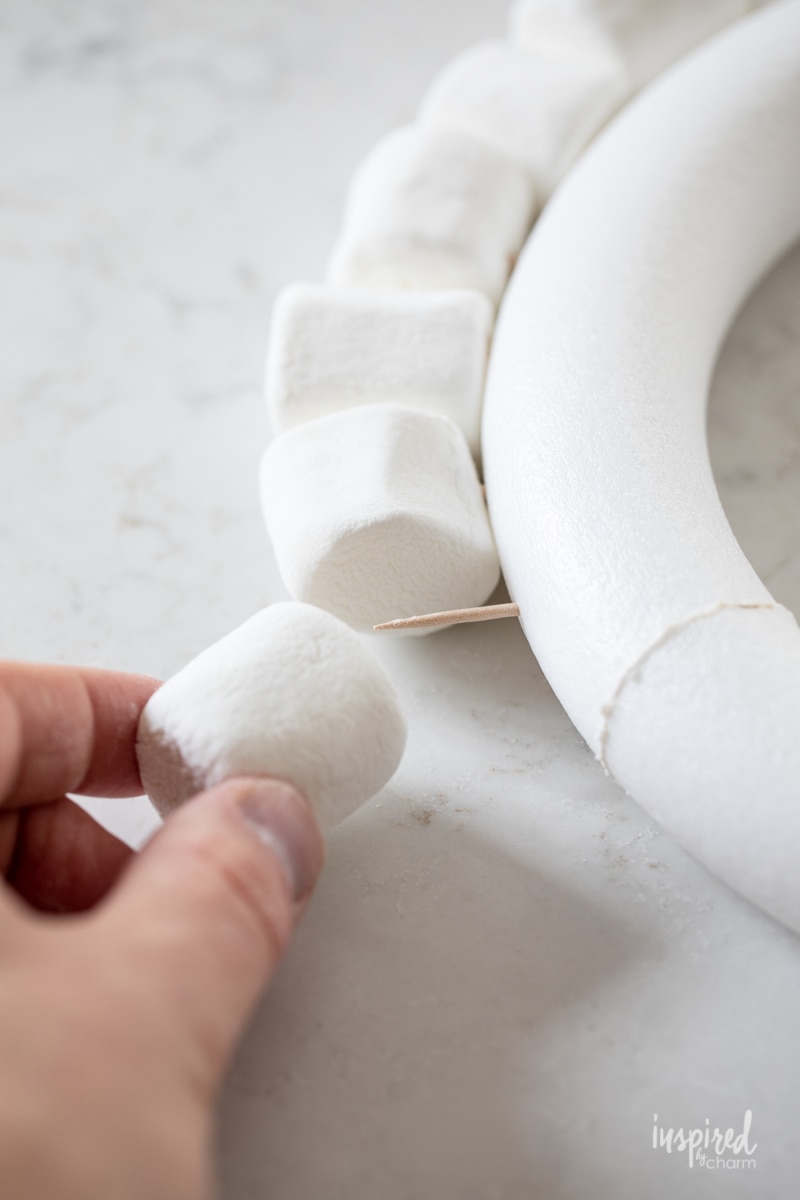
- Starting with the outer edge of the wreath, press a toothpick into the wreath form, and then add a marshmallow to the toothpick. (I told you this was easy.) The toothpick should be in the wreath far enough so that it doesn’t stick out of the opposite end of your marshmallow.
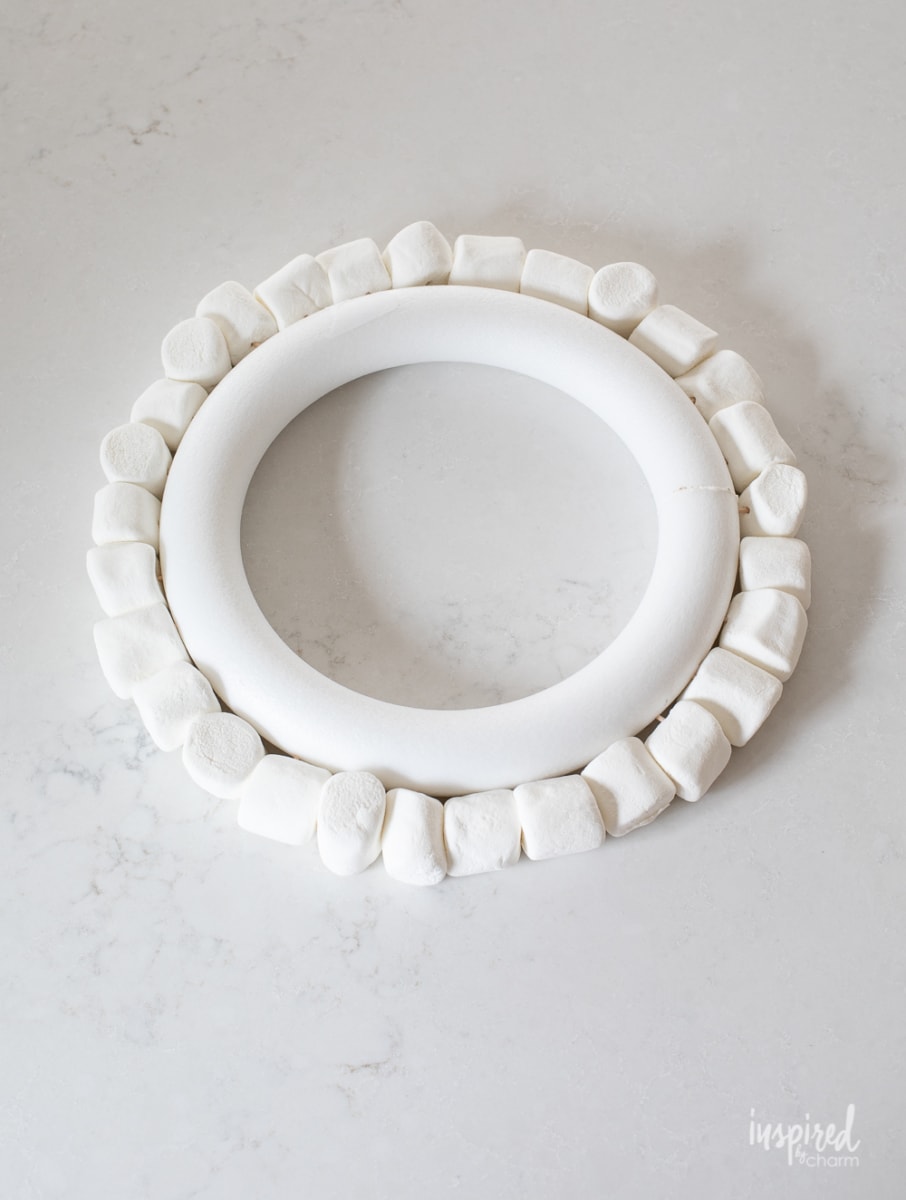
- Continue working all the way around the outer edge until it is full. I like to place the marshmallows pretty close together for a filled-in look. You can add the marshmallows in any direction you’d like. For my wreath, I varied the direction for a more whimsical look. In regards to the wreath my mom made, she was pretty consistent with how she placed the marshmallows so the wreath looks a bit tidier. Choose whichever look you like best.
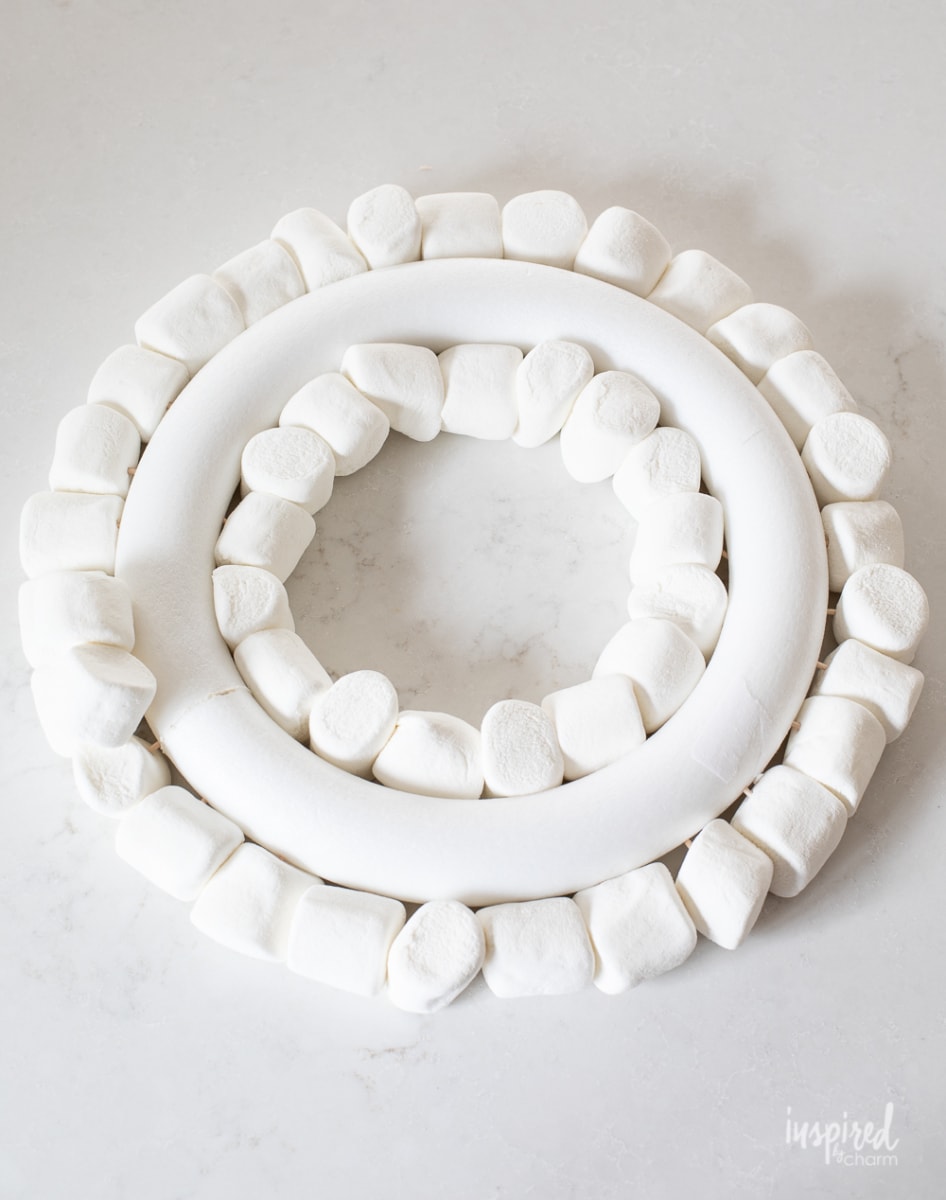
- With the outer ring of the wreath complete, repeat the same process in the inner ring.
💌 SAVE THIS POST / RECIPE!
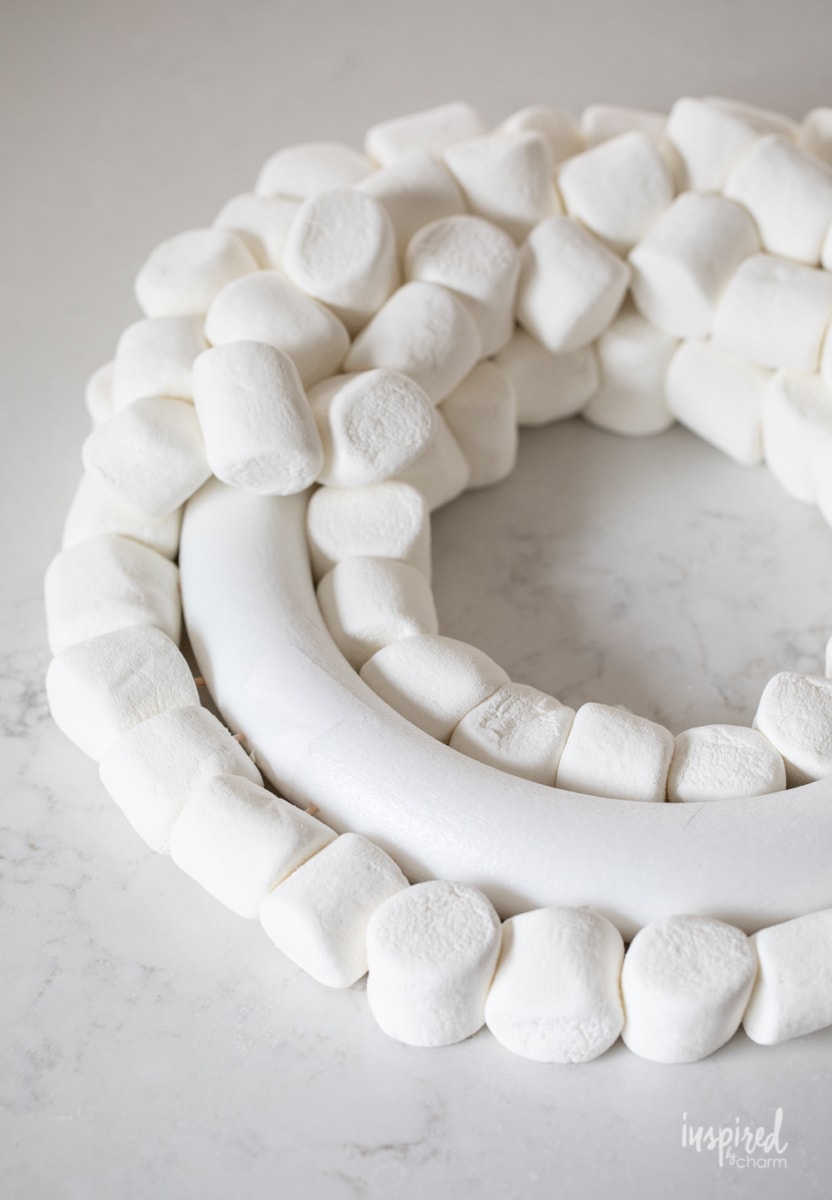
- Once you have the outside and inside of the wreath complete, just start filling in. I recommend filling in one area and working your way around the wreath until you end up back where you started.
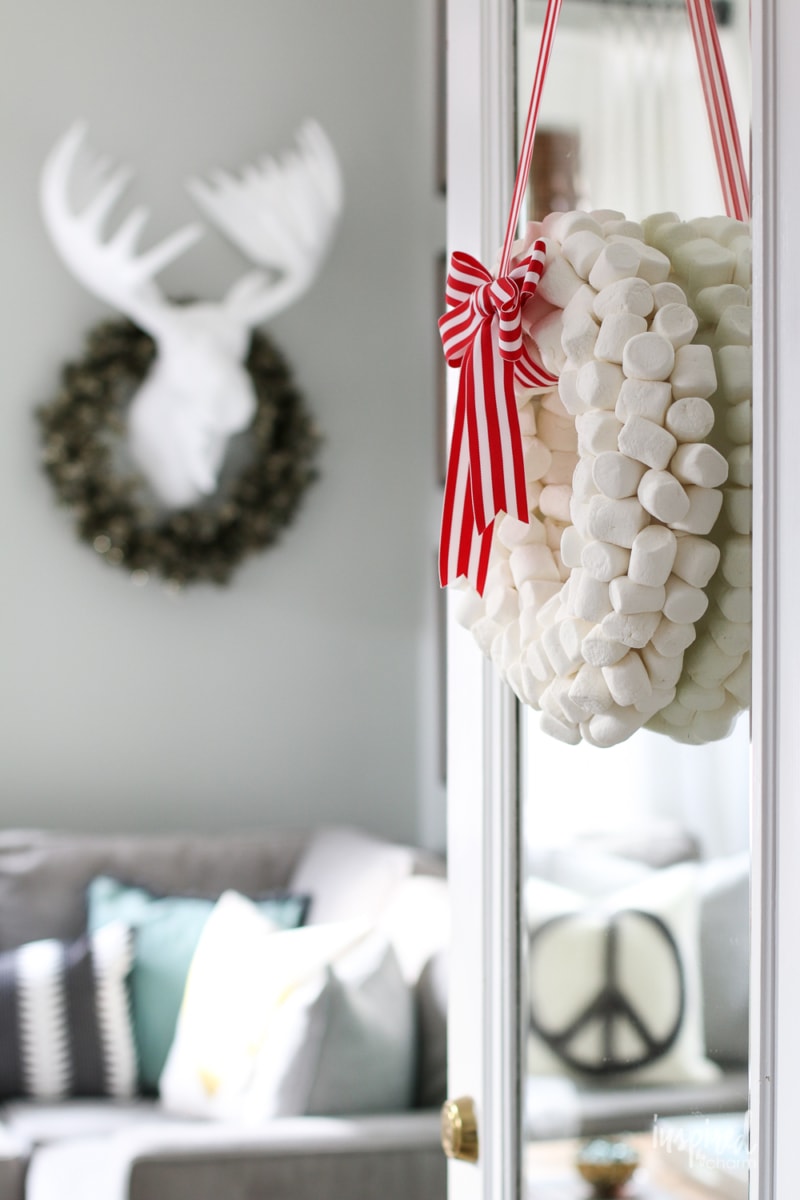
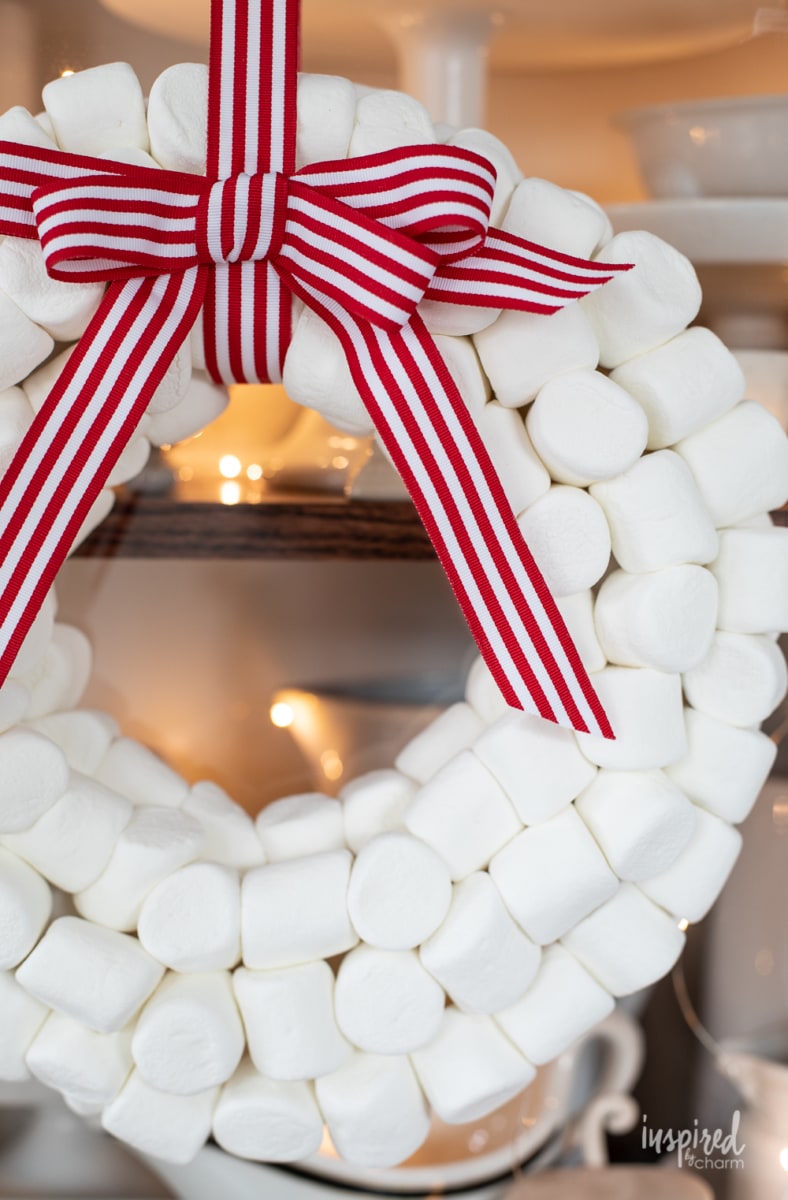
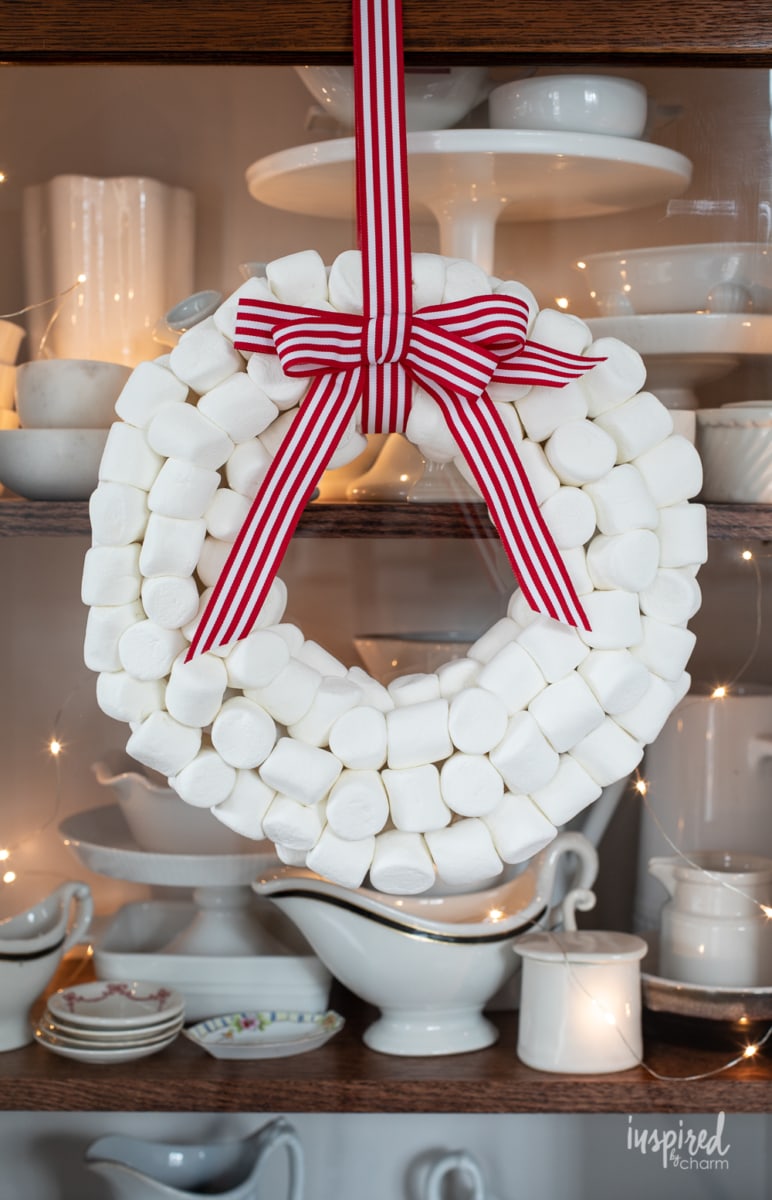
- Once the wreath is full and filled, add on a ribbon and a bow and hang that beauty up. You can find the ribbon I used HERE. I think this red and white striped ribbon pairs perfectly with the marshmallows. If for some reason that is sold out, check out these HERE and HERE.
- Now, I will say that the toothpicks are not foolproof. You are likely going to have a rogue marshmallow or two, especially once you hang it. When this happens, pull out your hot glue gun and glue those marshmallows into place. I had about 3-4 marshmallows that were being stubborn on this particular wreath. After using a few dabs of hot glue, I’ve had no other issues.
And that is it my friends! I told you this was a simple project.
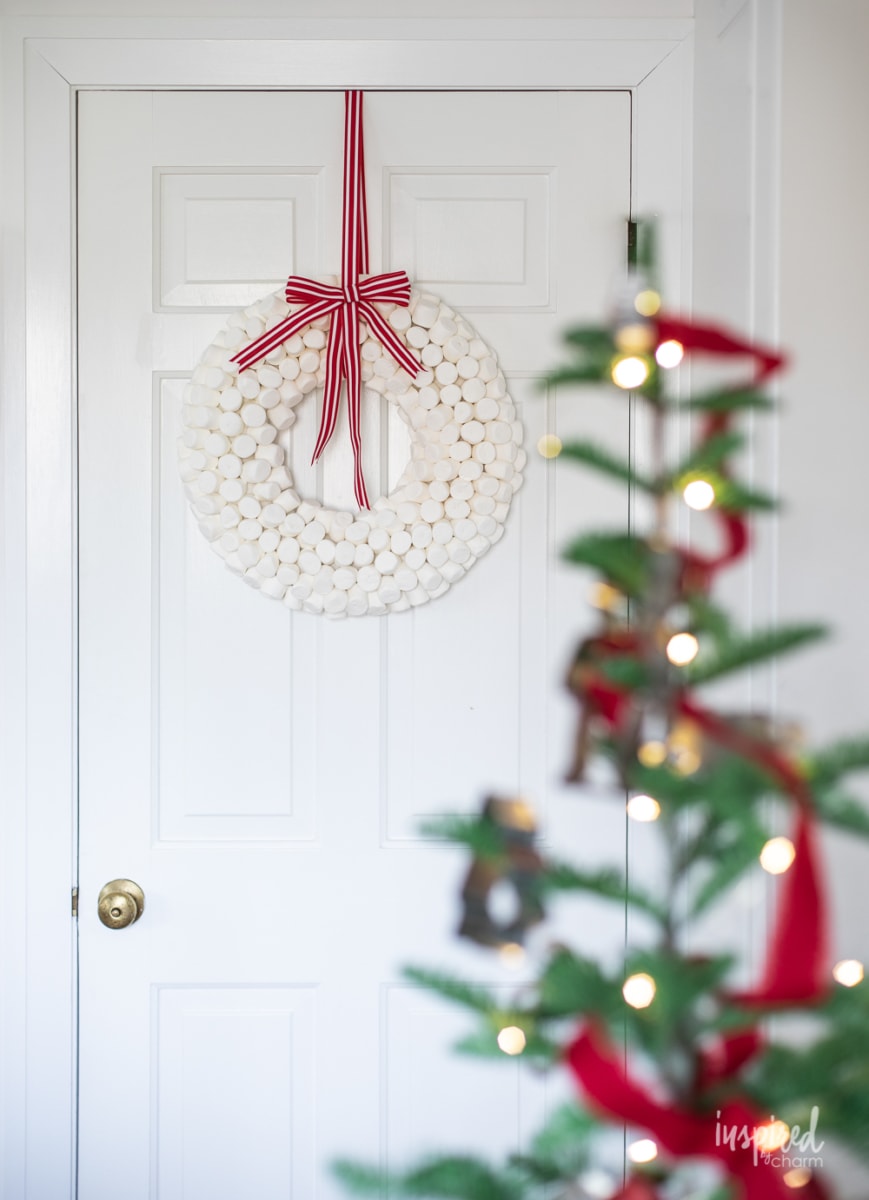
I think the end result is so cute and perfect for holiday decorating. Don’t you? I typically hang mine in or near my kitchen, but it will look fabulous anywhere.
Also, you can keep this for years and years as long as you don’t store it in an extremely hot attic as I did. Keep it dry and at a stable temperature and all will be well. The marshmallows will harden over time but they will keep their shape and fluffiness for years.
Frequently Asked Questions
Will the marshmallows go stale?
Yes, over time, exposed marshmallows will harden. However, this is primarily a decorative piece and isn’t meant for consumption. The hardened marshmallows might even help the wreath maintain its shape longer!
Can I eat the marshmallows afterward?
While they’re technically edible, this wreath is meant for decoration. If you’re keen on snacking, set aside a few marshmallows before you start crafting!
How long will the wreath last?
This wreath can last for years. It’s best to store it in a cool, dry place to prolong its life.
Can I hang it outside?
Nope. It’s best to display your marshmallow wreath indoors. This wreath will not hold up to wet elements, plus it make become sweet snack for bugs and other critters.
I ran out of marshmallows halfway through! What should I do?
No worries – it happens to the best of us! You can either fill in gaps with decorative bows, ornaments, or even sprigs of holly. Alternatively, take a quick trip to the store for another bag and resume your crafting.
Can I add lights?
Absolutely! Fairy lights or LED string lights can be woven through the wreath for an added touch of sparkle. Just make sure to keep any wires hidden and use battery-operated lights to avoid any fire hazards.
I hope you enjoyed this long-awaited tutorial on how to make a Marshmallow Wreath. Happy Holiday Crafting!
More Festive DIY Wreaths You’ll Love
- Gingerbread Cookie Wreath
- Vintage Christmas Ornament Wreath
- Cookie Cutter Wreath
- Rustic Star Anise Wreaths
- Gradient Rainbow Wreath
Did you make this festive marshmallow? I’d love to hear all about it! Please stop back and leave a comment and a 5-star rating below.
Want more from Inspired by Charm? Join the IBC Mailing List for inspiration in your inbox! Follow along on Instagram and TikTok for daily updates and behind-the-scenes looks at my processes. There’s even more inspiration on Facebook and Pinterest!
Marshmallow Wreath
Ingredients
- Styrofoam wreath form
- toothpicks
- marshmallows
- ribbon
- hot glue gun optional, but likely
Instructions
- Start with your wreath form. You can use any size you like. The one shown uses a 10-inch form.
- Grab your marshmallows and toothpicks. For this size wreath, I needed almost 3 standard-size bags of marshmallows and I used standard double-sided toothpicks.
- Start with the outer edge of the wreath, press a toothpick into the wreath form, and then add a marshmallow to the toothpick. The toothpick should be in the wreath far enough that it doesn’t stick out the opposite end of your marshmallow.
- Continue working all the way around the outer edge until it is full. I like to place the marshmallows pretty close together for a filled-in look. You can add the marshmallows in any direction you’d like. For my wreath, I varied the direction for a more whimsical look. In regards to the wreath my mom made, she was pretty consistent with how she placed the marshmallows so it looks a bit tidier.
- With the outer ring of the wreath complete, repeat the same process in the inner ring.
- Once you have the outside and inside of the wreath complete, just start filling in. I recommend filling in one area and working your way around the wreath until you end up back where you started.
- Once the wreath is full and filled, add on a ribbon and a bow and hang that beauty up.
I had a holiday craft party recently with 5 friends. We had a lot of fun making marshmallow wreaths and they all turned out great. Thanks for the clear directions and fun inspiration!
That’s amazing!! Love it!
xo Michael
You are genius, just looking at photos of your home brings me joy. I just made this wreath and hung it over the corner counter top where I have a little hot chocolate station. Adorable!!!
What a beautiful wreath idea! My sisters and I are having a wreath making day, so this will be a perfect and easy addition! Thank you for all your amazing ideas.
Michael, I want to thank you from the bottom of my heart for all the inspiration you share! Love, love, love the recipes, crafts, and home decor ideas you so skillfully articulate. Though I follow several bloggers, you are my FAV‼️ Just want you to know you are appreciated and inspiring‼️
HAPPY THANKSGIVING 🦃🤗🥧