Mini Peanut Butter Pies
This Post May Contain Affiliate Links. Please Read Our Disclosure Policy
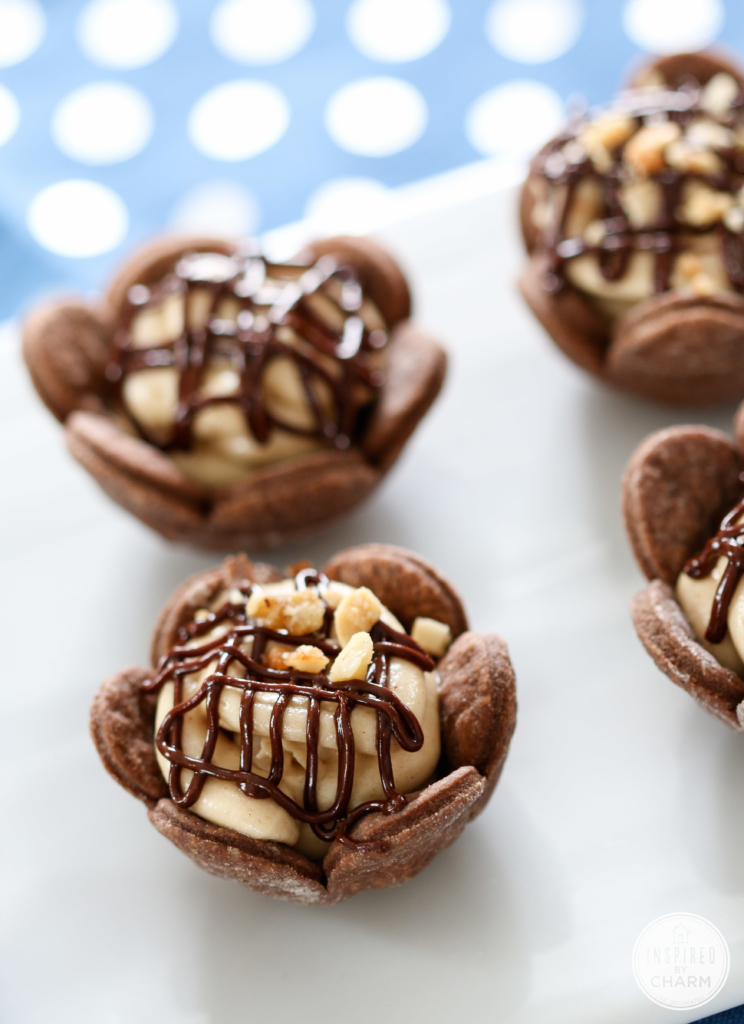
Are you looking for a dessert that will have your guests begging for the recipe? Look no further than these Mini Peanut Butter Pies with a chocolate crust. These bite-sized treats are easy to make but pack a flavorful punch, with a rich chocolate crust and creamy peanut butter filling.
Wow!. It seems as though I’ve been baking up a storm around here lately. From amazing pies to fun cookies to irresetible cream cheese desserts – apparently I have a big sweet tooth these days. Anyway, I came up with this idea for mini peanut butter pies late last week and couldn’t get it out of my head. I just had to give it a try as soon as possible.
Now, I’ve made a lot of recipes here on Inspired by Charm, but I can say with certainty that these Mini Peanut Butter Pies are officially in my top five. The combination of chocolate and peanut butter is probably my all-time favorite, so it’s not a surprise that I love these so much. I think you’re going to love them too!
And speaking of peanut butter, if you’re a fan, I have an entire collection of my best peanut butter dessert recipes.
Why You’ll Love This Recipe
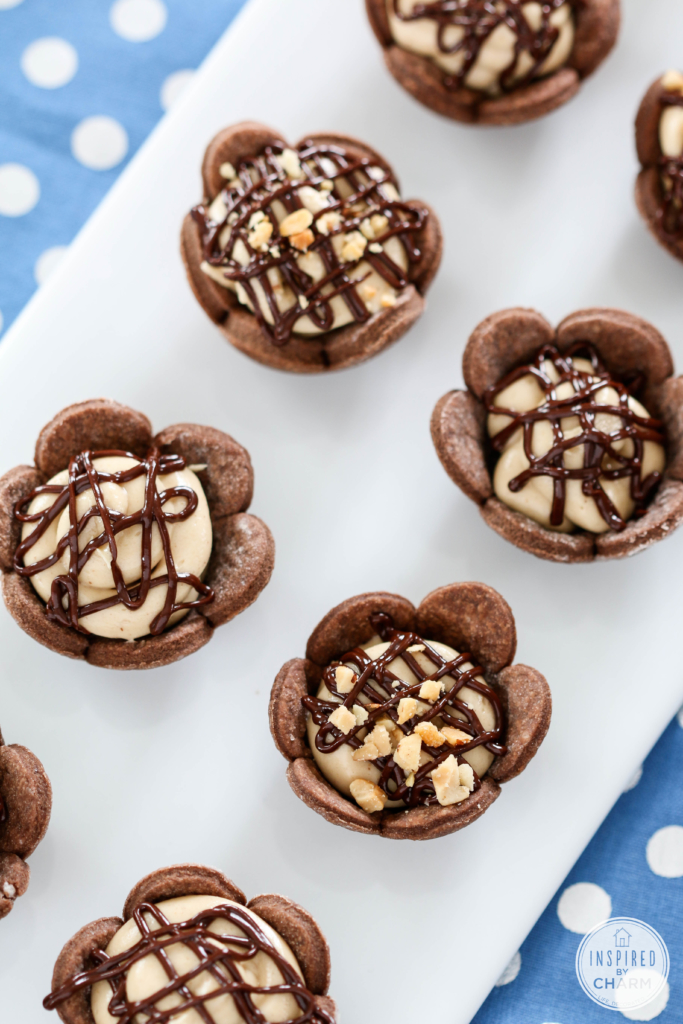
- Their individual mini size means they are the perfect dessert for entertaining, as each guest can have their own mini pie.
- Like any chocolate peanut butter dessert they are the perfect combination of sweet and salty, with the peanut butter filling being creamy and slightly savory.
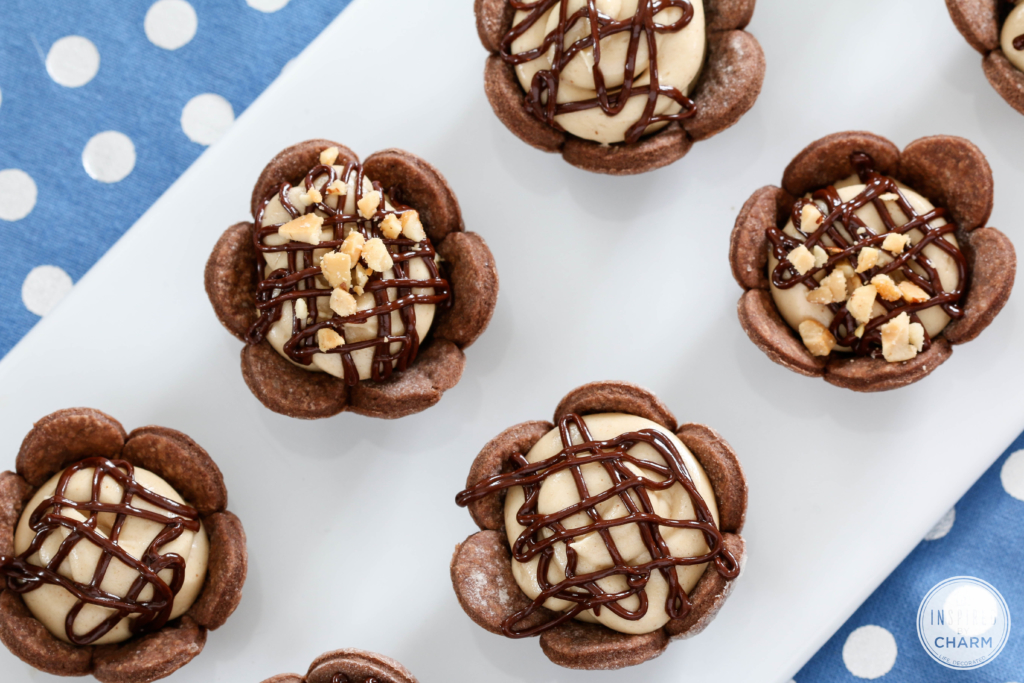
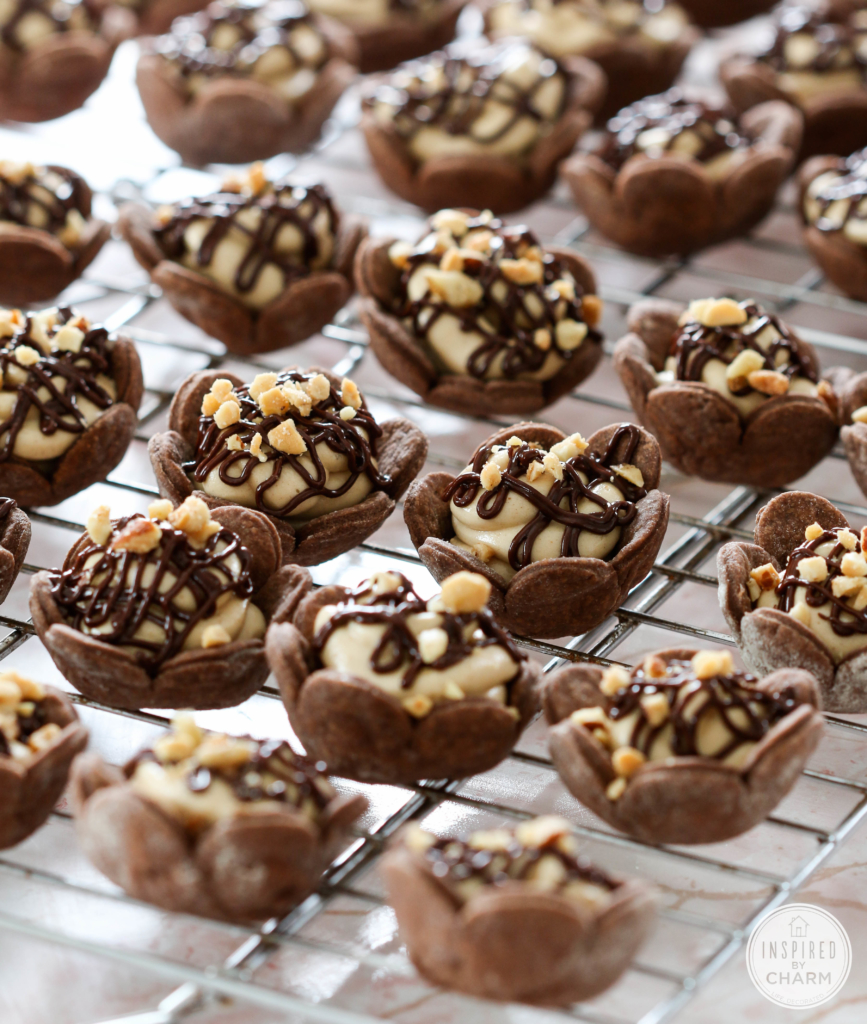
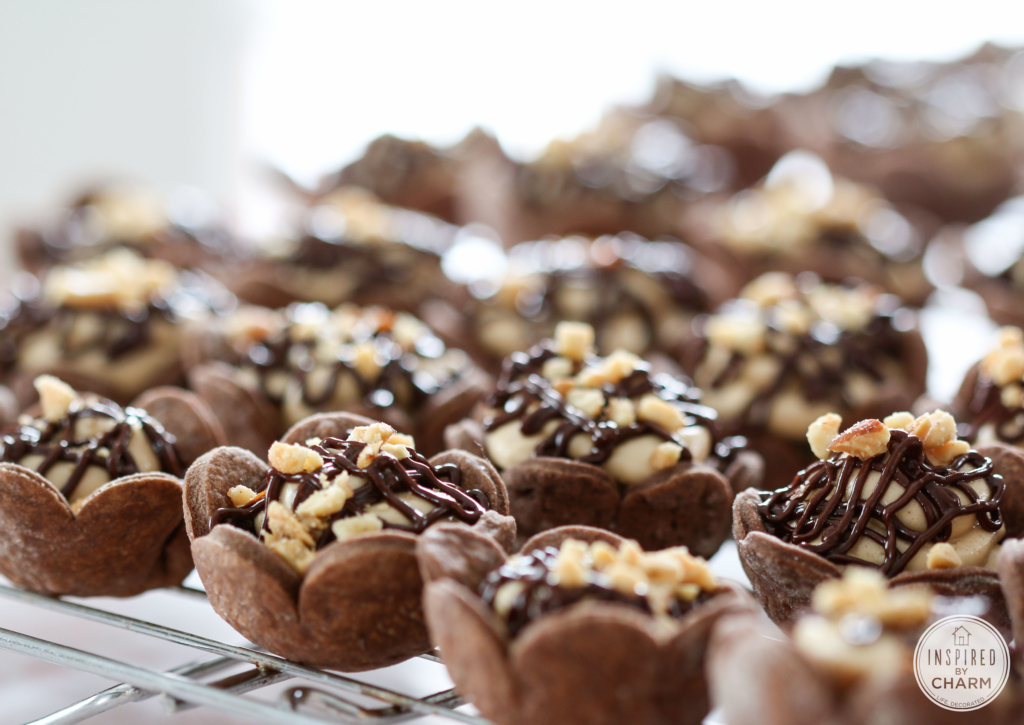
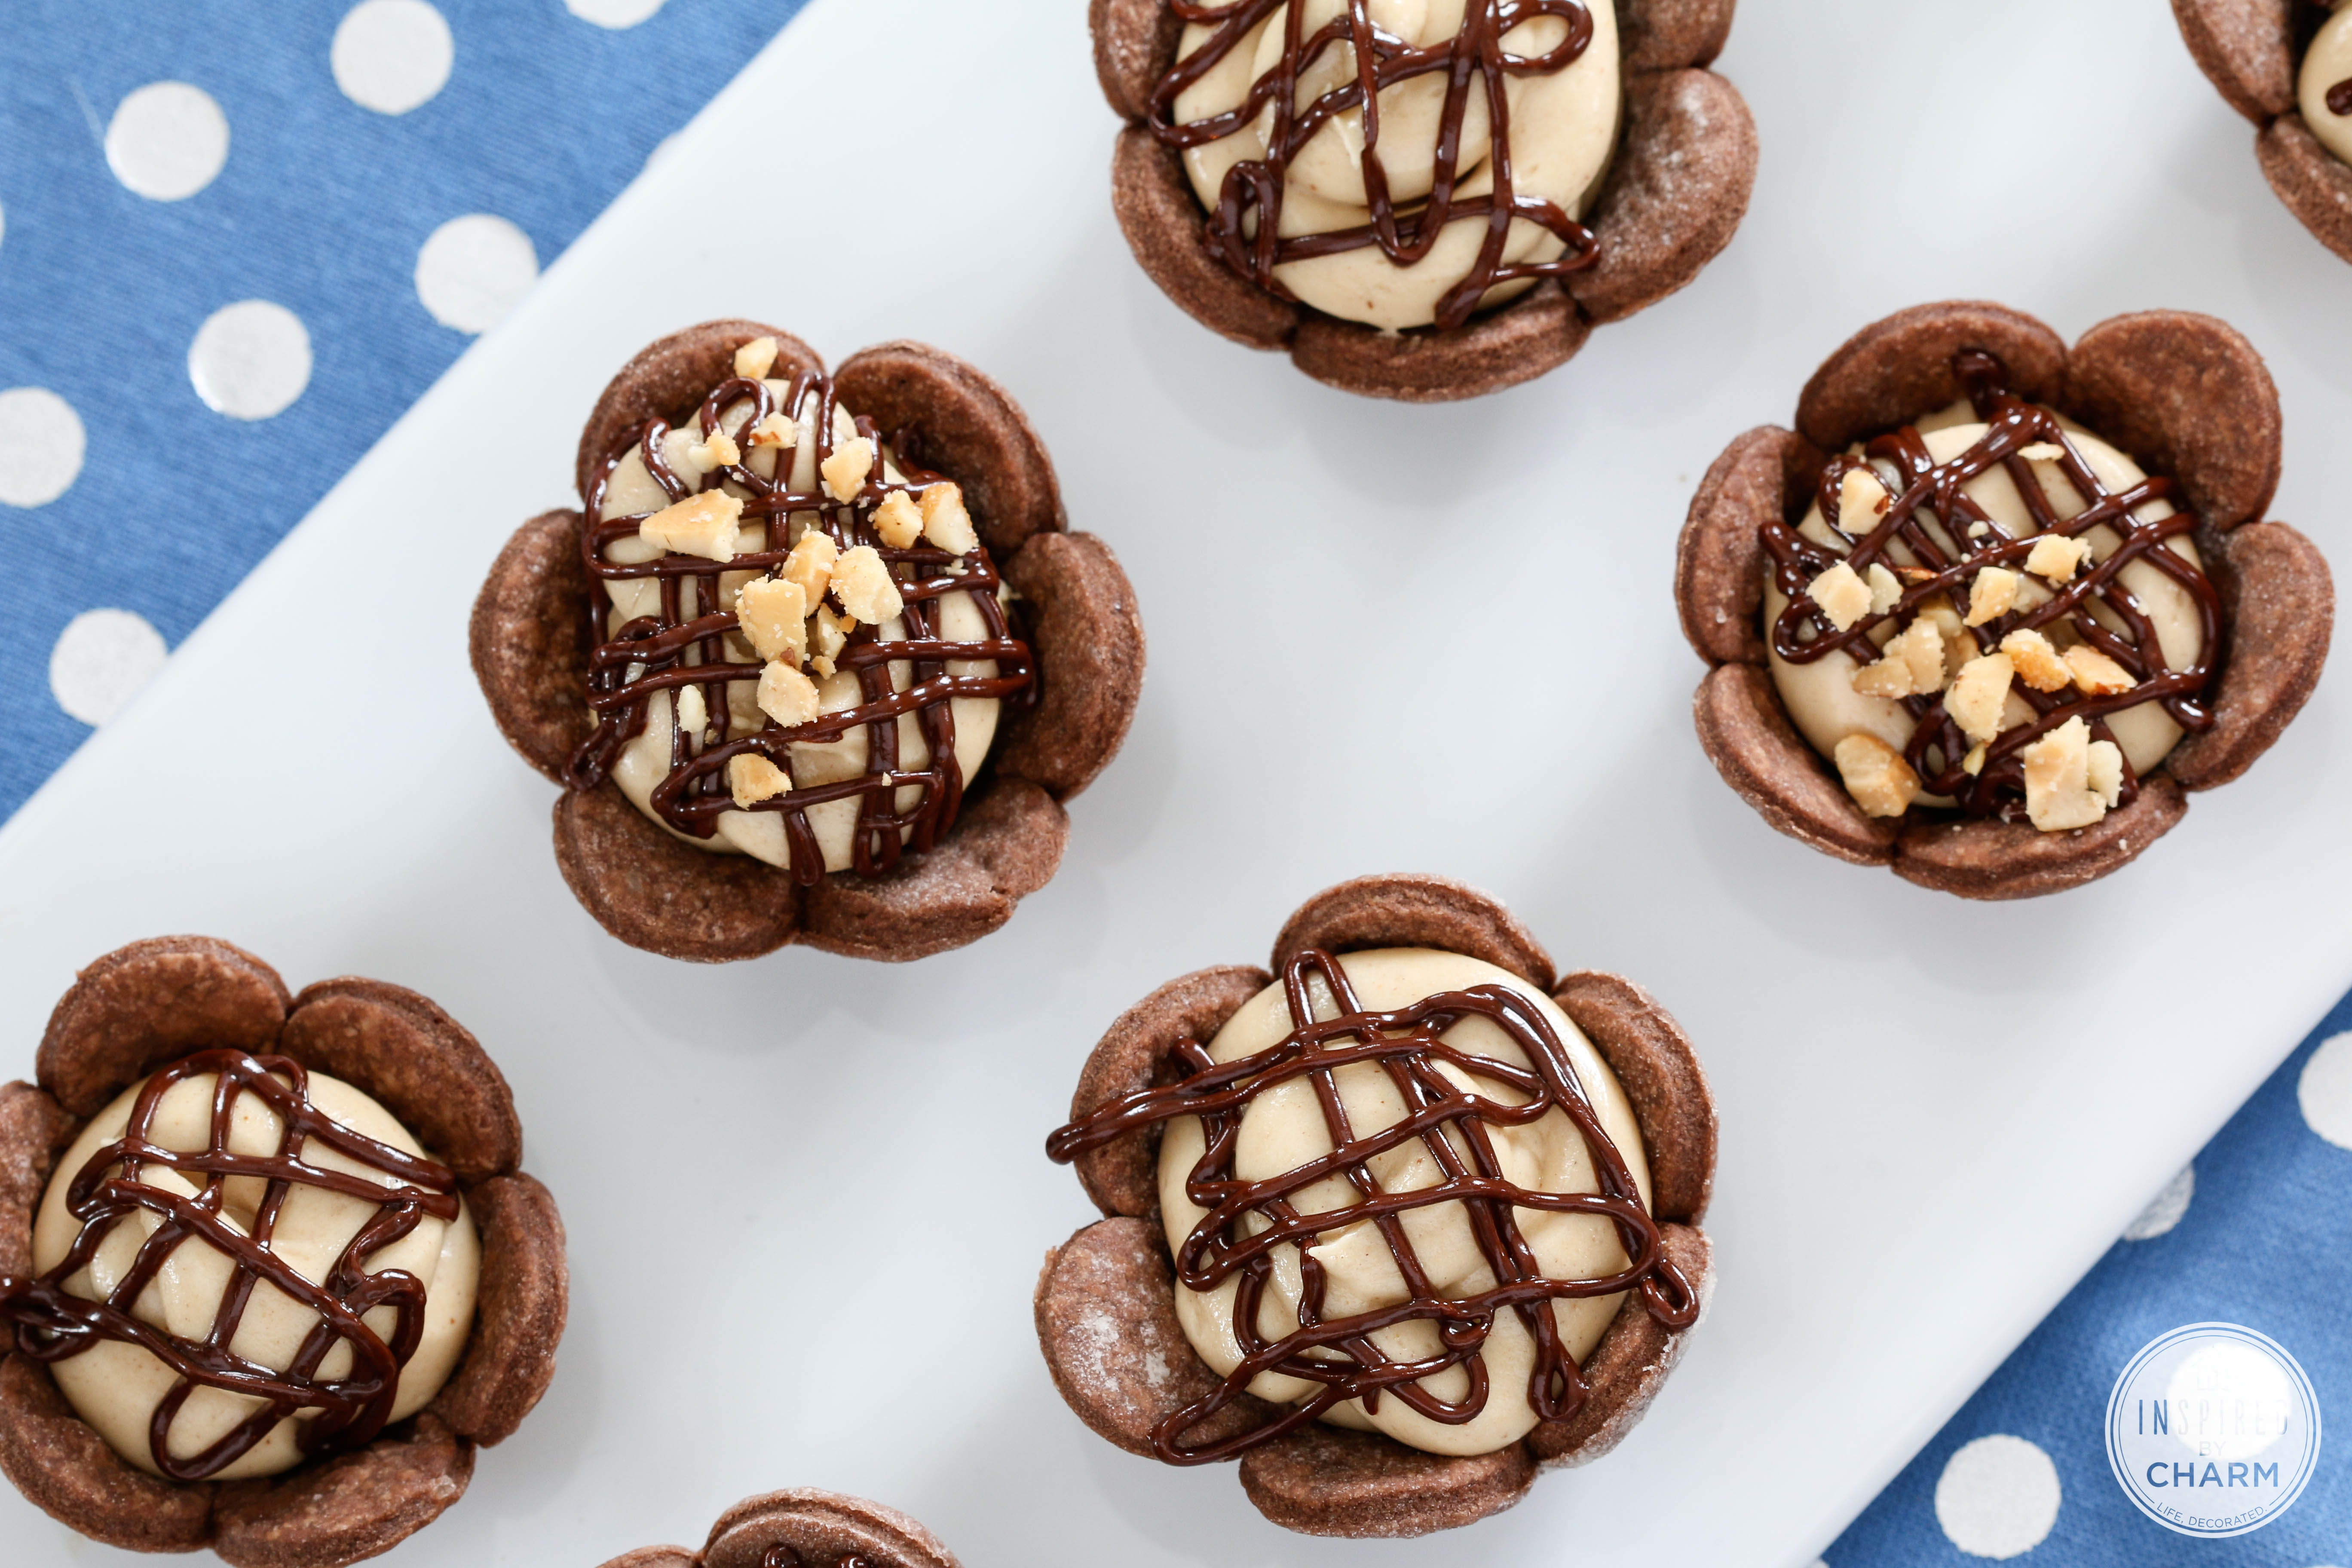
- The chocolate crust adds a decadent touch that will have your taste buds doing a happy dance. Plus, tell me that scalloped edge is not the cutest thing you’ve ever seen.
Ingredients
To create these adorable mini peanut butter pies, you’ll need a few basic ingredients. I broke them down by category to make it easy for you.
Chocolate Crust:
- all-purpose flour
- cocoa powder
- sugar
- kosher salt
- unsalted butter
- Crisco (vegetable shortening)
- eggs
- iced coffee
Peanut Butter Filling:
- creamy peanut butter
- cream cheese
- vanilla extract
- confectioners’ sugar
- cool whip
Garnish:
- semi-sweet chocolate chips
- Crisco
- Chopped peanuts (optional

How to Make
I will walk you through the process of making this blueberry galette. For your convenience, I’ve also provided a full ingredient list and detailed instructions in the printable recipe card below.
- Begin by preparing your chocolate pie dough. Don’t be intimated it’s easy. (Full details in the recipe card.)
- Press the dough into two flatten discs. Wrap in plastic and refrigerate for at least 30 minutes.
- Then, preheat your oven to 350 degrees F.
- On a floured surface, roll out your dough.
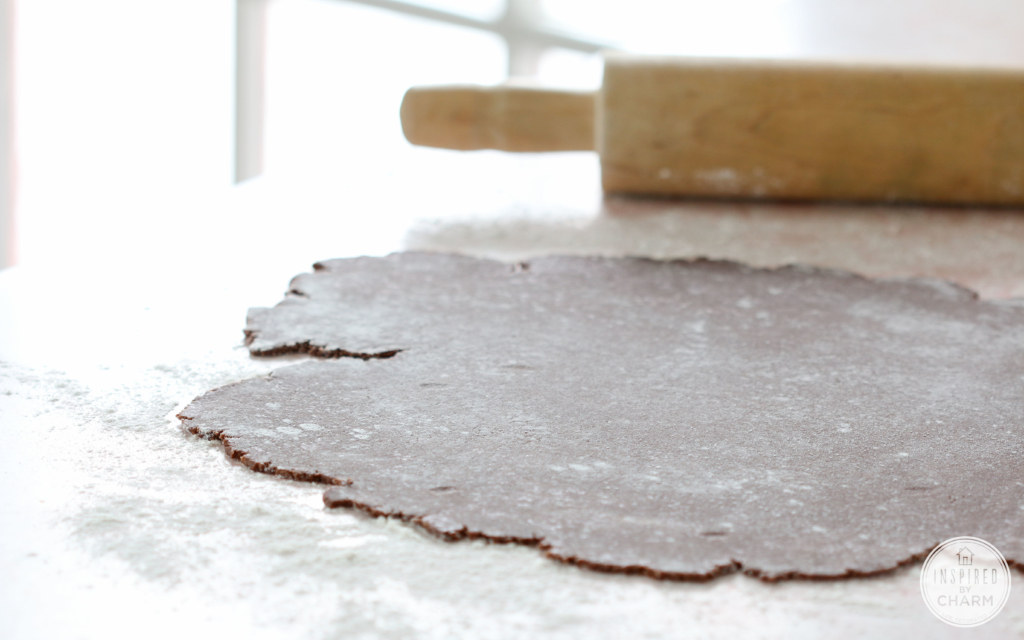

- Cut out the dough using a flower shaped cookie cutter. (My cookie cutter is 3-inches in diameter petal tip to petal tip.)
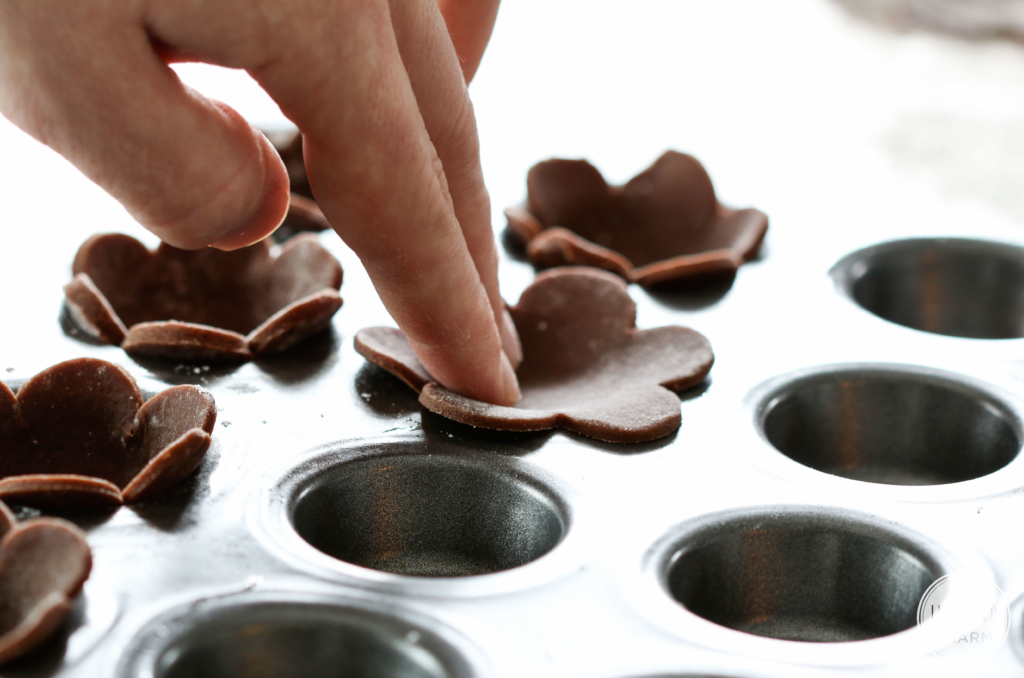
- Gently press the flowers into an ungreased mini muffin pan. Bake at 350 degrees F for 12 -15 minutes.
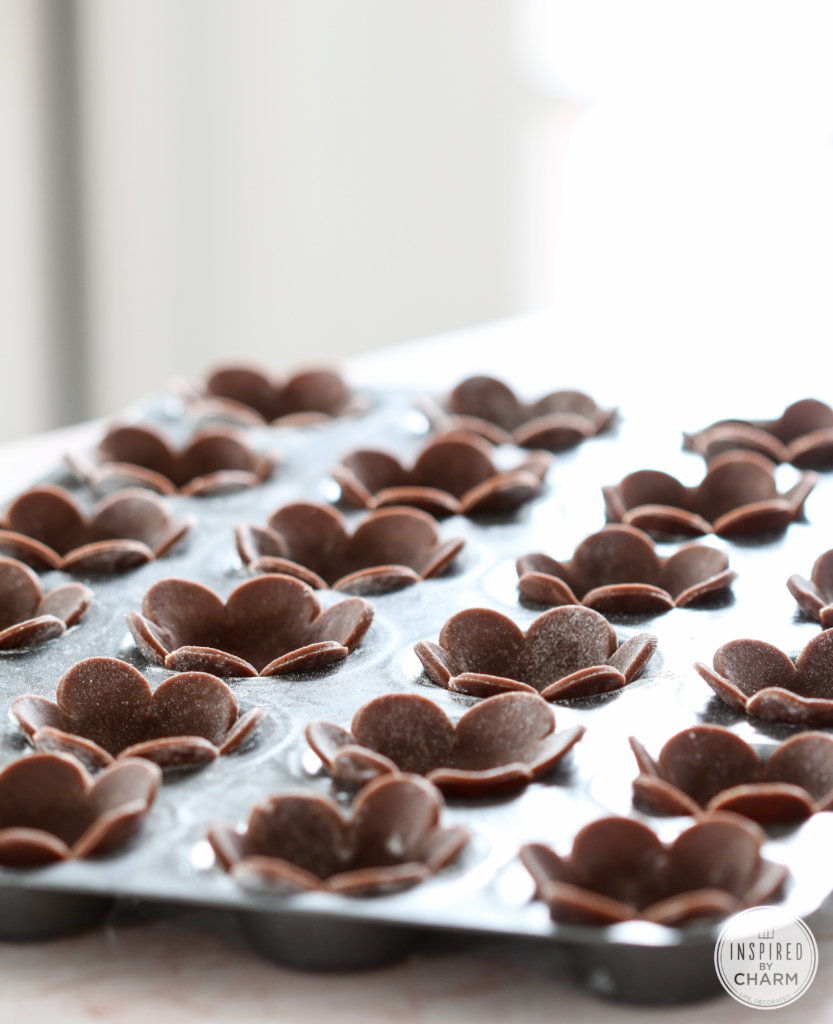
- Allow the mini pie shells to cool completely in the pan before removing. This will ensure they keep their shape.
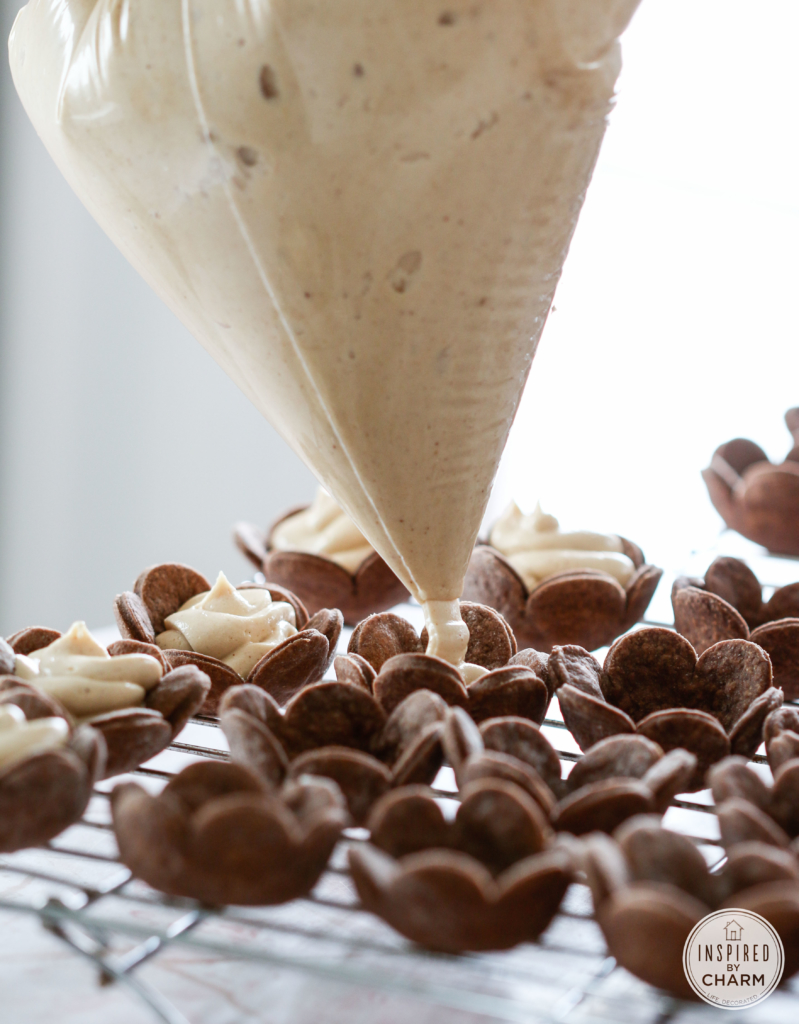
- While they are cooling, mix up the peanut butter pie filling. Beat the peanut butter with the cream cheese and vanilla until smooth.
- Then add the powdered sugar, beating again until smooth. Add in the Cool Whip and beat the mixture one final time until smooth.
- Add this filling into a piping bag or large plastic bag. Pipe into your cooled chocolate pie shells.
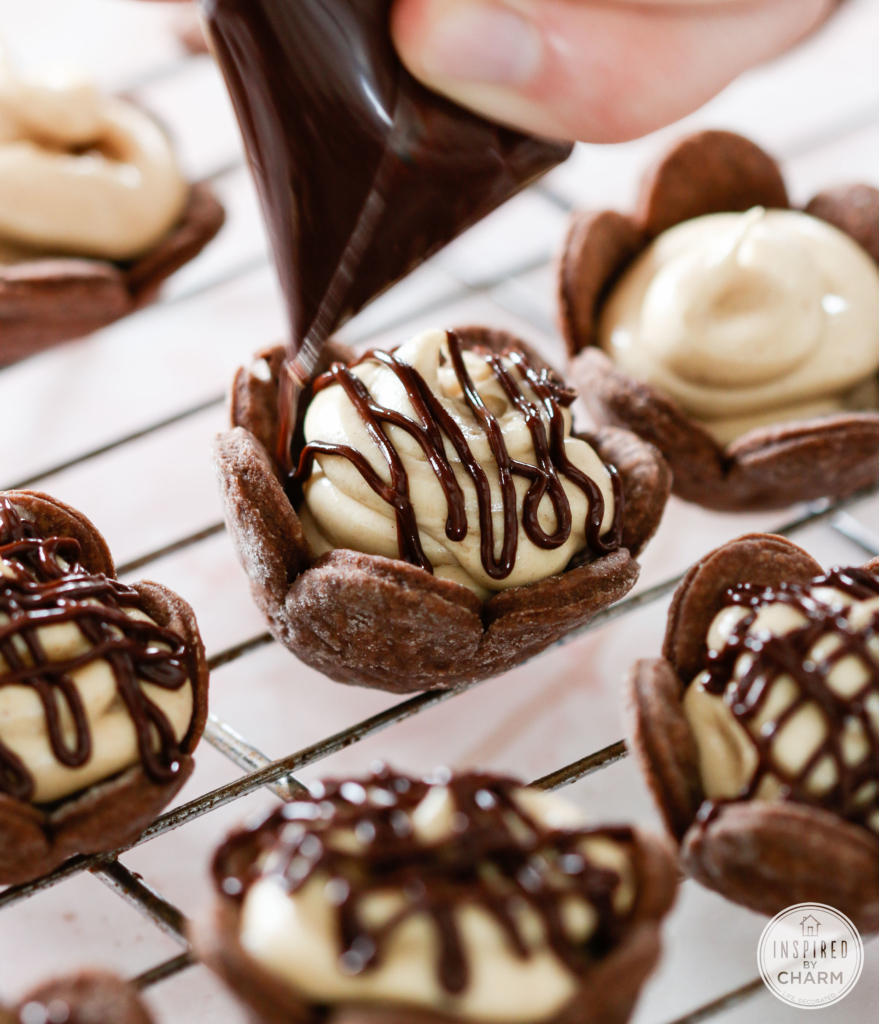
- For the drizzle, melt the chocolate chips and shortening in a microwavable bowl (or in a double broiler). Allow the mixture to cool slightly, then transfer to a plastic bag.
- Snip off a tiny portion of one corner of the bag and drizzle the chocolate onto the filled pie shells. Top with chopped peanut for a garnish.
💌 SAVE THIS POST / RECIPE!
And that’s it! You’re done. I know it may sound a little complicated, but they come together quickly. And I promise, they are worth the time.
Variations
Now that you have mastered the art of making mini peanut butter pies in a chocolate crust, why not experiment with some variations to keep your guests intrigued?
- For those who love a bit of texture in their desserts, you could add some chopped nuts on top of the pies. Almonds, hazelnuts, and pistachios would all work perfectly and add a crunch to the creamy filling.
- If you want to make your mini pies a bit more decadent, drizzle some caramel or hot fudge sauce over the top. This will create a visual masterpiece that your guests will definitely be impressed with.
With all these variations to play with, you can’t go wrong.
Frequently Asked Questions
If you’re new to making mini pies or have questions about this particular recipe, I’ve got you covered. Here are some frequently asked questions:
Can I use a different type of nut butter?
Yes, feel free to experiment with almond butter, cashew butter, or any other nut butter you prefer.
Can I use a different type of crust?
A: Absolutely! While I love (and highly recommend) the chocolate crust for these mini pies, you could use a traditional graham cracker crust or even a gluten-free option.
Can I make these mini pies ahead of time?
A: Yes, you can make them a day ahead of time and store them in the refrigerator. Just add your desired toppings right before serving.
Can I make these mini pies larger?
A: Sure! Instead of using a mini muffin tin, you could use a regular muffin tin for larger pies. Just adjust the baking time for the crust accordingly.
And if these photos haven’t given you enough encouragement, I really must insist you try this recipe. I was able to pass a few of these out to family and friends yesterday afternoon. Everyone gave them rave reviews.
The filling is obviously delicious and, as I mentioned above, I absolutely love this pie crust! It’s flaky, light, and the perfect amount of chocolately goodness.
Plus, the cuteness factor of this bite-sized pies is clearly off the scale. Based on how they look, you know they are going to be dynamite before they even cross your lips. Right?
More Pie Recipes You Will Love
- Apple Pie with All-Butter Crust
- Mixed Berry Slab Pie
- Blackberry Crostata
- Strawberry Hand Pies
- Blueberry Cream Pie
- Strawberry Rhubarb Pie
I insist that you tray making these mini peanut butter pies! If you do, please leave a comment and a 5-star rating below.
Want more from Inspired by Charm? Join the IBC Mailing List for inspiration in your inbox! Follow along on Instagram and TikTok for daily updates and behind-the-scenes looks at my processes. There’s even more inspiration on Facebook and Pinterest!
Mini Peanut Butter Pies
Ingredients
Chocolate Crust:
- 2 cups all-purpose flour
- 4 tablespoons unsweetened cocoa powder
- 4 tablespoons sugar
- 1 teaspoon kosher salt
- 1 stick unsalted butter cold
- 4 tablespoons Crisco (vegetable shortening)
- 2 egg yolks
- 6 – 8 tablespoons iced coffee ice water will work as well
Peanut Butter Filling:
- 1 cup creamy peanut butter
- 1 package (8 ounces) cream cheese softened
- 1 teaspoon vanilla
- 1 1/4 cup confectioners’ sugar
- 1 package (8 ounces) Cool Whip thawed
Chocolate Drizzle:
- 1 cup semi-sweet chocolate chips
- 1 tablespoon Crisco
- Chopped peanuts optional
Instructions
- In a food processor (you can also do this by hand if needed), combine the flour, cocoa, sugar, and salt on low until blended. Add the butter and Crisco and pulse until the mixture resembles coarse crumbles. Add the egg yolks and iced coffee and process with slow pulses until the dough forms a ball. Start with about 5 tablespoons of iced coffee and add more until the mixture comes together.
- Press the dough into two flatten discs. Wrap in plastic and refrigerate for at least 30 minutes.
- Then, preheat your oven to 350 degrees F.
- On a floured surface, roll out your dough until it is about 1/8 inch thick. Then cut out the dough using a flower shaped cookie cutter. My cookie cutter is 3-inches in diameter petal tip to petal tip. Once your first set of flowers are cut, you can ball up the dough and roll it out again. Repeat until you have used as much of the dough as possible.
- Gently press the flowers into an ungreased mini muffin pan. Bake at 350 degrees F for 12 -15 minutes.
- Allow the mini pie shells to cool completely in the pan before removing. This will ensure they keep their shape.
- While they are cooling, mix up the peanut butter pie filling. Beat the peanut butter with the cream cheese and vanilla until smooth. Then add the powdered sugar, beating again until smooth. Add in the Cool Whip and beat the mixture one final time until smooth.
- Add this filling into a piping bag or large plastic bag. Pipe into your cooled chocolate pie shells.
- For the drizzle, melt the chocolate chips and shortening in a microwavable bowl (or in a double broiler). Allow the mixture to cool slightly, then transfer to a plastic bag. Snip off a tiny portion of one corner of the bag and drizzle the chocolate onto the filled pie shells. Top with chopped peanut for a garnish.
I made these for a baby shower. They were a hit. Very charming touch with the flower crust. I added a few pink sixlets on top of a couple of them. 🙂
Hi Michael!
Thanks for the recipe! would love to make those for a party and have a question…
How wide is the mini muffin tray in diameter, please? I’m not sure which one to order since I don.t have any at all 🙁
Thank you!
Maria, they are just the standard mini muffin pan. The cavities for the muffins are about 2 inches.
xo Michael
Thanks for ones marvelous posting! I really enjoyed reading it, you happen to be a great author.I will always bookmark your
blog and will eventually come back at some point. I want to encourage
yourself to continue your great job, have a nice morning!
How many does this yield?
About 3 dozen.
xo Michael
Would thin roll out cookie dough work instead of pie crust? I was just curious although I am going to use your chocolate one the first time. (making them today )
How many does this recipe make? I have looked all over and do not see it anywhere.
About three dozen.
xo Michael
These look amazing! I can’t seem to find how many this recipe makes, I’m sure I’m just missing it, could anyone tell me?
although I’m off sugar i will be making these for my guests!
I will have to work out what to convert Crisco and cool whip to, as I live in Australia and I have never heard of either.
Crisco is vegetable shorting. Cool whip is whipped cream. 🙂
Hope that helps!
xo Michael
Not to be nitpicky, but Cool Whip is not whipped cream.
I just made these tonight and I was so excited because they are so cute and fun, unfortunately the crust tasted awful it was so bad we couldn’t even eat it. The filling however was so delicious so we licked that out and threw the crust away. I followed the recipe to the T so I’m not sure why it was so bad, I will make this again because they were still adorable but with a graham cracker crust instead.
Cherrie, It’s just a basic pie crust recipe with the addition of cocoa powder so I’m not sure what could have went wrong? Maybe one of your ingredients was bad / sour?
xo Michael
Hi Michael,
Reposted your DIY in my blog with proper links.
Check here: http://doityourselfproject.tumblr.com/post/125898819582/diy-peanut-butter-pie-with-chocolate-crust
Your blog is AMAZING! We love it!♥
can these be frozen? I am thinking of making these for my daughters’s wedding as part of the cookie table
I didn’t try freezing them. I don’t think I’d recommend it as the pie crust could get soggy as they defrost.
xo Michael
These look scrumptious! I was just wondering what Crisco is? I live in South Africa and I’ve never heard of it! 🙂
These look delicious!! Thanks for sharing. But I must ask, what does a flour shaped cookie cutter look like?? I couldn’t resist lol.
These look amazing! I’m thinking about making these for a bridal shower I’m throwing. Would I be able to make these the day before?
I’m not sure Beth. I’m thinking you could make the crusts and the filling the day before and then fill them the day of the shower. Assembling them a day in advance MAY result in a soggy bottom.
xo Michael
What a great recipe! I made these for my kid brothers on Sunday. They turned out adorable!
I hope you don’t mind but I did a pin test of your recipe on my blog. I gave proper attribution and hopefully this will result in some traffic to your wonderful site.
Grace & Peace
do these freeze well?
I haven’t tried. But I assume they are better fresh.
xo Michael
If I don’t have a food processor, will a standard mixer do the same job??
Hi these look awesome. I want to make them ahead for a party and was curious on how to store them. Thanks
Hi Michael,
I made these and they came out exactly as pictured and they were fabulous. The only change I made was to add some chocolate vinegar to my pie crust as I never make pie crust without vinegar (this tenderizes the crust).
I hope you don’t mind but I curated your recipe on my website. I gave proper attribution and hopefully this will result in some traffic to your wonderful site.
Thanks for this great recipe
Gloria Daniels
http://www.homeandgardendigest.com
I make peanut butter pie a lot and if you want it a bit fluffy try heavy whipping cream instead of cool whip
Would you beat the heavy whipping cream before adding it to the peanut butter mixture?