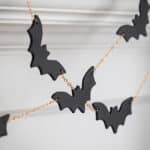
DIY Clay Bat Garland
Discover a charming DIY bat garland perfect for Halloween. This easy-to-follow tutorial will guide you step-by-step to create a spooky yet stylish decoration. From mantels to doorways, let these flying beauties adorn your space this season.
Ingredients
- Oven-bake clay
- Bat cookie cutter
- Rolling pin
- Baking sheet
- Parchment paper
- Drill and drill bit
- Gold link chain
- Gold jump rings
- Needle nose pliers
Instructions
- Begin by rolling out your oven-bake clay to about ¼ of an inch.
- Use your cookie cutter to cut out bats. (If desired, use the cutter on both sides to achieve bats facing different directions.)
- Place the bats on a parchment-lined baking sheet.
- Repeat with remaining clay. The clay can be reformed into a ball and rerolled as much as needed.
- Use a toothpick to create a hanging hole in the cutout on each side of the wing. You’ll want the hole to be about an ⅛ inch from the edge. (You can use the toothpick to create a hole that is large enough for your jump ring or just make a small hole with the toothpick and then use a hand drill to make the hole larger once the cutout is baked.)
- Bake at 275 degrees F for about 15 minutes. (This is the time suggested for 1/4-inch thick ornaments. If your thickness varies, adjust the baking time according to the package directions.) Pay attention to the clay as it bakes because it can burn.
- Remove from the oven and place on a baking rack to cool.
- Use your drill and a small drill bit to increase the size of the hanging holes.
- Next, create 6-inch long pieces of your gold link chain. To do this, use your pliers to open a link, detach the desired section, and then close the link.
- To connect the bats together, start by opening a jump ring with your pliers. Slide the open jump ring through the hole on your bat, and then add the end of one of your 6-inch chain pieces to the same ring. Close the jump ring securely.
- At the opposite end of the chain, attach another open jump ring and slide it through a second bat's hole. Close the ring.
- Continue this process until you've connected all the bats to create the complete garland.
- Once all your bats are strung together, you’re ready to hang the garland wherever you’d like!