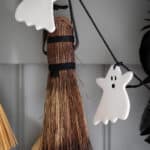
DIY Clay Ghost Garland
Dive into the Halloween spirit with this easy DIY Clay Ghost Garland! With a dash of creativity and a sprinkle of fun, you can turn simple oven-bake clay into boo-tiful decor. This garland will add a hauntingly perfect chic touch to your home during this spooky season.
Servings 1
Ingredients
- Oven-bake clay
- Ghost cookie cutter
- Rolling pin
- Baking sheet
- Parchment paper
- Drill and drill bit
- Paintbrush
- Black paint
- Cotton cord
Instructions
- Begin by rolling out your oven-bake clay to about ¼ of an inch.
- Use your cookie cutter to cut out the ghosts. (If desired, use the cutter on both sides to achieve ghosts facing different directions.)
- Place the ghosts on a parchment-lined baking sheet.
- Repeat with remaining clay. Clay can be reformed into a ball and rerolled as needed.
- Use a tool or an instrument with a blunt end (I used the end of a hand mixer beater) to add in a pair of eyes and an open mouth. Use a toothpick to create a hanging hole in the cutout near the top. (You can use the toothpick to create a hole that is large enough for your twine or just make a small hole with the toothpick and then use a hand drill to make the hole larger once the cutout is baked.)
- Bake at 275 degrees F for about 14-15 minutes. (This is the time suggested for 1/4-inch thick ornaments. If your thickness varies, adjust the baking time according to the package directions.) Pay attention to the clay as it bakes because it can burn.
- Remove from the oven and place on a baking rack to cool.
- Once cool, use a paintbrush and black acrylic paint to fill in the holes created for the eyes and mouth.
- Use your drill and a small drill bit to increase the size of the hanging hole.
- Thread a ghost onto your cording. Tie a knot at the top to keep it in place. Repeat with the remaining ghosts. (I strung my ghosts about six inches apart.)
- Hang and enjoy.